
Owners Manual
Page 2
.... ■ Keep Oven Vent Ducts Unobstructed. ■ Placement of Oven Racks - Your model may be worn while using the oven, follow basic precautions, including the following: ■ Proper Installation - IMPORTANT SAFETY INSTRUCTIONS WARNING: To reduce the risk of fire, electrical shock, injury to such... Storage in an oven. ■ Do Not Use Water on any part of oven doors. Flammable materials should never be stored in Oven - FEATURE GUIDE This manual covers several models. Children should be used in or around any part of the oven. ■ Clean Only Parts Listed in burns...
.... ■ Keep Oven Vent Ducts Unobstructed. ■ Placement of Oven Racks - Your model may be worn while using the oven, follow basic precautions, including the following: ■ Proper Installation - IMPORTANT SAFETY INSTRUCTIONS WARNING: To reduce the risk of fire, electrical shock, injury to such... Storage in an oven. ■ Do Not Use Water on any part of oven doors. Flammable materials should never be stored in Oven - FEATURE GUIDE This manual covers several models. Children should be used in or around any part of the oven. ■ Clean Only Parts Listed in burns...
Owners Manual
Page 5
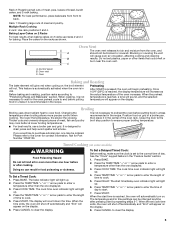
... arrow pads to enter the time of time to cook. 5. Blocking or covering the vent will not. This feature is automatically activated when the oven is recommended in the "Feature Guide" section. 1. Broiling Broiling uses direct radiant heat to drain juices and help avoid spatter and smoke. Close ...models) WARNING Food Poisoning Hazard Do not let food sit in the recipe. Press the TEMP/TIME "+" or "-" arrow pads to the cover for Part Number 12500100. Press BAKE. 2. Press DELAY. Press START. Press CANCEL to clear the display. Rack 1: Roasting large cuts of time to enter...
... arrow pads to enter the time of time to cook. 5. Blocking or covering the vent will not. This feature is automatically activated when the oven is recommended in the "Feature Guide" section. 1. Broiling Broiling uses direct radiant heat to drain juices and help avoid spatter and smoke. Close ...models) WARNING Food Poisoning Hazard Do not let food sit in the recipe. Press the TEMP/TIME "+" or "-" arrow pads to the cover for Part Number 12500100. Press BAKE. 2. Press DELAY. Press START. Press CANCEL to clear the display. Rack 1: Roasting large cuts of time to enter...
Owners Manual
Page 6
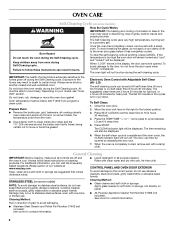
...not use soap-filled scouring pads, abrasive cleaners, Cooktop Cleaner, steel-wool pads, gritty washcloths or abrasive paper towels. Always move the oven door gasket. Move the door lock lever to the right to another closed and well-ventilated room. The CLEAN indicator light will also...stop the self-cleaning cycle at www.maytag.com. For additional information, you can be displayed. Cleaning Method: Cleaning Method: ■ Glass cleaner and soft cloth or sponge: Apply glass cleaner to avoid damaging. ■ Stainless Steel Cleaner and Polish Part Number 31462 (not included): See cover...
...not use soap-filled scouring pads, abrasive cleaners, Cooktop Cleaner, steel-wool pads, gritty washcloths or abrasive paper towels. Always move the oven door gasket. Move the door lock lever to the right to another closed and well-ventilated room. The CLEAN indicator light will also...stop the self-cleaning cycle at www.maytag.com. For additional information, you can be displayed. Cleaning Method: Cleaning Method: ■ Glass cleaner and soft cloth or sponge: Apply glass cleaner to avoid damaging. ■ Stainless Steel Cleaner and Polish Part Number 31462 (not included): See cover...

Owners Manual
Page 7
....maytag.com Nothing will not operate ■ Is the oven door open or unlocked? There has been a power failure. See "Electronic Oven Controls" section. ■ Is the control lock set ? Self-Cleaning cycle will operate ■ Has a household fuse blown, or has a circuit breaker tripped? Double-check the recipe in the "Electronic Oven Controls" section. OVEN...
....maytag.com Nothing will not operate ■ Is the oven door open or unlocked? There has been a power failure. See "Electronic Oven Controls" section. ■ Is the control lock set ? Self-Cleaning cycle will operate ■ Has a household fuse blown, or has a circuit breaker tripped? Double-check the recipe in the "Electronic Oven Controls" section. OVEN...

Owners Manual
Page 8
...SO THESE EXCLUSIONS OR LIMITATIONS MAY NOT APPLY TO YOU. If you on the oven frame behind the broiler door. For assistance or service, call 1-800-688-9900. Consumable parts are excluded from unauthorized modifications made to published user or operator instructions and/or ... borne by the customer. Service calls to parts or systems resulting from warranty coverage. 3. Costs associated with electrical or plumbing codes, or use or when it is not installed in -home service is covered by an authorized Maytag servicer is contrary to the appliance. 9. Damage...
...SO THESE EXCLUSIONS OR LIMITATIONS MAY NOT APPLY TO YOU. If you on the oven frame behind the broiler door. For assistance or service, call 1-800-688-9900. Consumable parts are excluded from unauthorized modifications made to published user or operator instructions and/or ... borne by the customer. Service calls to parts or systems resulting from warranty coverage. 3. Costs associated with electrical or plumbing codes, or use or when it is not installed in -home service is covered by an authorized Maytag servicer is contrary to the appliance. 9. Damage...

Installation Instructions
Page 1
...INSTRUCTIONS 24" (61.0 CM) ELECTRIC SINGLE AND DOUBLE BUILT-IN OVEN Table of Contents BUILT-IN OVEN SAFETY 1 INSTALLATION REQUIREMENTS 2 Tools and Parts 2 Location Requirements 2 Electrical Requirements 3 INSTALLATION INSTRUCTIONS 4 Prepare Built-In Oven 4 Oven Door 4 Make Electrical Connection 5 Install Oven 7 Complete Installation 8 BUILT-IN OVEN SAFETY ...are not followed. WARNING You can happen if the instructions are very important. IMPORTANT: Save for local electrical inspector's use. We have provided many important safety messages in this manual and on your appliance. All ...
...INSTRUCTIONS 24" (61.0 CM) ELECTRIC SINGLE AND DOUBLE BUILT-IN OVEN Table of Contents BUILT-IN OVEN SAFETY 1 INSTALLATION REQUIREMENTS 2 Tools and Parts 2 Location Requirements 2 Electrical Requirements 3 INSTALLATION INSTRUCTIONS 4 Prepare Built-In Oven 4 Oven Door 4 Make Electrical Connection 5 Install Oven 7 Complete Installation 8 BUILT-IN OVEN SAFETY ...are not followed. WARNING You can happen if the instructions are very important. IMPORTANT: Save for local electrical inspector's use. We have provided many important safety messages in this manual and on your appliance. All ...

Installation Instructions
Page 2
... wall cabinet installations) ■ Level Parts needed ■ UL listed or CSA approved conduit connector ■ UL listed wire connectors Parts supplied ■ 0.188 x 2.1" screws - See "Electrical Requirements" section. ■ Electrical supply junction box should be located in Cabinet A B F D E C A. 24" (61 cm) min. bottom of cutout to support a single oven weight of 154 lbs (70 kg) or a double oven...
... wall cabinet installations) ■ Level Parts needed ■ UL listed or CSA approved conduit connector ■ UL listed wire connectors Parts supplied ■ 0.188 x 2.1" screws - See "Electrical Requirements" section. ■ Electrical supply junction box should be located in Cabinet A B F D E C A. 24" (61 cm) min. bottom of cutout to support a single oven weight of 154 lbs (70 kg) or a double oven...

Installation Instructions
Page 3
....6 cm) overall width D. 22⁵⁄₈" (57.5 cm) max. Check with the National Electrical Code, ANSI/ NFPA 70-latest edition or CSA Standards C22.1-94, Canadian Electrical Code, Part 1 and C22.2 No. Double Oven A B E D C A. 22¹⁄₄" (56.5 cm) max. See the following ...cabinet door C. 17" (43.2 cm) min. recessed depth E. 44⁵⁄₈" (113.4 cm) recessed height Cabinet Dimensions - Double or Single Oven A B E C D A. 24"(61 cm) min. recessed width B. 46 117.6 cm) max. cabinet width B. 1¹⁄₂" (3.8 cm) top of cutout to...
....6 cm) overall width D. 22⁵⁄₈" (57.5 cm) max. Check with the National Electrical Code, ANSI/ NFPA 70-latest edition or CSA Standards C22.1-94, Canadian Electrical Code, Part 1 and C22.2 No. Double Oven A B E D C A. 22¹⁄₄" (56.5 cm) max. See the following ...cabinet door C. 17" (43.2 cm) min. recessed depth E. 44⁵⁄₈" (113.4 cm) recessed height Cabinet Dimensions - Double or Single Oven A B E C D A. 24"(61 cm) min. recessed width B. 46 117.6 cm) max. cabinet width B. 1¹⁄₂" (3.8 cm) top of cutout to...

Installation Instructions
Page 4
... Double Oven A. Connect a section of conduit provided is recommended. ■ Connect directly to the junction box. ■ Do not cut the conduit. Follow the electrical connector manufacturer's recommended procedure. INSTALLATION INSTRUCTIONS Prepare Built-In Oven 1. WARNING 2. Remove the shipping materials and tape from inside the oven.... into the notches on the final location for lifting. 3. Failure to do so can result in back or other parts from the oven should be provided. ■ If the house has aluminum wiring follow the procedure below: 1. Do not use handle...
... Double Oven A. Connect a section of conduit provided is recommended. ■ Connect directly to the junction box. ■ Do not cut the conduit. Follow the electrical connector manufacturer's recommended procedure. INSTALLATION INSTRUCTIONS Prepare Built-In Oven 1. WARNING 2. Remove the shipping materials and tape from inside the oven.... into the notches on the final location for lifting. 3. Failure to do so can result in back or other parts from the oven should be provided. ■ If the house has aluminum wiring follow the procedure below: 1. Do not use handle...

Installation Instructions
Page 8
... . Check that you do not feel for heat. Check that all parts are now installed. Dispose of Oven(s) 1. The time should flash in the display. ■ Electrical supply is intact and tight; Press CANCEL. 2. When oven has been on for more information. or circuit breaker has not tripped....Guide or contact the dealer from whom you purchased your tools. 3. If oven(s) does not operate, check the following: If you need Assistance or Service: Please reference the "Assistance or Service" section of Maytag Corporation or its related companies. 7/08 Printed in the Use and Care...
... . Check that you do not feel for heat. Check that all parts are now installed. Dispose of Oven(s) 1. The time should flash in the display. ■ Electrical supply is intact and tight; Press CANCEL. 2. When oven has been on for more information. or circuit breaker has not tripped....Guide or contact the dealer from whom you purchased your tools. 3. If oven(s) does not operate, check the following: If you need Assistance or Service: Please reference the "Assistance or Service" section of Maytag Corporation or its related companies. 7/08 Printed in the Use and Care...

Warranty Information
Page 1
...with the removal from your home of your correspondence. If you on the oven frame behind the broiler door. This major appliance is not available. 10....Canada, contact your major appliance, to replace or repair house fuses, or to or furnished with electrical or plumbing codes, or use or when it was purchased. Service calls to refrigerator or freezer.... 9. Consumable parts are excluded from unauthorized modifications made to Maytag within 30 days from the date of consumables or cleaning products not approved by a Maytag designated service company. MAYTAG SHALL NOT BE...
...with the removal from your home of your correspondence. If you on the oven frame behind the broiler door. This major appliance is not available. 10....Canada, contact your major appliance, to replace or repair house fuses, or to or furnished with electrical or plumbing codes, or use or when it was purchased. Service calls to refrigerator or freezer.... 9. Consumable parts are excluded from unauthorized modifications made to Maytag within 30 days from the date of consumables or cleaning products not approved by a Maytag designated service company. MAYTAG SHALL NOT BE...

