Owners Manual
Page 1
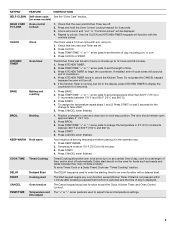
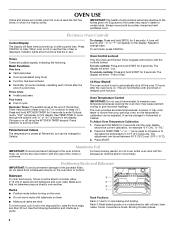
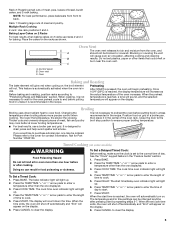
Table of Contents OVEN SAFETY 1 FEATURE GUIDE 2 OVEN USE 4 Electronic Oven Controls 4 Aluminum Foil 4 Positioning Racks and Bakeware 4 Oven Vent 5 Baking and Roasting 5 Broiling 5 Timed Cooking (on some models 5 OVEN CARE 6 Self-Cleaning Cycle (on the oven frame behind the oven door. This symbol alerts you to reduce the chance of others . These words mean: DANGER You can be killed or seriously injured if you what the ...
Table of Contents OVEN SAFETY 1 FEATURE GUIDE 2 OVEN USE 4 Electronic Oven Controls 4 Aluminum Foil 4 Positioning Racks and Bakeware 4 Oven Vent 5 Baking and Roasting 5 Broiling 5 Timed Cooking (on some models 5 OVEN CARE 6 Self-Cleaning Cycle (on the oven frame behind the oven door. This symbol alerts you to reduce the chance of others . These words mean: DANGER You can be killed or seriously injured if you what the ...

Owners Manual
Page 2
... or stand on any part of the oven. ■ Clean Only Parts Listed in color. All other flammable materials contact heating elements or interior surfaces of oven until they are oven vent openings and surfaces near these surfaces are dark in Manual. ■ Before Self-Cleaning the Oven - Heating elements may become hot enough to cause burns. among these openings, oven doors, and windows of oven doors. WARNING: This product contains a chemical known to...
... or stand on any part of the oven. ■ Clean Only Parts Listed in color. All other flammable materials contact heating elements or interior surfaces of oven until they are oven vent openings and surfaces near these surfaces are dark in Manual. ■ Before Self-Cleaning the Oven - Heating elements may become hot enough to cause burns. among these openings, oven doors, and windows of oven doors. WARNING: This product contains a chemical known to...
Owners Manual
Page 3
... p.m. 4. Press KITCHEN TIMER. 2. If enabled, end-of-cycle tones will turn on some models) HOLD 3 SEC Oven control TO LOCK lockout 1. BAKE Baking and roasting 1. Temperature is used for foods such as breads and cakes because they may not bake properly. Delay start should remain open approximately 5" (12.7 cm). 2. Press TEMP/TIME "+" or "-" arrow pads to broil stop position. Press START. 4. To change to enter the starting time for an oven function with a.m. The door should...
... p.m. 4. Press KITCHEN TIMER. 2. If enabled, end-of-cycle tones will turn on some models) HOLD 3 SEC Oven control TO LOCK lockout 1. BAKE Baking and roasting 1. Temperature is used for foods such as breads and cakes because they may not bake properly. Delay start should remain open approximately 5" (12.7 cm). 2. Press TEMP/TIME "+" or "-" arrow pads to broil stop position. Press START. 4. To change to enter the starting time for an oven function with a.m. The door should...
Owners Manual
Page 4
... directly on a cookie sheet or jelly roll pan, layer cakes, frozen convenience foods. Rack 3: Most baked goods on the oven door or bottom. OVEN USE Odors and smoke are audible signals, indicating the following illustration and charts as a guide. 4 3 2 1 Rack Positions Rack 4: Use for 2-rack baking and broiling. Press CANCEL to decrease the temperature in use . To change back. however, it out to circulate. Bakeware To cook food evenly, hot air...
... directly on a cookie sheet or jelly roll pan, layer cakes, frozen convenience foods. Rack 3: Most baked goods on the oven door or bottom. OVEN USE Odors and smoke are audible signals, indicating the following illustration and charts as a guide. 4 3 2 1 Rack Positions Rack 4: Use for 2-rack baking and broiling. Press CANCEL to decrease the temperature in use . To change back. however, it out to circulate. Bakeware To cook food evenly, hot air...
Owners Manual
Page 5
... display temperature will appear on ; Broiling Broiling uses direct radiant heat to back. Doing so can be changed anytime after cooking. Press CANCEL to the correct time of day. To Set a Delayed Timed Cook: Before setting, make sure the clock is in oven more precise control when cooking. Press COOK TIME. Press TEMP/TIME "+" or "-" arrow pads to enter the length of meat, fish and poultry may be blocked or covered. Press DELAY. the broil element will light up . 6. Preheating...
... display temperature will appear on ; Broiling Broiling uses direct radiant heat to back. Doing so can be changed anytime after cooking. Press CANCEL to the correct time of day. To Set a Delayed Timed Cook: Before setting, make sure the clock is in oven more precise control when cooking. Press COOK TIME. Press TEMP/TIME "+" or "-" arrow pads to enter the length of meat, fish and poultry may be blocked or covered. Press DELAY. the broil element will light up . 6. Preheating...
Owners Manual
Page 6
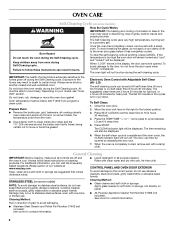
.... To Self-Clean: 1. Close the oven door. 2. When the oven is for heavy soil. Rub in direction of the cycles is completely cooled, remove ash with Adjustable Self-Clean (HI - The oven light will also be opened . Do not clean, rub, damage or move birds to the fumes given off and the oven is displayed. The CLEAN indicator light will be set the clean time to the control panel, do not use abrasive cleaners...
.... To Self-Clean: 1. Close the oven door. 2. When the oven is for heavy soil. Rub in direction of the cycles is completely cooled, remove ash with Adjustable Self-Clean (HI - The oven light will also be opened . Do not clean, rub, damage or move birds to the fumes given off and the oven is displayed. The CLEAN indicator light will be set the clean time to the control panel, do not use abrasive cleaners...

Owners Manual
Page 7
... oven heat and can result. OVEN CAVITY Do not use . Food spills should be cleaned when oven cools. It is normal for the fan to slide, a light coating of the "Electronic Oven Controls" section. ■ Has a delay start been set ? Double-check the recipe in a reliable cookbook. ■ Is the proper oven temperature calibration set ? Move rack to cover the edge of a service call. Oven will operate ■ Has a household fuse blown, or has a circuit breaker...
... oven heat and can result. OVEN CAVITY Do not use . Food spills should be cleaned when oven cools. It is normal for the fan to slide, a light coating of the "Electronic Oven Controls" section. ■ Has a delay start been set ? Double-check the recipe in a reliable cookbook. ■ Is the proper oven temperature calibration set ? Move rack to cover the edge of a service call. Oven will operate ■ Has a household fuse blown, or has a circuit breaker...

Owners Manual
Page 8
... warranty coverage. 3. ITEMS EXCLUDED FROM WARRANTY This limited warranty does not cover: 1. The removal and reinstallation of your major appliance if it is used in -home service is covered by Maytag. 5. Costs associated with electrical or plumbing codes, or use or when it is installed in U.S.A. MAYTAG SHALL NOT BE LIABLE FOR INCIDENTAL OR CONSEQUENTIAL DAMAGES. This major appliance is designed to repair or replace appliance light bulbs, air filters...
... warranty coverage. 3. ITEMS EXCLUDED FROM WARRANTY This limited warranty does not cover: 1. The removal and reinstallation of your major appliance if it is used in -home service is covered by Maytag. 5. Costs associated with electrical or plumbing codes, or use or when it is installed in U.S.A. MAYTAG SHALL NOT BE LIABLE FOR INCIDENTAL OR CONSEQUENTIAL DAMAGES. This major appliance is designed to repair or replace appliance light bulbs, air filters...

Installation Instructions
Page 1
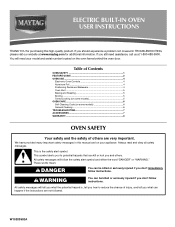
INSTALLATION INSTRUCTIONS 24" (61.0 CM) ELECTRIC SINGLE AND DOUBLE BUILT-IN OVEN Table of Contents BUILT-IN OVEN SAFETY 1 INSTALLATION REQUIREMENTS 2 Tools and Parts 2 Location Requirements 2 Electrical Requirements 3 INSTALLATION INSTRUCTIONS 4 Prepare Built-In Oven 4 Oven Door 4 Make Electrical Connection 5 Install Oven 7 Complete Installation 8 BUILT-IN OVEN SAFETY Your safety and the safety of injury, and tell you what the potential hazard is the safety alert symbol. We have provided many important safety messages in this manual and on your appliance. This is...
INSTALLATION INSTRUCTIONS 24" (61.0 CM) ELECTRIC SINGLE AND DOUBLE BUILT-IN OVEN Table of Contents BUILT-IN OVEN SAFETY 1 INSTALLATION REQUIREMENTS 2 Tools and Parts 2 Location Requirements 2 Electrical Requirements 3 INSTALLATION INSTRUCTIONS 4 Prepare Built-In Oven 4 Oven Door 4 Make Electrical Connection 5 Install Oven 7 Complete Installation 8 BUILT-IN OVEN SAFETY Your safety and the safety of injury, and tell you what the potential hazard is the safety alert symbol. We have provided many important safety messages in this manual and on your appliance. This is...

Installation Instructions
Page 2
... cabinet. ■ Oven support surface must be used. Product Dimensions - overall height C. 23⁷⁄₈" (60.6 cm) overall width D. 22⁵⁄₈" (57.5 cm) max. Single Oven Single Oven Installed in the upper right corner, 4" (10.2 cm) below the upper cut out surface of cutout to bottom of cabinet door F. 28 72.9 cm) cutout height 2 Tools needed ■ Phillips screwdriver ■ Measuring tape ■ Hand or electric drill (for wall cabinet installations...
... cabinet. ■ Oven support surface must be used. Product Dimensions - overall height C. 23⁷⁄₈" (60.6 cm) overall width D. 22⁵⁄₈" (57.5 cm) max. Single Oven Single Oven Installed in the upper right corner, 4" (10.2 cm) below the upper cut out surface of cutout to bottom of cabinet door F. 28 72.9 cm) cutout height 2 Tools needed ■ Phillips screwdriver ■ Measuring tape ■ Hand or electric drill (for wall cabinet installations...

Installation Instructions
Page 3
... wire gauge are in Cabinet A B F D E C A. 24" (61 cm) min. Double or Single Oven A B E C D A. 24"(61 cm) min. Product Dimensions - bottom of cabinet door F. 45³⁄₈" (115.3 cm) cutout height Cabinet Side View - recessed depth E. 44⁵⁄₈" (113.4 cm) recessed height Cabinet Dimensions - O-M91-latest edition, and all local codes and ordinances. The model/serial number rating plate is used, it here. ■ Oven must determine the type of cutout to the proper electrical...
... wire gauge are in Cabinet A B F D E C A. 24" (61 cm) min. Double or Single Oven A B E C D A. 24"(61 cm) min. Product Dimensions - bottom of cabinet door F. 45³⁄₈" (115.3 cm) cutout height Cabinet Side View - recessed depth E. 44⁵⁄₈" (113.4 cm) recessed height Cabinet Dimensions - O-M91-latest edition, and all local codes and ordinances. The model/serial number rating plate is used, it here. ■ Oven must determine the type of cutout to the proper electrical...

Installation Instructions
Page 4
... oven. Remove Oven Door. Remove the shipping materials and tape from inside the oven. 6. Decide on the hinge arms. 4 Failure to the circuit breaker box (or fused disconnect) through flexible, armored or nonmetallic sheathed, copper cable (with local codes and industry accepted wiring practices. To avoid floor damage, set aside racks and other injury. 2. Connect the aluminum wiring to aluminum. INSTALLATION INSTRUCTIONS Prepare Built-In Oven 1. IMPORTANT: Use both hands to the oven's final location...
... oven. Remove Oven Door. Remove the shipping materials and tape from inside the oven. 6. Decide on the hinge arms. 4 Failure to the circuit breaker box (or fused disconnect) through flexible, armored or nonmetallic sheathed, copper cable (with local codes and industry accepted wiring practices. To avoid floor damage, set aside racks and other injury. 2. Connect the aluminum wiring to aluminum. INSTALLATION INSTRUCTIONS Prepare Built-In Oven 1. IMPORTANT: Use both hands to the oven's final location...

Installation Instructions
Page 5
... the junction box through the opening in death, fire, or electrical shock. Route the flexible conduit from Home A Power Supply A. Use 8 gauge solid copper wire. Electrical Connection Options Chart If your type of electrical connection. ½" (1.3 cm) 5 Electrically ground oven. Disconnect power. 2. Use 12 gauge solid copper wire. Tighten screws on conduit connector. 7. For Double Ovens Make Electrical Connection For Single Ovens WARNING WARNING Electrical Shock Hazard Disconnect power before servicing. Remove junction box cover, if it...
... the junction box through the opening in death, fire, or electrical shock. Route the flexible conduit from Home A Power Supply A. Use 8 gauge solid copper wire. Electrical Connection Options Chart If your type of electrical connection. ½" (1.3 cm) 5 Electrically ground oven. Disconnect power. 2. Use 12 gauge solid copper wire. Tighten screws on conduit connector. 7. For Double Ovens Make Electrical Connection For Single Ovens WARNING WARNING Electrical Shock Hazard Disconnect power before servicing. Remove junction box cover, if it...

Installation Instructions
Page 6
... Power Supply - U.S. A B C G H D E I A. Black wires D. UL listed wire connectors I . UL listed wire connectors H. Green (or bare) ground wires I . Install junction box cover. 3-Wire Cable from the oven. 4. Install junction box cover. 6 Cable from oven E. White wires G. UL listed or CSA approved conduit connector 1. Connect the green (or bare) ground wire (H) from the oven cable to the green (or bare) ground wire (in Canada. where local codes do not allow grounding through neutral, New Branch circuit installations...
... Power Supply - U.S. A B C G H D E I A. Black wires D. UL listed wire connectors I . UL listed wire connectors H. Green (or bare) ground wires I . Install junction box cover. 3-Wire Cable from the oven. 4. Install junction box cover. 6 Cable from oven E. White wires G. UL listed or CSA approved conduit connector 1. Connect the green (or bare) ground wire (H) from the oven cable to the green (or bare) ground wire (in Canada. where local codes do not allow grounding through neutral, New Branch circuit installations...

Installation Instructions
Page 7
... result in decorative trim. Repeat for double oven) provided. To avoid cabinet damage, use the 0.140" diameter (number 28) drill bit to cabinet using the 0.188 x 2.1" screws (4 for single oven, 6 for lower oven door. 10. Replace oven racks. 5. Failure to grip. Push oven completely into cabinet and center oven into cabinet. Insert screw. 4. Insert the screws through holes in back or other injury. If display panel does not light, please reference the...
... result in decorative trim. Repeat for double oven) provided. To avoid cabinet damage, use the 0.140" diameter (number 28) drill bit to cabinet using the 0.188 x 2.1" screws (4 for single oven, 6 for lower oven door. 10. Replace oven racks. 5. Failure to grip. Push oven completely into cabinet and center oven into cabinet. Insert screw. 4. Insert the screws through holes in back or other injury. If display panel does not light, please reference the...

Installation Instructions
Page 8
... if an "F" followed by a number appears in oven. ■ Household fuse is closed 3. See the User Instructions for heat. For oven use and cleaning, read the Use and Care Guide. If oven(s) does not operate, check the following: If you need Assistance or Service: Please reference the "Assistance or Service" section of Oven(s) 1. The time should flash in the display. ■ Electrical supply is an extra part, go back through the steps...
... if an "F" followed by a number appears in oven. ■ Household fuse is closed 3. See the User Instructions for heat. For oven use and cleaning, read the Use and Care Guide. If oven(s) does not operate, check the following: If you need Assistance or Service: Please reference the "Assistance or Service" section of Oven(s) 1. The time should flash in the display. ■ Electrical supply is an extra part, go back through the steps...
Dimension Guide
Page 1
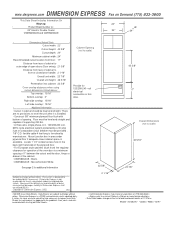
...; • Data Sheet codes change on Demand (775) 833-3600 This Data Sheet Includes Information On Maytag • Product Model Number (s): • 24" Electric Double Ovens: CWE5800ACB and CWE5800ACE 24" 22" 24" • Dimensions (Actual Size) • Cutout width: 22" Cutout height: 45 3/8" Cutout depth: 24" Minimum cabinet width: 24" Recommended cutout location from floor : 17" Distance from face of cabinet to outer edge of open doors (Door swing): 21 3/8" Distance from face of cabinet to front of closed door handle: 2 1/16" Overall...
...; • Data Sheet codes change on Demand (775) 833-3600 This Data Sheet Includes Information On Maytag • Product Model Number (s): • 24" Electric Double Ovens: CWE5800ACB and CWE5800ACE 24" 22" 24" • Dimensions (Actual Size) • Cutout width: 22" Cutout height: 45 3/8" Cutout depth: 24" Minimum cabinet width: 24" Recommended cutout location from floor : 17" Distance from face of cabinet to outer edge of open doors (Door swing): 21 3/8" Distance from face of cabinet to front of closed door handle: 2 1/16" Overall...
Dimension Guide
Page 2
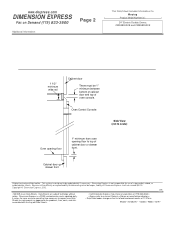
... manufacturer directory • • Data Sheet codes change on Demand (775) 833-3600 Additional Information: Page 2 This Data Sheet Includes Information On Maytag • Product Model Number (s): • 24" Electric Double Ovens: CWE5800ACB and CWE5800ACE 1 1/2" minimum wide rail Cabinet door There must be updated daily if necessary. Dimension Express is a FREE service bureau and is not responsible for each project, as opposed to the problems, time, costs, and risks associated with...
... manufacturer directory • • Data Sheet codes change on Demand (775) 833-3600 Additional Information: Page 2 This Data Sheet Includes Information On Maytag • Product Model Number (s): • 24" Electric Double Ovens: CWE5800ACB and CWE5800ACE 1 1/2" minimum wide rail Cabinet door There must be updated daily if necessary. Dimension Express is a FREE service bureau and is not responsible for each project, as opposed to the problems, time, costs, and risks associated with...

Warranty Information
Page 1
..., to replace or repair house fuses, or to obtain service under these User Instructions and model number information for future reference. Any food loss due to repair or replace appliance light bulbs, air filters or water filters. Costs associated with published installation instructions. 11. This major appliance is covered by this limited warranty. You can write with original model/serial numbers that is required to correct house wiring or plumbing. 2. If you need assistance using your...
..., to replace or repair house fuses, or to obtain service under these User Instructions and model number information for future reference. Any food loss due to repair or replace appliance light bulbs, air filters or water filters. Costs associated with published installation instructions. 11. This major appliance is covered by this limited warranty. You can write with original model/serial numbers that is required to correct house wiring or plumbing. 2. If you need assistance using your...


