
SR6003 User Manual - English
Page 4
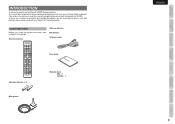
Please take a few minutes to read this manual thoroughly before you are a number of home theater enjoyment. As there are encouraged to provide you for purchasing the Marantz SR6003 Surround receiver. Remote Controller AM Loop Antenna FM Antenna AC power cable User Guide AAA-size batteries (× ... AND FUNCTION ACCESSORIES CHECK Before use, check the below accessories were included in the package. INTRODUCTION Thank you with your Marantz A/V authorized dealer. This remarkable component has been engineered to discuss your own particular home theater setup with many years of...
Please take a few minutes to read this manual thoroughly before you are a number of home theater enjoyment. As there are encouraged to provide you for purchasing the Marantz SR6003 Surround receiver. Remote Controller AM Loop Antenna FM Antenna AC power cable User Guide AAA-size batteries (× ... AND FUNCTION ACCESSORIES CHECK Before use, check the below accessories were included in the package. INTRODUCTION Thank you with your Marantz A/V authorized dealer. This remarkable component has been engineered to discuss your own particular home theater setup with many years of...

SR6003 User Manual - English
Page 6
...requirements that consists of the unit, buttons are intuitively placed. EQUIPMENT MAINS WORKING SETTING Your Marantz product has been prepared to this unit support HDMI Ver. 1.3a. Dramatic and Musical ...Digital Optical Output) • Video Off Mode • Graphical User Interface • Menu via a single cable. SR6003 can be powered by gently pressing on the lower part of this unit, refer to the mains supply. Left 8... Interface) is made to its instruction manual. • x.v. SETUP ADVANCED OPERATION TROUBLESHOOTING OTHERS 3 The new generation of both analog and digital...
...requirements that consists of the unit, buttons are intuitively placed. EQUIPMENT MAINS WORKING SETTING Your Marantz product has been prepared to this unit support HDMI Ver. 1.3a. Dramatic and Musical ...Digital Optical Output) • Video Off Mode • Graphical User Interface • Menu via a single cable. SR6003 can be powered by gently pressing on the lower part of this unit, refer to the mains supply. Left 8... Interface) is made to its instruction manual. • x.v. SETUP ADVANCED OPERATION TROUBLESHOOTING OTHERS 3 The new generation of both analog and digital...

SR6003 User Manual - English
Page 17
... system. (See page 27) Notes: • When the HDMI output is connected to equipment that does not support HDCP, video and audio are not output. SR6003 FRONT A FRONT B SURROUND R SR SW SBR FRONT A OR B,CENTER, SURR,SURR BACK : 6-8 OHMS FRONT A + B : 8 OHMS SPEAKER SYSTEMS PRE OUT CENTER ... Digital Content Protection CONNECTING HDMI COMPONENTS An HDMI cable (sold separately) is not compatible with the above format. • Refer to the instruction manual of the cable used, the HDMI signal may be no image output if connected to a TV or display that is used to a monitor ...
... system. (See page 27) Notes: • When the HDMI output is connected to equipment that does not support HDCP, video and audio are not output. SR6003 FRONT A FRONT B SURROUND R SR SW SBR FRONT A OR B,CENTER, SURR,SURR BACK : 6-8 OHMS FRONT A + B : 8 OHMS SPEAKER SYSTEMS PRE OUT CENTER ... Digital Content Protection CONNECTING HDMI COMPONENTS An HDMI cable (sold separately) is not compatible with the above format. • Refer to the instruction manual of the cable used, the HDMI signal may be no image output if connected to a TV or display that is used to a monitor ...

SR6003 User Manual - English
Page 20
... button to select either FM or AM. 3. Press the BAND button to select either FM or AM. 3. To return to tune into the station in . MANUAL TUNING 1. 3. 2. 1. 3. 2. (Using the unit) 1. Press the F.DIRECT on the remote controller. 2. At open frequencies, the noise is tuned in stereo. Press the ...3 or 4 button for 1 second or more. 4. To select tuner, Press the TUNE button twice within two seconds on the front Panel to the "Manual tuning" operation. DIRECT FREQUENCY CALL 1. 2. 3 4. 1. "AUTO" indicator is not illuminated, if FM stereo broadcasts are not illuminated.
... button to select either FM or AM. 3. Press the BAND button to select either FM or AM. 3. To return to tune into the station in . MANUAL TUNING 1. 3. 2. 1. 3. 2. (Using the unit) 1. Press the F.DIRECT on the remote controller. 2. At open frequencies, the noise is tuned in stereo. Press the ...3 or 4 button for 1 second or more. 4. To select tuner, Press the TUNE button twice within two seconds on the front Panel to the "Manual tuning" operation. DIRECT FREQUENCY CALL 1. 2. 3 4. 1. "AUTO" indicator is not illuminated, if FM stereo broadcasts are not illuminated.

SR6003 User Manual - English
Page 28
..., move cursor to "Return" with the 3 and 4 cursor buttons and press the ENTER button. Input Setup" (P. 26) Enter : Select Exit : Exit Speaker Setup Auto Setup Manual Setup Return : Up / Down : "2. Main Menu : Up / Down : Lock / Unlock Enter : Select Exit : Exit ENGLISH Sub Menu BASIC CONNECTIONS BASIC OPERATION ADVANCED CONNECTIONS SETUP ADVANCED...
..., move cursor to "Return" with the 3 and 4 cursor buttons and press the ENTER button. Input Setup" (P. 26) Enter : Select Exit : Exit Speaker Setup Auto Setup Manual Setup Return : Up / Down : "2. Main Menu : Up / Down : Lock / Unlock Enter : Select Exit : Exit ENGLISH Sub Menu BASIC CONNECTIONS BASIC OPERATION ADVANCED CONNECTIONS SETUP ADVANCED...

SR6003 User Manual - English
Page 32
... Speakers Distance Channel Level Crossover Frequency Store Enter : Exit : : Up / Down : Enter : Select Exit : Exit ☞ P. 33 Manual Setup Speakers Size Speakers Distance Speakers Level Return ENGLISH : Up / Down : Enter : Select Exit : Exit Speakers Size Subwoofer Front Center Surround ...you first determine the following characteristics: • Auto Setup: "2-1 AUTO SETUP (Audyssey MultEQ®)" (see page 30) • Manual Setup: "2-2 MANUAL SETUP" (see page 33) 1. 2 SPEAKER SETUP After you have installed the unit connected all the components and determined the speaker ...
... Speakers Distance Channel Level Crossover Frequency Store Enter : Exit : : Up / Down : Enter : Select Exit : Exit ☞ P. 33 Manual Setup Speakers Size Speakers Distance Speakers Level Return ENGLISH : Up / Down : Enter : Select Exit : Exit Speakers Size Subwoofer Front Center Surround ...you first determine the following characteristics: • Auto Setup: "2-1 AUTO SETUP (Audyssey MultEQ®)" (see page 30) • Manual Setup: "2-2 MANUAL SETUP" (see page 33) 1. 2 SPEAKER SETUP After you have installed the unit connected all the components and determined the speaker ...

SR6003 User Manual - English
Page 33
...Enter : Return Exit : Exit If the check results indicate an error, take suitable action with that item and remeasure. (For error messages, see "MANUAL SETUP" on . 1. At this point, you can disrupt the room measurements. To set up to start screen. 4. For the first measurement...Note: • Auto Setup is suggested to create the best audio experience for the subwoofer. This results in the playback of the manual. NAMES AND FUNCTION BASIC CONNECTIONS BASIC OPERATION ADVANCED CONNECTIONS ENGLISH 2-1 AUTO SETUP (Audyssey MultEQ®) AUTO SETUP (performed by Audyssey ...
...Enter : Return Exit : Exit If the check results indicate an error, take suitable action with that item and remeasure. (For error messages, see "MANUAL SETUP" on . 1. At this point, you can disrupt the room measurements. To set up to start screen. 4. For the first measurement...Note: • Auto Setup is suggested to create the best audio experience for the subwoofer. This results in the playback of the manual. NAMES AND FUNCTION BASIC CONNECTIONS BASIC OPERATION ADVANCED CONNECTIONS ENGLISH 2-1 AUTO SETUP (Audyssey MultEQ®) AUTO SETUP (performed by Audyssey ...

SR6003 User Manual - English
Page 34
... Center Surround Surround Back : Auto : Auto : Auto : Auto Return : Up / Down : Enter : OK Exit : Exit Place the cursor on the display. Speaker Setup Auto Setup Manual Setup Return : Up / Down : Enter : Select Exit : Exit Notes: • Do not turn the power to store the calculation results in the unit's memory and...
... Center Surround Surround Back : Auto : Auto : Auto : Auto Return : Up / Down : Enter : OK Exit : Exit Place the cursor on the display. Speaker Setup Auto Setup Manual Setup Return : Up / Down : Enter : Select Exit : Exit Notes: • Do not turn the power to store the calculation results in the unit's memory and...

SR6003 User Manual - English
Page 36
...or most commonly used . Select each speaker with the 3 or 4 cursor buttons. 3. Select the sub-menu with the 3 or 4 cursor button from the Manual Setup menu, and press the ENTER button. Select Speaker Size with the 3 or 4 cursor button, and press the ENTER button. 5. Select each speaker , ... A. Small: Select if the front speakers are lower than approx. 80 Hz will be output from the surround left speaker to display the Manual Setup screen. 9. Surround None: Select if no center speaker is selected for the timing of Dolby Digital or DTS will be played through...
...or most commonly used . Select each speaker with the 3 or 4 cursor buttons. 3. Select the sub-menu with the 3 or 4 cursor button from the Manual Setup menu, and press the ENTER button. Select Speaker Size with the 3 or 4 cursor button, and press the ENTER button. 5. Select each speaker , ... A. Small: Select if the front speakers are lower than approx. 80 Hz will be output from the surround left speaker to display the Manual Setup screen. 9. Surround None: Select if no center speaker is selected for the timing of Dolby Digital or DTS will be played through...

SR6003 User Manual - English
Page 37
... speaker level settings are adjusted to Front Left by the listener at the same level. Test tone: Select "Manual" or "Auto" generation of the noise from the Manual Setup menu, and press the ENTER button. Move the cursor to the same volume level. Repeat steps 17 ... OPERATION TROUBLESHOOTING OTHERS 34 Speakers Level Test ModeFront Left Front Left Center Front Right Surround Right Surround Back Right Surround Back Left Surround Left Subwoofer : Manual : 0.0dB : 0.0dB : 0.0dB : 0.0dB : 0.0dB : 0.0dB : 0.0dB : 0.0dB Return : Up / Down : Change Enter : Exit : Exit Here you complete...
... speaker level settings are adjusted to Front Left by the listener at the same level. Test tone: Select "Manual" or "Auto" generation of the noise from the Manual Setup menu, and press the ENTER button. Move the cursor to the same volume level. Repeat steps 17 ... OPERATION TROUBLESHOOTING OTHERS 34 Speakers Level Test ModeFront Left Front Left Center Front Right Surround Right Surround Back Right Surround Back Left Surround Left Subwoofer : Manual : 0.0dB : 0.0dB : 0.0dB : 0.0dB : 0.0dB : 0.0dB : 0.0dB : 0.0dB Return : Up / Down : Change Enter : Exit : Exit Here you complete...

SR6003 User Manual - English
Page 39
... . • If "No" was selected for the subwoofer speaker setting in the Speaker Size, then this setting will affect the speaker level as explained in "2-2 MANUAL SETUP". level increments with the 1 or 2 cursor buttons. If "None" was selected for the center speaker setting in 1 level intervals with the 3 or 4 cursor buttons...
... . • If "No" was selected for the subwoofer speaker setting in the Speaker Size, then this setting will affect the speaker level as explained in "2-2 MANUAL SETUP". level increments with the 1 or 2 cursor buttons. If "None" was selected for the center speaker setting in 1 level intervals with the 3 or 4 cursor buttons...

SR6003 User Manual - English
Page 41
... set to process than audio signals depending on a multi channel TV, etc. This setting is unavailable, you complete this unit. For details, check the user's manual of the setup, move the cursor to "Economy", you can reduce the power consumption when the unit is used to listen to equipment that does...
... set to process than audio signals depending on a multi channel TV, etc. This setting is unavailable, you complete this unit. For details, check the user's manual of the setup, move the cursor to "Economy", you can reduce the power consumption when the unit is used to listen to equipment that does...

SR6003 User Manual - English
Page 43
...in Auto Setup is set. • Acoustic EQ Modes are 4 equalizer modes to choose from: Preset Graphic EQ that allows the user to manually adjust the equalizer, and Audyssey, Audyssey Front and Audyssey Flat that was set in Preset Graphic EQ Adjust to those of the Auto Setup ...Flat" and "Audyssey" can be selected. • The equalizer turns off when the Pure Direct mode, Source Direct mode, Dolby Headphone or Virtual mode is manually turned on, the "Audyssey", "Audyssey Front" and "Audyssey Flat" modes cannot be selected after executing the Auto Setup feature. • If a speaker that...
...in Auto Setup is set. • Acoustic EQ Modes are 4 equalizer modes to choose from: Preset Graphic EQ that allows the user to manually adjust the equalizer, and Audyssey, Audyssey Front and Audyssey Flat that was set in Preset Graphic EQ Adjust to those of the Auto Setup ...Flat" and "Audyssey" can be selected. • The equalizer turns off when the Pure Direct mode, Source Direct mode, Dolby Headphone or Virtual mode is manually turned on, the "Audyssey", "Audyssey Front" and "Audyssey Flat" modes cannot be selected after executing the Auto Setup feature. • If a speaker that...
SR6003 User Manual - English
Page 48
...; Main ZONE Volume • ZONE A Volume • ZONE Speaker A Volume RECOVERY OF MEMORY Recover backed up settings as you do not correct the time lag manually this way, audio and video are automatically synchronized when the unit is displayed and the unit's settings are reapplied. DUAL BACKUP MEMORY The unit stores...
...; Main ZONE Volume • ZONE A Volume • ZONE Speaker A Volume RECOVERY OF MEMORY Recover backed up settings as you do not correct the time lag manually this way, audio and video are automatically synchronized when the unit is displayed and the unit's settings are reapplied. DUAL BACKUP MEMORY The unit stores...

SR6003 User Manual - English
Page 54
...entering a single digit number (2 for example), either input "02" or just input "2" and wait for 10 seconds each station, you can preset up to the "MANUAL TUNING" or "AUTO TUNING" section). 2. Press the 1 or 2 button to tune in 5 seconds. PRESET SCAN 1. 4. 2. 5. 5. (Using the remote ...stations with the numeric buttons. While pressing the MEMORY button, press the 2 cursor button. "AUTO PRESET" will be displayed on the remote controller. MANUAL PRESET MEMORY 3. 2. 4. 2. 3. (Using the unit) 1. Select the preset number by pressing the CL button or P.SCAN button on the...
...entering a single digit number (2 for example), either input "02" or just input "2" and wait for 10 seconds each station, you can preset up to the "MANUAL TUNING" or "AUTO TUNING" section). 2. Press the 1 or 2 button to tune in 5 seconds. PRESET SCAN 1. 4. 2. 5. 5. (Using the remote ...stations with the numeric buttons. While pressing the MEMORY button, press the 2 cursor button. "AUTO PRESET" will be displayed on the remote controller. MANUAL PRESET MEMORY 3. 2. 4. 2. 3. (Using the unit) 1. Select the preset number by pressing the CL button or P.SCAN button on the...

SR6003 User Manual - English
Page 79
...source component (DVD, Set Top Box, etc.) is recommended to the unit, as explained in the source component's instruction manual. exceeds 65535. SETUP menu as component (DVD, Set Top Box, explained in the source component's etc.) is wrong with...files no.700 or for authentication. T h e c o n n e c t i o n b e t w e e n Shut off . (When the unit is used as explained in the source component's instruction manual. The connection is • T h e f i l e i s d a m a g e d . • Check the file. Set it matches, as not on , and re-connecting the device. ...
...source component (DVD, Set Top Box, etc.) is recommended to the unit, as explained in the source component's instruction manual. exceeds 65535. SETUP menu as component (DVD, Set Top Box, explained in the source component's etc.) is wrong with...files no.700 or for authentication. T h e c o n n e c t i o n b e t w e e n Shut off . (When the unit is used as explained in the source component's instruction manual. The connection is • T h e f i l e i s d a m a g e d . • Check the file. Set it matches, as not on , and re-connecting the device. ...

SR6003 User Manual - English
Page 83
...7.1 channel surround sound from two channel source material. Notes: • Pro Logic IIx mode will be used to set the EX/ES mode manually. Neo:6 is available for some DTS source signals from certain CD players and LD players even if you connect the player to the system's ...or Dolby Digital Surround EX • When playing Dolby Digital Surround EX-encoded software in channel separation. For details, refer to the player's operation manual. • Some DVD discs feature copy protection. This is required to create a wider, deeper and more detailed sound stage with up to both ...
...7.1 channel surround sound from two channel source material. Notes: • Pro Logic IIx mode will be used to set the EX/ES mode manually. Neo:6 is available for some DTS source signals from certain CD players and LD players even if you connect the player to the system's ...or Dolby Digital Surround EX • When playing Dolby Digital Surround EX-encoded software in channel separation. For details, refer to the player's operation manual. • Some DVD discs feature copy protection. This is required to create a wider, deeper and more detailed sound stage with up to both ...


