
Owner's Manual in English
Page 1
Display Rear panel 1 Remote Owner's Manual Index Connections Playback Settings Tips Appendix AV Surround Receiver NR1605 Front panel You can print more than one page of a PDF onto a single sheet of paper. Contents .
Display Rear panel 1 Remote Owner's Manual Index Connections Playback Settings Tips Appendix AV Surround Receiver NR1605 Front panel You can print more than one page of a PDF onto a single sheet of paper. Contents .
Owner's Manual in English
Page 5
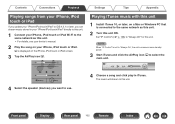
... Audyssey® Setup 176 149 Procedure for speaker settings (Audyssey® Setup) 178 150 Error messages 184 154 Retrieving Audyssey® Setup settings 185 155 Manual Setup 186 155 Amp Assign 186 156 Speaker Config. 187 158 Distances 189 160 Levels 190 160 Crossovers 191 162 Bass 192 166 Front Speaker...
... Audyssey® Setup 176 149 Procedure for speaker settings (Audyssey® Setup) 178 150 Error messages 184 154 Retrieving Audyssey® Setup settings 185 155 Manual Setup 186 155 Amp Assign 186 156 Speaker Config. 187 158 Distances 189 160 Levels 190 160 Crossovers 191 162 Bass 192 166 Front Speaker...

Owner's Manual in English
Page 7
...Marantz product. Quick Start Guide . Warranty (for USA/for future reference. AM loop antenna . Remote control unit (RC024SR) . Accessories Check that the following parts are supplied with the product. Microphone stand . Contents Connections Playback Settings Thank you for purchasing this owner's manual... carefully before using the product. CD-ROM (Owner's Manual) . Notes on radio . Safety Instructions . Power cord . After reading this manual, be sure to keep it for CANADA) . Cable...
...Marantz product. Quick Start Guide . Warranty (for USA/for future reference. AM loop antenna . Remote control unit (RC024SR) . Accessories Check that the following parts are supplied with the product. Microphone stand . Contents Connections Playback Settings Thank you for purchasing this owner's manual... carefully before using the product. CD-ROM (Owner's Manual) . Notes on radio . Safety Instructions . Power cord . After reading this manual, be sure to keep it for CANADA) . Cable...

Owner's Manual in English
Page 72
... that lets you tune in . Scanning is the case, then use "Direct Tune" to . You can also use the "Manual" mode or "Direct Tune" mode to select "FM/AM", then press ENTER. If this unit H 01 FM 92.10MHz . 3 Press OPTION. CH/PAGE d f Function Selects ...
... that lets you tune in . Scanning is the case, then use "Direct Tune" to . You can also use the "Manual" mode or "Direct Tune" mode to select "FM/AM", then press ENTER. If this unit H 01 FM 92.10MHz . 3 Press OPTION. CH/PAGE d f Function Selects ...

Owner's Manual in English
Page 74
... the button is overwritten. If you cannot tune in manually. 1 Press OPTION when the input source is displayed. 2 Use ui to "Manual" and tune in automatically with "Auto" mode, change the mode to select "Auto Preset Memory", then press ENTER. 3 Press ENTER. The option menu screen is "...
... the button is overwritten. If you cannot tune in manually. 1 Press OPTION when the input source is displayed. 2 Use ui to "Manual" and tune in automatically with "Auto" mode, change the mode to select "Auto Preset Memory", then press ENTER. 3 Press ENTER. The option menu screen is "...
Owner's Manual in English
Page 84
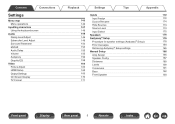
... programs on this PC and remote connections...". 5 Follow the screen instructions to end the setting. 3 Click the "Share my media" check box, select "Marantz NR1605", and then click "Allow". 4 As you did in NAS Change settings on the NAS to allow this setting first. . o Sharing media stored in step... mobile devices) used as a media controller, and then click "Allow". 5 Click "OK" to access the NAS. For details, see the owner's manual that came with the NAS. If you want to use as media controllers to finish. Front panel Display Rear panel 84 Remote Index o When using...
... programs on this PC and remote connections...". 5 Follow the screen instructions to end the setting. 3 Click the "Share my media" check box, select "Marantz NR1605", and then click "Allow". 4 As you did in NAS Change settings on the NAS to allow this setting first. . o Sharing media stored in step... mobile devices) used as a media controller, and then click "Allow". 5 Click "OK" to access the NAS. For details, see the owner's manual that came with the NAS. If you want to use as media controllers to finish. Front panel Display Rear panel 84 Remote Index o When using...
Owner's Manual in English
Page 102
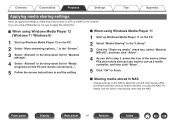
..." directly to this unit. 1 Connect your iPhone, iPod touch or iPad Wi-Fi to the same network as this unit. 0 For details, see your device's manual. 2 Play the song on your iPhone, iPod touch or iPad. ' is displayed on a Mac or Windows PC that is set to "Always On", the unit...
..." directly to this unit. 1 Connect your iPhone, iPod touch or iPad Wi-Fi to the same network as this unit. 0 For details, see your device's manual. 2 Play the song on your iPhone, iPod touch or iPad. ' is displayed on a Mac or Windows PC that is set to "Always On", the unit...

Owner's Manual in English
Page 114
... watching movies in a dark room at night. brighter and more vivid. The option menu screen is done with this unit. Custom: Adjusts the picture quality manually. 4 Press ENTER. Settings Tips Appendix 3 Use o p to select "Picture Mode", then press ENTER. Contents Connections Playback Adjusting the picture quality for your viewing environment (Picture...
... watching movies in a dark room at night. brighter and more vivid. The option menu screen is done with this unit. Custom: Adjusts the picture quality manually. 4 Press ENTER. Settings Tips Appendix 3 Use o p to select "Picture Mode", then press ENTER. Contents Connections Playback Adjusting the picture quality for your viewing environment (Picture...

Owner's Manual in English
Page 128
... HDMI control function of this unit to check that video from one device to standby, check that the power of this unit. Check the owner's manual of each device for all devices connected by HDMI is played back correctly. 6 When you turn the TV's power to communicate with another device via...
... HDMI control function of this unit to check that video from one device to standby, check that the power of this unit. Check the owner's manual of each device for all devices connected by HDMI is played back correctly. 6 When you turn the TV's power to communicate with another device via...
Owner's Manual in English
Page 144
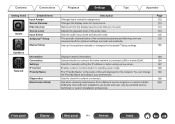
... to check the network connection. 199 Use when receiving maintenance from the display input sources that are made automatically. Network Manual Setup Information Connection Settings IP Control Friendly Name Diagnostics Maintenance Mode Description Changes input connector assignment. Changes the display name for... use by the end user, only by a trained service technician or custom installation professional. Removes from a Marantz service engineer or custom installer. 200 Ordinarily, this unit displayed on the network. Page 172 174 174 174 175 176 186 Displays...
... to check the network connection. 199 Use when receiving maintenance from the display input sources that are made automatically. Network Manual Setup Information Connection Settings IP Control Friendly Name Diagnostics Maintenance Mode Description Changes input connector assignment. Changes the display name for... use by the end user, only by a trained service technician or custom installation professional. Removes from a Marantz service engineer or custom installer. 200 Ordinarily, this unit displayed on the network. Page 172 174 174 174 175 176 186 Displays...

Owner's Manual in English
Page 145
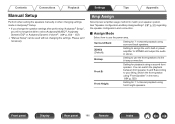
... about updates and upgrades, updates the firmware, and sets up the notification message display. Sets individual setting items according to Marantz. Language Select . Configures the ECO Mode and Auto Standby energy-saving functions. Checks for activating trigger out function. Makes ...Information Usage Data Firmware Setup Lock Begin Setup... Sets ZONE2 audio playback settings. Changes the display title of the separate manual "Quick Start Guide" Front panel Display Rear panel 145 Remote Index Select the conditions for the latest firmware information about...
... about updates and upgrades, updates the firmware, and sets up the notification message display. Sets individual setting items according to Marantz. Language Select . Configures the ECO Mode and Auto Standby energy-saving functions. Checks for activating trigger out function. Makes ...Information Usage Data Firmware Setup Lock Begin Setup... Sets ZONE2 audio playback settings. Changes the display title of the separate manual "Quick Start Guide" Front panel Display Rear panel 145 Remote Index Select the conditions for the latest firmware information about...

Owner's Manual in English
Page 160
... "HDMI", "COMP" or "VIDEO" is assigned for watching movies in a dark room such as a theater room. brighter and more vivid. Custom: Adjusts the picture quality manually. Picture Adjust Picture quality can be set when "Picture Mode" is done with this unit. ISF Day: A mode suited for each input source. (v p. 173) 0 "Contrast...
... "HDMI", "COMP" or "VIDEO" is assigned for watching movies in a dark room such as a theater room. brighter and more vivid. Custom: Adjusts the picture quality manually. Picture Adjust Picture quality can be set when "Picture Mode" is done with this unit. ISF Day: A mode suited for each input source. (v p. 173) 0 "Contrast...

Owner's Manual in English
Page 176
... measurement position (main listening position). For best results, we recommend you measure in six or more positions, as shown in the illustration (up the speakers manually, use "Manual Setup" on the menu. (v p. 187) Audyssey® Setup To perform measurement, place the Sound calibration microphone in "Setup Assistant". Front panel Display Rear panel...
... measurement position (main listening position). For best results, we recommend you measure in six or more positions, as shown in the illustration (up the speakers manually, use "Manual Setup" on the menu. (v p. 187) Audyssey® Setup To perform measurement, place the Sound calibration microphone in "Setup Assistant". Front panel Display Rear panel...

Owner's Manual in English
Page 185
.... Settings Tips Appendix Front panel Display Rear panel 185 Remote Index Contents Connections Playback Retrieving Audyssey® Setup settings If you have changed each setting manually. Audyssey Setup Your AV receiver can return to Audyssey® Setup measurement result (value calculated at the start by MultEQ®) even when you set...
.... Settings Tips Appendix Front panel Display Rear panel 185 Remote Index Contents Connections Playback Retrieving Audyssey® Setup settings If you have changed each setting manually. Audyssey Setup Your AV receiver can return to Audyssey® Setup measurement result (value calculated at the start by MultEQ®) even when you set...
Owner's Manual in English
Page 186
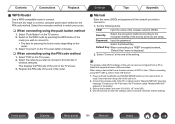
... to select Audyssey MultEQ®, Audyssey Dynamic EQ® or Audyssey Dynamic Volume®. (v p. 156 - 157) 0 "Manual Setup" can switch the playback between front speaker A and B according to match your liking. Contents Connections Playback Settings Tips Appendix... Manual Setup Perform when setting the speakers manually or when changing settings made in Audyssey® Setup. 0 If you change the speaker settings after performing "Audyssey&#...
... to select Audyssey MultEQ®, Audyssey Dynamic EQ® or Audyssey Dynamic Volume®. (v p. 156 - 157) 0 "Manual Setup" can switch the playback between front speaker A and B according to match your liking. Contents Connections Playback Settings Tips Appendix... Manual Setup Perform when setting the speakers manually or when changing settings made in Audyssey® Setup. 0 If you change the speaker settings after performing "Audyssey&#...

Owner's Manual in English
Page 191
... "Small". (v p. 192) 0 The default crossover frequency is "80 Hz", which will work best with the lower limit frequency of the "Speaker Config." See the speaker manual for all speakers. Contents Connections Playback Crossovers Set in "Small". All (Default): Individual: Sets the same crossover frequency for information concerning speaker crossover frequency. We...
... "Small". (v p. 192) 0 The default crossover frequency is "80 Hz", which will work best with the lower limit frequency of the "Speaker Config." See the speaker manual for all speakers. Contents Connections Playback Crossovers Set in "Small". All (Default): Individual: Sets the same crossover frequency for information concerning speaker crossover frequency. We...

Owner's Manual in English
Page 194
... connect to the home network (LAN). Wired (Ethernet): Use a LAN cable to connect to create a vTuner account. When assigning an IP address to each device manually, you need to assign an IP address to this unit by connecting it to a home network (LAN), you set up your home network (LAN) via...
... connect to the home network (LAN). Wired (Ethernet): Use a LAN cable to connect to create a vTuner account. When assigning an IP address to each device manually, you need to assign an IP address to this unit by connecting it to a home network (LAN), you set up your home network (LAN) via...
Owner's Manual in English
Page 196
...connecting using a device that supports wireless LAN connection. Use the browser to connect. There are using the push button method or the PIN code method. o Manual Enter the name (SSID) and password of the network you wish to connect to from a PC or tablet that has a firmware version of the access... your Wi-Fi device to the WPS mode by pressing the WPS button of the unit in the URL. 4. Switch to Wi-Fi network called "Marantz NR1605"" appears in "Use iOS Device". 1. Start up the browser and enter "192.168.1.16" in the router. This displays the PIN code of the ...
...connecting using a device that supports wireless LAN connection. Use the browser to connect. There are using the push button method or the PIN code method. o Manual Enter the name (SSID) and password of the network you wish to connect to from a PC or tablet that has a firmware version of the access... your Wi-Fi device to the WPS mode by pressing the WPS button of the unit in the URL. 4. Switch to Wi-Fi network called "Marantz NR1605"" appears in "Use iOS Device". 1. Start up the browser and enter "192.168.1.16" in the router. This displays the PIN code of the ...

Owner's Manual in English
Page 197
...from your provider, enter both "Primary DNS" and "Secondary DNS". o Default Gateway When connected to the network. Off: Configure the network settings manually. Network/Settings DHCP Off -IP Address 192.168.000.001 -Subnet Mask 255.255.255.000 -Default Gateway 255.255.255.000 -Primary ...000.000.000 -Secondary DNS 000.000.000.000 Proxy Off -Address 000.000.000.000 -Port 00000 Save Cancel Configures the network settings manually . Normally input 255.255.255.0. Settings Tips Appendix o IP Address Set the IP address within the ranges shown below. 0 The Network ...
...from your provider, enter both "Primary DNS" and "Secondary DNS". o Default Gateway When connected to the network. Off: Configure the network settings manually. Network/Settings DHCP Off -IP Address 192.168.000.001 -Subnet Mask 255.255.255.000 -Default Gateway 255.255.255.000 -Primary ...000.000.000 -Secondary DNS 000.000.000.000 Proxy Off -Address 000.000.000.000 -Port 00000 Save Cancel Configures the network settings manually . Normally input 255.255.255.0. Settings Tips Appendix o IP Address Set the IP address within the ranges shown below. 0 The Network ...

Owner's Manual in English
Page 215
... described in this unit. Are the other devices operating properly? Is the set being operated as it could be due to a fault in the owner's manual? 3. Front panel Display Rear panel 215 Remote Index Are the connections correct? 2.
... described in this unit. Are the other devices operating properly? Is the set being operated as it could be due to a fault in the owner's manual? 3. Front panel Display Rear panel 215 Remote Index Are the connections correct? 2.


