
NR1402N_ENG_CD-ROM_v00
Page 14
... one would normally sit alone within the listening environment. This will increase in the path while the measurements are performed by these test signals will cause inaccurate readings. • Loud test sounds may cause measurement disruptions (even if the cell phone is not in more effective correction. About setup microphone placement •...
... one would normally sit alone within the listening environment. This will increase in the path while the measurements are performed by these test signals will cause inaccurate readings. • Loud test sounds may cause measurement disruptions (even if the cell phone is not in more effective correction. About setup microphone placement •...
NR1402N_ENG_CD-ROM_v00
Page 16
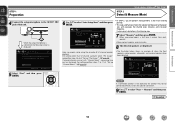
... setting, perform steps 7 to 5 of "Set up "Pre Assign"" (vpage 35). When the setup microphone is connected, the following items if necessary. When measuring begins, a test tone is output from each speaker. • Measurement requires several minutes. 8 The detected speakers are set with "Channel Select", measuring time can be connected correctly...
... setting, perform steps 7 to 5 of "Set up "Pre Assign"" (vpage 35). When the setup microphone is connected, the following items if necessary. When measuring begins, a test tone is output from each speaker. • Measurement requires several minutes. 8 The detected speakers are set with "Channel Select", measuring time can be connected correctly...

NR1402N_ENG_CD-ROM_v00
Page 60
... Level" is output from each channel to "Large", "Full Band" is not displayed. Set the Crossover Frequency to suit the bass reproduction capability of the test • Front L / F.Height L / Center / F.Height R / Front R / Surround R / tone to "Small", sound below the crossover frequency is displayed. "...Crossover : Set the crossover frequency. can be set for the different surround modes, use the operation see page 40. • When you press TEST TONE, you have a speaker that can be set when "Advanced" is selected differ depending on to the "Subwoofer Mode" setting (vpage 56...
... Level" is output from each channel to "Large", "Full Band" is not displayed. Set the Crossover Frequency to suit the bass reproduction capability of the test • Front L / F.Height L / Center / F.Height R / Front R / Surround R / tone to "Small", sound below the crossover frequency is displayed. "...Crossover : Set the crossover frequency. can be set for the different surround modes, use the operation see page 40. • When you press TEST TONE, you have a speaker that can be set when "Advanced" is selected differ depending on to the "Subwoofer Mode" setting (vpage 56...
NR1402N_ENG_CD-ROM_v00
Page 71
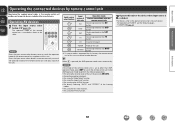
... function. • For switching the M-DAX function. • For directly selecting "AUTO" and "STEREO" of the listening modes. • For using the test tone function. • For using the HT-EQ function. 2 Operate this unit can control another devices. NOTE Press the input source select buttons once to... unit Device registered on the BD button Device registered on the DVD button Device registered on the SAT button Device registered on the TV button marantz CD player TUNER Radio of this unit M-XPort Device registered on the M-XP button zz If a preset code is switched. • For ...
... function. • For switching the M-DAX function. • For directly selecting "AUTO" and "STEREO" of the listening modes. • For using the test tone function. • For using the HT-EQ function. 2 Operate this unit can control another devices. NOTE Press the input source select buttons once to... unit Device registered on the BD button Device registered on the DVD button Device registered on the SAT button Device registered on the TV button marantz CD player TUNER Radio of this unit M-XPort Device registered on the M-XP button zz If a preset code is switched. • For ...

NR1402N_ENG_CD-ROM_v00
Page 80
...) E1 Muting button (MUTE 19) E2 DISPLAY button 60) E3 STATUS OSD button 53) E4 M-DAX button 52) E5 Pure direct button (P.DIRECT 24) E6 TEST TONE button 57) E7 Power buttons (ON/STANDBY C 5) E8 SET indicator 69, 70) E9 SEND indicator 69, 70) R0 Remote control signal transmitter 78) NOTE...
...) E1 Muting button (MUTE 19) E2 DISPLAY button 60) E3 STATUS OSD button 53) E4 M-DAX button 52) E5 Pure direct button (P.DIRECT 24) E6 TEST TONE button 57) E7 Power buttons (ON/STANDBY C 5) E8 SET indicator 69, 70) E9 SEND indicator 69, 70) R0 Remote control signal transmitter 78) NOTE...