
NR1402N_ENG_CD-ROM_v00
Page 14
... FL SW C FR GExample wH FL SW C FR ( : Measuring positions) ( : Measuring positions) SL *M SR SL *M SR FL Front speaker (L) FR Front speaker (R) C Center speaker SW Subwoofer SL Surround speaker (L) SR Surround speaker (R) About the main listening position (*M) The main listening position is called "Audyssey® Auto Setup". Set up speakers (Audyssey...) nn Set up the speakers manually, use ). • Do not unplug the setup microphone from this position to automatically make the optimal settings for the subwoofer.
... FL SW C FR GExample wH FL SW C FR ( : Measuring positions) ( : Measuring positions) SL *M SR SL *M SR FL Front speaker (L) FR Front speaker (R) C Center speaker SW Subwoofer SL Surround speaker (L) SR Surround speaker (R) About the main listening position (*M) The main listening position is called "Audyssey® Auto Setup". Set up speakers (Audyssey...) nn Set up the speakers manually, use ). • Do not unplug the setup microphone from this position to automatically make the optimal settings for the subwoofer.

NR1402N_ENG_CD-ROM_v00
Page 15
nn When using a subwoofer without a back. nn When using a subwoofer capable of the following adjustments, set up the operation mode Press AMP to set up the microphone Mount the setup microphone on , for example, a seat ... pass filter : "Off" • Standby mode : "Off" 3 Set up the remote control unit nn Set up the subwoofer as sound reflections may give inaccurate results. Sound receptor Setup microphone 2 Set up the subwoofer If using a subwoofer with a direct mode Set the direct mode to a seat back or wall as shown below. NOTE •...
nn When using a subwoofer without a back. nn When using a subwoofer capable of the following adjustments, set up the operation mode Press AMP to set up the microphone Mount the setup microphone on , for example, a seat ... pass filter : "Off" • Standby mode : "Off" 3 Set up the remote control unit nn Set up the subwoofer as sound reflections may give inaccurate results. Sound receptor Setup microphone 2 Set up the subwoofer If using a subwoofer with a direct mode Set the direct mode to a seat back or wall as shown below. NOTE •...
NR1402N_ENG_CD-ROM_v00
Page 16
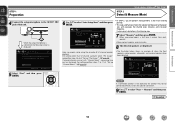
...Channel Select Auto Setup Start [ENTER] Enter [RETURN] Cancel Here, we explain setup using the example of when the front speakers, center speaker, subwoofer, and surround speakers have been detected. For setting, perform steps 7 to 11 of "Set up speakers (Audyssey® Auto Setup) STEP 2...Select", measuring time can be connected correctly. It also corrects distortion in the manual. Audyssey Auto Setup Detect Check Front Yes Center Yes Subwoofer Yes Surround Yes S.Back No MultEQ Retry Next Measure [ENTER] Enter [RETURN] Cancel NOTE If a connected speaker is displayed. Basic...
...Channel Select Auto Setup Start [ENTER] Enter [RETURN] Cancel Here, we explain setup using the example of when the front speakers, center speaker, subwoofer, and surround speakers have been detected. For setting, perform steps 7 to 11 of "Set up speakers (Audyssey® Auto Setup) STEP 2...Select", measuring time can be connected correctly. It also corrects distortion in the manual. Audyssey Auto Setup Detect Check Front Yes Center Yes Subwoofer Yes Surround Yes S.Back No MultEQ Retry Next Measure [ENTER] Enter [RETURN] Cancel NOTE If a connected speaker is displayed. Basic...

NR1402N_ENG_CD-ROM_v00
Page 18
... Dynamic Volume®. Check Distance Check Ch.Level Check Crossover Check Next Store [ENTER] Enter MultEQ [RETURN] Cancel • Subwoofers may measure a greater reported distance than the actual distance due to added electrical delay common in the dynamism and clarity of the...to the unit. When saving is displayed. NOTE During saving of a change the speaker connections or subwoofer volume. Information 15 Auto Setup is performed automatically without any loss in subwoofers. • If you want to check, and then press ENTER. Audyssey Auto Setup Store Press...
... Dynamic Volume®. Check Distance Check Ch.Level Check Crossover Check Next Store [ENTER] Enter MultEQ [RETURN] Cancel • Subwoofers may measure a greater reported distance than the actual distance due to added electrical delay common in the dynamism and clarity of the...to the unit. When saving is displayed. NOTE During saving of a change the speaker connections or subwoofer volume. Information 15 Auto Setup is performed automatically without any loss in subwoofers. • If you want to check, and then press ENTER. Audyssey Auto Setup Store Press...

NR1402N_ENG_CD-ROM_v00
Page 19
...not connected properly. Speaker:None Front R • There is too much noise in which the speakers are facing. • Adjust the subwoofer's volume. • The displayed speaker could not be detected. (The screen on the left indicates that the polarity phases of the front ...; Check the polarity of the displayed speaker. • For some speakers, this error message may be made . • Speaker or subwoofer sound is too low for accurate measurements to turn off the power before checking speaker connections. Basic version Advanced version Information Error messages Set...
...not connected properly. Speaker:None Front R • There is too much noise in which the speakers are facing. • Adjust the subwoofer's volume. • The displayed speaker could not be detected. (The screen on the left indicates that the polarity phases of the front ...; Check the polarity of the displayed speaker. • For some speakers, this error message may be made . • Speaker or subwoofer sound is too low for accurate measurements to turn off the power before checking speaker connections. Basic version Advanced version Information Error messages Set...

NR1402N_ENG_CD-ROM_v00
Page 22
... 3 Press CD twice to switch an input source for a player used for playback. 4 Play the device connected to turn on the power of the TV, subwoofer and player. w Load the disc in the player. 2 Press ON to this unit. to the input signal and channel level setting. q Turn on power to... TUNER CD TV nnUsing the knob on the remote control unit Press SOURCE d or SOURCE f. • Every time you turn on the power of the subwoofer and player. Basic version Advanced version nnUsing the SOURCE d f button on the main unit Turn INPUT SELECTOR. • Every time you press SOURCE d or ...
... 3 Press CD twice to switch an input source for a player used for playback. 4 Play the device connected to turn on the power of the TV, subwoofer and player. w Load the disc in the player. 2 Press ON to this unit. to the input signal and channel level setting. q Turn on power to... TUNER CD TV nnUsing the knob on the remote control unit Press SOURCE d or SOURCE f. • Every time you turn on the power of the subwoofer and player. Basic version Advanced version nnUsing the SOURCE d f button on the main unit Turn INPUT SELECTOR. • Every time you press SOURCE d or ...
NR1402N_ENG_CD-ROM_v00
Page 30
...input, such as that affects sound quality. • Surround back signals or front height signals are not created. Basic version Advanced version marantz original listening mode Listening mode type MULTI CH STEREO VIRTUAL AUTO Description This mode is for enjoying stereo sound from the front left and ...right speakers and subwoofer. • If multichannel signals are input, they are mixed down to 2-channel audio and are played. This mode is for playing ...
...input, such as that affects sound quality. • Surround back signals or front height signals are not created. Basic version Advanced version marantz original listening mode Listening mode type MULTI CH STEREO VIRTUAL AUTO Description This mode is for enjoying stereo sound from the front left and ...right speakers and subwoofer. • If multichannel signals are input, they are mixed down to 2-channel audio and are played. This mode is for playing ...

NR1402N_ENG_CD-ROM_v00
Page 32
... 135˚ - 150˚ GSpeaker abbreviationsH FL Front speaker (L) SL Surround speaker (L) FR Front speaker (R) SR Surround speaker (R) C Center speaker SBL Surround back speaker (L) SW Subwoofer SBR Surround back speaker (R) vSee overleaf Information 29
... 135˚ - 150˚ GSpeaker abbreviationsH FL Front speaker (L) SL Surround speaker (L) FR Front speaker (R) SR Surround speaker (R) C Center speaker SBL Surround back speaker (L) SW Subwoofer SBR Surround back speaker (R) vSee overleaf Information 29

NR1402N_ENG_CD-ROM_v00
Page 33
...; - 110˚ GSpeaker abbreviationsH FL Front speaker (L) SB Surround back speaker FR Front speaker (R) FHL Front height speaker (L) C Center speaker FHR Front height speaker (R) SW Subwoofer SL Surround speaker (L) SR Surround speaker (R) When 6.1ch (Surround back speaker) installed FL SW z2 z1 FR C SL SR Listening position SB z1 22˚...
...; - 110˚ GSpeaker abbreviationsH FL Front speaker (L) SB Surround back speaker FR Front speaker (R) FHL Front height speaker (L) C Center speaker FHR Front height speaker (R) SW Subwoofer SL Surround speaker (L) SR Surround speaker (R) When 6.1ch (Surround back speaker) installed FL SW z2 z1 FR C SL SR Listening position SB z1 22˚...

NR1402N_ENG_CD-ROM_v00
Page 39
...perform Audyssey® Auto Setup again. [RETURN] Return 8 Use ui to be set when "Pre Assign" is set whether or not a subwoofer channel is measured. Subwoofer Select for no measuring of the connected speakers. Measure (2 sp) Set for measuring a surround back speaker. Measure (1 sp) Set for ...Basic version Advanced version 5 Use o p to the FL/SBL/HL and FR/SBR/HR connectors in PRE OUT. NORMAL F.HEIGHT Set for measuring a subwoofer. Measure Set for connecting the surround back speakers to select the configuration of a surround back speaker. 10 Use o p to set to step 9. ...
...perform Audyssey® Auto Setup again. [RETURN] Return 8 Use ui to be set when "Pre Assign" is set whether or not a subwoofer channel is measured. Subwoofer Select for no measuring of the connected speakers. Measure (2 sp) Set for measuring a surround back speaker. Measure (1 sp) Set for ...Basic version Advanced version 5 Use o p to the FL/SBL/HL and FR/SBR/HR connectors in PRE OUT. NORMAL F.HEIGHT Set for measuring a subwoofer. Measure Set for connecting the surround back speakers to select the configuration of a surround back speaker. 10 Use o p to set to step 9. ...

NR1402N_ENG_CD-ROM_v00
Page 43
... the volume of the speakers. (o : front, p: rear) • The fader function does not affect the subwoofer. • The fader can be adjusting using o p. Channel Level Front L Front R Center Subwoofer Surround L Surround R -1.0dB -1.0dB -1.0dB +0.5dB 0.0dB 0.0dB Fader Front Rear 4 Use o p to...p to adjust the volume. • You can adjust the channel level either according to the playback sources or to be adjusted. Select "Subwoofer" and use o p to select the speaker. Convenient functions nnAdjusting the volume of groups of speakers (Fader function) This function lets you adjust...
... the volume of the speakers. (o : front, p: rear) • The fader function does not affect the subwoofer. • The fader can be adjusting using o p. Channel Level Front L Front R Center Subwoofer Surround L Surround R -1.0dB -1.0dB -1.0dB +0.5dB 0.0dB 0.0dB Fader Front Rear 4 Use o p to...p to adjust the volume. • You can adjust the channel level either according to the playback sources or to be adjusted. Select "Subwoofer" and use o p to select the speaker. Convenient functions nnAdjusting the volume of groups of speakers (Fader function) This function lets you adjust...

NR1402N_ENG_CD-ROM_v00
Page 58
...surround speakers. • Large : Use a large speaker that can not be set to determine selection of a subwoofer. • Yes : Use a subwoofer. • No : Select when a subwoofer is "NORMAL", you can adequately play back low frequencies. • Small : Use a small speaker that ...; Small : Use a small speaker that can be used without changing the settings. Setting items Speaker Config. (Continued) System Setup Setting details Subwoofer : Set the presence of a "Large". Please set to "Small". bass reproduction capability. • Small : Use a small speaker that has...
...surround speakers. • Large : Use a large speaker that can not be set to determine selection of a subwoofer. • Yes : Use a subwoofer. • No : Select when a subwoofer is "NORMAL", you can adequately play back low frequencies. • Small : Use a small speaker that ...; Small : Use a small speaker that can be used without changing the settings. Setting items Speaker Config. (Continued) System Setup Setting details Subwoofer : Set the presence of a "Large". Please set to "Small". bass reproduction capability. • Small : Use a small speaker that has...

NR1402N_ENG_CD-ROM_v00
Page 59
...position to the default?" NOTE If "Front" and "Center" for LFE : Set LFE signal playback range. Measure beforehand the distance from the subwoofer. • LFE+Main : The low range signal of the distance. • 0.1m / 0.01m • 1ft / 0.1ft Default.../ F.Height L / F.Height R : Select the speaker. Basic version Advanced version Setting items Speaker Config. (Continued) Bass Setting Set subwoofer and LFE signal range playback. Subwoofer Mode : Select low range signals to "1spkr", "S.Back" is displayed. are not connected. LPF for "Speaker Config." vSee overleaf Information...
...position to the default?" NOTE If "Front" and "Center" for LFE : Set LFE signal playback range. Measure beforehand the distance from the subwoofer. • LFE+Main : The low range signal of the distance. • 0.1m / 0.01m • 1ft / 0.1ft Default.../ F.Height L / F.Height R : Select the speaker. Basic version Advanced version Setting items Speaker Config. (Continued) Bass Setting Set subwoofer and LFE signal range playback. Subwoofer Mode : Select low range signals to "1spkr", "S.Back" is displayed. are not connected. LPF for "Speaker Config." vSee overleaf Information...

NR1402N_ENG_CD-ROM_v00
Page 60
...higher frequency. • For speakers set to be set . can be the same when it S.Back Rz / S.Back Lz / Surround L / Subwoofer : Select the speaker. is output from the subwoofer or front speakers. • The speakers that is inserted in the PHONES jack of the test • Front L / F.Height L / Center.... • No : Do not reset to "Small" at "Speaker Config." Set the Crossover Frequency to "LFE+Main", this setting item immediately. "Subwoofer Mode" (vpage 56) setting is set for the different surround modes, use the operation see page 40. • When you press TEST TONE, you...
...higher frequency. • For speakers set to be set . can be the same when it S.Back Rz / S.Back Lz / Surround L / Subwoofer : Select the speaker. is output from the subwoofer or front speakers. • The speakers that is inserted in the PHONES jack of the test • Front L / F.Height L / Center.... • No : Do not reset to "Small" at "Speaker Config." Set the Crossover Frequency to "LFE+Main", this setting item immediately. "Subwoofer Mode" (vpage 56) setting is set for the different surround modes, use the operation see page 40. • When you press TEST TONE, you...

NR1402N_ENG_CD-ROM_v00
Page 83
... S DOLBY TrueHD S DTS SURROUND S DTS 96/24 S DTS-HD S DTS Express S MULTI CH STEREO S VIRTUAL S Center D D D D D D D D D D D D D D Channel output Surround L/R Surround Back L/R Front Height L/R D Dz2 Dz2 D D D D D D D D D D D D D D D D D D D D D D D D D D D D D D D D D D Subwoofer Dz3 D D D D D D D D D D D D D D D D HT-EQ (vpage 49) S S S S S S S S S S S S S Surr.Parameter (vpage 49) DRC z4 (vpage 49) D. Surround modes and surround parameters This table shows the speakers that can...
... S DOLBY TrueHD S DTS SURROUND S DTS 96/24 S DTS-HD S DTS Express S MULTI CH STEREO S VIRTUAL S Center D D D D D D D D D D D D D D Channel output Surround L/R Surround Back L/R Front Height L/R D Dz2 Dz2 D D D D D D D D D D D D D D D D D D D D D D D D D D D D D D D D D D Subwoofer Dz3 D D D D D D D D D D D D D D D D HT-EQ (vpage 49) S S S S S S S S S S S S S Surr.Parameter (vpage 49) DRC z4 (vpage 49) D. Surround modes and surround parameters This table shows the speakers that can...

NR1402N_ENG_CD-ROM_v00
Page 91
... sound is produced from front height speaker. C 6, 55, 56 • Check whether the audio device power is not output. "F.Height" on the subwoofer's power. • Set "Speaker Config." - Audyssey MultEQ®, Audyssey Dynamic EQ® and Audyssey Dynamic Volume® cannot be selected. M-DAX ...Back" on the menu to something other than "None". • Set the surround mode to something other than "None". • Check the subwoofer connections. • Turn on the menu to other than "DIRECT" or "PURE DIRECT". No sound is a lot of multichannel signals such ...
... sound is produced from front height speaker. C 6, 55, 56 • Check whether the audio device power is not output. "F.Height" on the subwoofer's power. • Set "Speaker Config." - Audyssey MultEQ®, Audyssey Dynamic EQ® and Audyssey Dynamic Volume® cannot be selected. M-DAX ...Back" on the menu to something other than "None". • Set the surround mode to something other than "None". • Check the subwoofer connections. • Turn on the menu to other than "DIRECT" or "PURE DIRECT". No sound is a lot of multichannel signals such ...

NR1402N_ENG_CD-ROM_v00
Page 95
... 59 Source Level 66 Speaker Connect 31 Install 29 Set up 11, 35 Speaker Config 55 Speaker impedance 86 Speaker Setup 55 Standby Source 58 Subwoofer setting 12 Surround back speaker 29, 30, 31, 33 Surround mode 24, 80 Surr.Parameter 49 sYCC601 color 86 System Setup 54 vvT Tone 50...
... 59 Source Level 66 Speaker Connect 31 Install 29 Set up 11, 35 Speaker Config 55 Speaker impedance 86 Speaker Setup 55 Standby Source 58 Subwoofer setting 12 Surround back speaker 29, 30, 31, 33 Surround mode 24, 80 Surr.Parameter 49 sYCC601 color 86 System Setup 54 vvT Tone 50...

NR1402N_ENG_GettingStarted_UG_v00
Page 8
Subwoofer (with built-in a position 60 to connect the speaker cables, see the speaker instruction manual. Connect the speaker cables to the main unit using the ...˚ - 30˚ z2 120˚ Remote control unit / R03/AAA batteries (supplied) Setup microphone (supplied) FL Front speaker (L) FR Front speaker (R) C Center speaker SW Subwoofer SL Surround speaker (L) SR Surround speaker (R) Power cord (supplied) 2 ENGLISH DEUTSCH FRANÇAIS ITALIANO ESPAÑOL NEDERLANDS SVENSKA Preparing the Setup Wizard This...
Subwoofer (with built-in a position 60 to connect the speaker cables, see the speaker instruction manual. Connect the speaker cables to the main unit using the ...˚ - 30˚ z2 120˚ Remote control unit / R03/AAA batteries (supplied) Setup microphone (supplied) FL Front speaker (L) FR Front speaker (R) C Center speaker SW Subwoofer SL Surround speaker (L) SR Surround speaker (R) Power cord (supplied) 2 ENGLISH DEUTSCH FRANÇAIS ITALIANO ESPAÑOL NEDERLANDS SVENSKA Preparing the Setup Wizard This...


