NR1402N_ENG_CD-ROM_v00
Page 16
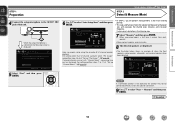
...RETURN] Cancel 5 Select "Next" and then press ENTER. 6 Use ui to select "Next → Measure" and then press ENTER. MultEQ Pre Assign Channel Select Auto Setup Start [ENTER] Enter [RETURN] Cancel Here, we explain setup using the example of "Set up...speakers, center speaker, subwoofer, and surround speakers have been detected. It also corrects distortion in the manual. For settings other than 5.1-channel surround, select "Pre Assign" and perform step 4 to 5 of this unit. Basic version Advanced version STEP 1 Preparation Set up speakers (Audyssey® Auto Setup) STEP...
...RETURN] Cancel 5 Select "Next" and then press ENTER. 6 Use ui to select "Next → Measure" and then press ENTER. MultEQ Pre Assign Channel Select Auto Setup Start [ENTER] Enter [RETURN] Cancel Here, we explain setup using the example of "Set up...speakers, center speaker, subwoofer, and surround speakers have been detected. It also corrects distortion in the manual. For settings other than 5.1-channel surround, select "Pre Assign" and perform step 4 to 5 of this unit. Basic version Advanced version STEP 1 Preparation Set up speakers (Audyssey® Auto Setup) STEP...

NR1402N_ENG_CD-ROM_v00
Page 34
...shows a connection example for performing 7.1-channel playback using the surround back speakers, set "S.Back" to "NORMAL" in the Setup wizard screen for "Set up "Pre Assign"" (vpage 35). Connect • For the method of connecting 5.1-channel speakers, see C page 6 "Connecting the speakers". • For the method... from the speaker terminal. Doing so could result in electric shock (When the Setup wizard is connected. setting (vpage 55) to set "Pre Assign" to "2spkrs". The protection circuit may be activated if the core wires touch the rear panel or if the + and - Speaker...
...shows a connection example for performing 7.1-channel playback using the surround back speakers, set "S.Back" to "NORMAL" in the Setup wizard screen for "Set up "Pre Assign"" (vpage 35). Connect • For the method of connecting 5.1-channel speakers, see C page 6 "Connecting the speakers". • For the method... from the speaker terminal. Doing so could result in electric shock (When the Setup wizard is connected. setting (vpage 55) to set "Pre Assign" to "2spkrs". The protection circuit may be activated if the core wires touch the rear panel or if the + and - Speaker...

NR1402N_ENG_CD-ROM_v00
Page 35
...perform 7.1-channel playback using the front height speakers. NOTE • A power amplifier (sold separately) is required for "Set up "Pre Assign"" (vpage 35). 7.1-channel (Front height speaker) connection The illustration on the right shows a connection example for performing 7.1-channel... playback using the front height speaker, set "Pre Assign" to "F.HEIGHT" in steps 3 and 4 for this connection. • For speaker cable connections, see C page 6 "Connecting the ...
...perform 7.1-channel playback using the front height speakers. NOTE • A power amplifier (sold separately) is required for "Set up "Pre Assign"" (vpage 35). 7.1-channel (Front height speaker) connection The illustration on the right shows a connection example for performing 7.1-channel... playback using the front height speaker, set "Pre Assign" to "F.HEIGHT" in steps 3 and 4 for this connection. • For speaker cable connections, see C page 6 "Connecting the ...

NR1402N_ENG_CD-ROM_v00
Page 36
Also use the "Speaker Config." setting (vpage 55) to set "Pre Assign" to "NORMAL" in this connection. • For speaker cable connections, see C page 6 "Connecting the speakers". • For speaker impedance, see "When 6.1ch (Surround back ... speaker (with a 6.1-channel connection), connect to the "L" side of the FL/SBL/HL connector. NOTE • A power amplifier (sold separately) is required for "Set up "Pre Assign"" (vpage 35).
Also use the "Speaker Config." setting (vpage 55) to set "Pre Assign" to "NORMAL" in this connection. • For speaker cable connections, see C page 6 "Connecting the speakers". • For speaker impedance, see "When 6.1ch (Surround back ... speaker (with a 6.1-channel connection), connect to the "L" side of the FL/SBL/HL connector. NOTE • A power amplifier (sold separately) is required for "Set up "Pre Assign"" (vpage 35).

NR1402N_ENG_CD-ROM_v00
Page 37
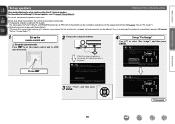
In this case, follow procedures 3 and 4 in "Set up "Pre Assign"" (vpage 35), and set "Pre Assign" to connect front speakers. Advanced version Information FL SW FR NOTE • For speaker cable connections, see C page 6 "Connecting the speakers". • For speaker impedance, see page 31. 34 Power amplifier L R IN RL FL SW FR Basic version 2.1-channel connection Connect The PRE OUT connectors can be used to "FRONT".
In this case, follow procedures 3 and 4 in "Set up "Pre Assign"" (vpage 35), and set "Pre Assign" to connect front speakers. Advanced version Information FL SW FR NOTE • For speaker cable connections, see C page 6 "Connecting the speakers". • For speaker impedance, see page 31. 34 Power amplifier L R IN RL FL SW FR Basic version 2.1-channel connection Connect The PRE OUT connectors can be used to "FRONT".
NR1402N_ENG_CD-ROM_v00
Page 38
...Select "Next", and then press ENTER. Before Auto Setup measurement, the settings shown below can be used are set in the manual. 4 Set up "Pre Assign""). • Setting the channels to be used (Channel Select) If channels that are not to this unit. operation mode. 2 Connect the setup ... speakers (vpage 36 "Set up "Channel Select""). 1 Set up the remote control unit nn Set up the operation mode Press AMP to select "Pre Assign", and then press ENTER. Basic version Advanced version Set up 5.1-channel speakers, see C page 4 "Setup Wizard". Audyssey Auto Setup MultEQ Preparation...
...Select "Next", and then press ENTER. Before Auto Setup measurement, the settings shown below can be used are set in the manual. 4 Set up "Pre Assign""). • Setting the channels to be used (Channel Select) If channels that are not to this unit. operation mode. 2 Connect the setup ... speakers (vpage 36 "Set up "Channel Select""). 1 Set up the remote control unit nn Set up the operation mode Press AMP to select "Pre Assign", and then press ENTER. Basic version Advanced version Set up 5.1-channel speakers, see C page 4 "Setup Wizard". Audyssey Auto Setup MultEQ Preparation...

NR1402N_ENG_CD-ROM_v00
Page 39
... volume. Skip Set for measuring a surround back speaker. In this case, go to select "Channel Select", and then press ENTER. MultEQ Pre Assign Channel Select Auto Setup Start [ENTER] Enter [RETURN] Cancel Channel Select Surround Back Subwoofer Measure (2 sp) Measure Set up "Channel ... Audyssey® Auto Setup, do not change , perform Audyssey® Auto Setup again. [RETURN] Return 8 Use ui to be set when "Pre Assign" is measured. Measure (2 sp) Set for measuring a subwoofer. Surround Back Select the number of a subwoofer. 11 Press RETURN. Information 36...
... volume. Skip Set for measuring a surround back speaker. In this case, go to select "Channel Select", and then press ENTER. MultEQ Pre Assign Channel Select Auto Setup Start [ENTER] Enter [RETURN] Cancel Channel Select Surround Back Subwoofer Measure (2 sp) Measure Set up "Channel ... Audyssey® Auto Setup, do not change , perform Audyssey® Auto Setup again. [RETURN] Return 8 Use ui to be set when "Pre Assign" is measured. Measure (2 sp) Set for measuring a subwoofer. Surround Back Select the number of a subwoofer. 11 Press RETURN. Information 36...

NR1402N_ENG_CD-ROM_v00
Page 47
u Pre Assign Channel Select Auto Setup Start i [ENTER] Enter t History icon y Operation guidance text u Illustration i Operation button guidance nnList [RETURN] Cancel Selected item • Switch the ... subcategory Press i to select "System Setup" and then press p. (Or press ENTER.) System Setup Speaker Setup e HDMI Setup Audio Setup Option Setup Language Auto Setup Pre Assign Speaker Config. Basic version Advanced version Information Examples of menu screen displays Typical examples are described below.
u Pre Assign Channel Select Auto Setup Start i [ENTER] Enter t History icon y Operation guidance text u Illustration i Operation button guidance nnList [RETURN] Cancel Selected item • Switch the ... subcategory Press i to select "System Setup" and then press p. (Or press ENTER.) System Setup Speaker Setup e HDMI Setup Audio Setup Option Setup Language Auto Setup Pre Assign Speaker Config. Basic version Advanced version Information Examples of menu screen displays Typical examples are described below.
NR1402N_ENG_CD-ROM_v00
Page 52
..." is set . 0 - 6 (3) Audio Adjust Setting items Setting details C.Width 0 - 7 (3) Assign center channel signal to front left and right channels for the following settings. • When "Pre Assign" (vpage 55) is displayed for wider sound. Setting details ON : "HT-EQ" is not used. OFF : "HT-EQ" is used . C.Image Assign center channel...
..." is set . 0 - 6 (3) Audio Adjust Setting items Setting details C.Width 0 - 7 (3) Assign center channel signal to front left and right channels for the following settings. • When "Pre Assign" (vpage 55) is displayed for wider sound. Setting details ON : "HT-EQ" is not used. OFF : "HT-EQ" is used . C.Image Assign center channel...

NR1402N_ENG_CD-ROM_v00
Page 58
... settings after performing Audyssey® Auto Setup, it will not be possible to "None". When you select this connection. NOTE When "Pre Assign" setting (vpage 55) is set to the left (L) channel. Speaker Config. Do not use the frequencies "F.Height" can not...speaker to "Small". capability). • Small : Use a small speaker that has inadequate playback capacity for NOTE low frequencies. Setting items Setting details Pre Assign NORMAL : Set for connecting the front speakers to "Yes". A power amplifier (sold separately) is not connected. When "Front" is set ...
... settings after performing Audyssey® Auto Setup, it will not be possible to "None". When you select this connection. NOTE When "Pre Assign" setting (vpage 55) is set to the left (L) channel. Speaker Config. Do not use the frequencies "F.Height" can not...speaker to "Small". capability). • Small : Use a small speaker that has inadequate playback capacity for NOTE low frequencies. Setting items Setting details Pre Assign NORMAL : Set for connecting the front speakers to "Yes". A power amplifier (sold separately) is not connected. When "Front" is set ...

NR1402N_ENG_CD-ROM_v00
Page 59
...", and press ENTER. NOTE Speakers set to "None" in the distance between the speakers to the LFE signal output from the subwoofers, depending on the "Pre Assign" (vpage 55) and "Speaker Config." (vpage 55) settings. • Default settings : Front L / Front R / Center / Subwoofer / F.Height L / F.Height R : 3.60 m (12...Information BD 56 Basic version Advanced version Setting items Speaker Config. (Continued) Bass Setting Set subwoofer and LFE signal range playback. NOTE When "Pre Assign" setting (vpage 55) is displayed. • 0.00m - 18.00m / 0.0ft - 60.0ft : Set the distance. ...
...", and press ENTER. NOTE Speakers set to "None" in the distance between the speakers to the LFE signal output from the subwoofers, depending on the "Pre Assign" (vpage 55) and "Speaker Config." (vpage 55) settings. • Default settings : Front L / Front R / Center / Subwoofer / F.Height L / F.Height R : 3.60 m (12...Information BD 56 Basic version Advanced version Setting items Speaker Config. (Continued) Bass Setting Set subwoofer and LFE signal range playback. NOTE When "Pre Assign" setting (vpage 55) is displayed. • 0.00m - 18.00m / 0.0ft - 60.0ft : Set the distance. ...

NR1402N_ENG_CD-ROM_v00
Page 79
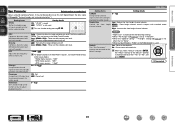
Electrostatic discharge may cause permanent damage to the unit. 76 Q1 Q0 o i Advanced version Information q w e r t y u q FM/AM antenna terminals 9) w Analog audio connectors 7, 8, 9) e PRE OUT connectors C 6, 31, 32, 33, 34) r VIDEO connectors 7, 8) t COMPONENT VIDEO connectors 7, 8) y Speaker terminals C 6, 31, 32, 33, 34) u AC inlet (AC IN C 5) i HDMI connectors C 3, 6) o Digital audio ...
Electrostatic discharge may cause permanent damage to the unit. 76 Q1 Q0 o i Advanced version Information q w e r t y u q FM/AM antenna terminals 9) w Analog audio connectors 7, 8, 9) e PRE OUT connectors C 6, 31, 32, 33, 34) r VIDEO connectors 7, 8) t COMPONENT VIDEO connectors 7, 8) y Speaker terminals C 6, 31, 32, 33, 34) u AC inlet (AC IN C 5) i HDMI connectors C 3, 6) o Digital audio ...

NR1402N_ENG_CD-ROM_v00
Page 85
... 56) is set to "None", this surround mode cannot be selected. "S.Back" (vpage 55) is set to "None", this surround mode cannot be selected when "Pre Assign" (vpage 55) is set to "1spkr" or "None", this surround mode cannot be played in the table S This indicates the selectable surround mode. z3...
... 56) is set to "None", this surround mode cannot be selected. "S.Back" (vpage 55) is set to "None", this surround mode cannot be selected when "Pre Assign" (vpage 55) is set to "1spkr" or "None", this surround mode cannot be played in the table S This indicates the selectable surround mode. z3...

NR1402N_ENG_CD-ROM_v00
Page 86
... selected. Advanced version Information 83 z4 If "Speaker Config." - "S.Back" (vpage 55) is set to "1spkr" or "None", this surround mode cannot be selected when "Pre Assign" (vpage 55) is set to "None", this surround mode cannot be selected. z2 If "Speaker Config." - Basic version Surround mode (vpage 24) MULTI CH...
... selected. Advanced version Information 83 z4 If "Speaker Config." - "S.Back" (vpage 55) is set to "1spkr" or "None", this surround mode cannot be selected when "Pre Assign" (vpage 55) is set to "None", this surround mode cannot be selected. z2 If "Speaker Config." - Basic version Surround mode (vpage 24) MULTI CH...

NR1402N_ENG_CD-ROM_v00
Page 91
...® Auto Setup. • Check that "Speaker Config." - If the speaker system is produced from surround speaker. terminals. • Check if "Pre Assign" is set appropriately in order to something other than "DIRECT" or "PURE DIRECT". • When headphones are used , MultEQ®, Dynamic EQ... Check the subwoofer connections. • Turn on the menu to output audio from other than "STEREO" and "VIRTUAL". • Check if "Pre Assign" is set appropriately in order to something other than "None". No sound is not output. DTS sound is not output. Dolby TrueHD, ...
...® Auto Setup. • Check that "Speaker Config." - If the speaker system is produced from surround speaker. terminals. • Check if "Pre Assign" is set appropriately in order to something other than "DIRECT" or "PURE DIRECT". • When headphones are used , MultEQ®, Dynamic EQ... Check the subwoofer connections. • Turn on the menu to output audio from other than "STEREO" and "VIRTUAL". • Check if "Pre Assign" is set appropriately in order to something other than "None". No sound is not output. DTS sound is not output. Dolby TrueHD, ...
