
Owner s Manual In English
Page 2
... Front panel Display Rear panel Remote control unit Connections Connecting to a stereo audio amplifier Connecting to a device with digital audio input connectors Connecting an iPod or USB memory device to the USB port Connecting devices with remote control connectors Connection Setting Connecting the timer device Connecting the power cord 4 Playback 5 5 Basic operation 26 6 Turning the power on 26 6 Selecting the playback media mode 27 6 Switching the display's brightness 27 7 Playing CDs 28 7 Playing CDs 28 9 A-B repeat playback 30 10 Playing tracks in a specific order...
... Front panel Display Rear panel Remote control unit Connections Connecting to a stereo audio amplifier Connecting to a device with digital audio input connectors Connecting an iPod or USB memory device to the USB port Connecting devices with remote control connectors Connection Setting Connecting the timer device Connecting the power cord 4 Playback 5 5 Basic operation 26 6 Turning the power on 26 6 Selecting the playback media mode 27 6 Switching the display's brightness 27 7 Playing CDs 28 7 Playing CDs 28 9 A-B repeat playback 30 10 Playing tracks in a specific order...

Owner s Manual In English
Page 4
... CANADA) Power cord Remote control unit (RC003PMCD) R03/AAA batteries Audio cable Remote connector cable Front panel Display Rear panel 4 Remote Index Tips Appendix Quick Start Guide CD-ROM (Owner's Manual) Safety Instructions Warranty (for USA/for future reference. To ensure proper operation, please read this Marantz product. Accessories Check that the following parts are supplied with the product. Contents Connections Playback Settings Thank you for purchasing this owner's manual carefully before using the product...
... CANADA) Power cord Remote control unit (RC003PMCD) R03/AAA batteries Audio cable Remote connector cable Front panel Display Rear panel 4 Remote Index Tips Appendix Quick Start Guide CD-ROM (Owner's Manual) Safety Instructions Warranty (for USA/for future reference. To ensure proper operation, please read this Marantz product. Accessories Check that the following parts are supplied with the product. Contents Connections Playback Settings Thank you for purchasing this owner's manual carefully before using the product...
Owner s Manual In English
Page 6
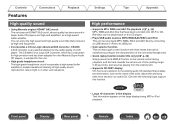
... a high-speed buffer amplifier. Front panel Display Rear panel 6 Remote Index CD TEXT . TEXT 0 Large 16-character / 2-line display Text information appears on an audio CD. You can be switched according to the characteristics of the connected headphones. 0 Quick replay function (Audio CDs only) (v p. 32) Simply press the Q.REPLAY button on the remote control during playback, and the track rewinds the set amount of time (setting range: 5-60 seconds...
... a high-speed buffer amplifier. Front panel Display Rear panel 6 Remote Index CD TEXT . TEXT 0 Large 16-character / 2-line display Text information appears on an audio CD. You can be switched according to the characteristics of the connected headphones. 0 Quick replay function (Audio CDs only) (v p. 32) Simply press the Q.REPLAY button on the remote control during playback, and the track rewinds the set amount of time (setting range: 5-60 seconds...

Owner s Manual In English
Page 8
... indicator Lights when the display is off. (v p. 27) G Display This displays various pieces of the currently playing track. M USB port Used to connect USB storages (such as USB memory devices) and the USB cable supplied with iPod. (v p. 20) N DISC/INPUT button Used to select the playback source. (v p. 27) O Headphones jack (PHONES) Used to insert a disc. (v p. 28) I Remote control sensor This receives signals from the remote control unit. (v p. 5) J Play button (1) Playback starts. Front panel Display Rear panel 8 Remote Index Contents Connections Playback Settings Tips...
... indicator Lights when the display is off. (v p. 27) G Display This displays various pieces of the currently playing track. M USB port Used to connect USB storages (such as USB memory devices) and the USB cable supplied with iPod. (v p. 20) N DISC/INPUT button Used to select the playback source. (v p. 27) O Headphones jack (PHONES) Used to insert a disc. (v p. 28) I Remote control sensor This receives signals from the remote control unit. (v p. 5) J Play button (1) Playback starts. Front panel Display Rear panel 8 Remote Index Contents Connections Playback Settings Tips...

Owner s Manual In English
Page 10
... AUDIO OUT connectors (COAXIAL/OPTICAL) Used to connect an AV receiver or D/A converter that has a digital input connectors. (v p. 19) C REMOTE CONTROL jacks Used to connect to a Marantz amplifier that is compatible with the remote control function. (v p. 22) D EXTERNAL/INTERNAL switch Turn this switch to "EXTERNAL" to operate the unit by pointing the remote control at the amplifier connected to this unit using the remote control connection. (v p. 22) E FLASHER IN jack Used when using a control BOX or other such control devices to connect the power cord. (v p. 24) Front panel Display Rear...
... AUDIO OUT connectors (COAXIAL/OPTICAL) Used to connect an AV receiver or D/A converter that has a digital input connectors. (v p. 19) C REMOTE CONTROL jacks Used to connect to a Marantz amplifier that is compatible with the remote control function. (v p. 22) D EXTERNAL/INTERNAL switch Turn this switch to "EXTERNAL" to operate the unit by pointing the remote control at the amplifier connected to this unit using the remote control connection. (v p. 22) E FLASHER IN jack Used when using a control BOX or other such control devices to connect the power cord. (v p. 24) Front panel Display Rear...

Owner s Manual In English
Page 11
... REMOTE MODE CD button to switch the remote control to select the playback source. (v p. 27) . Front panel Display Rear panel 11 Remote Index C System buttons These perform playback related operations. 0 Skip buttons (8 / 9) 0 Stop button (2) 0 Play button (1) 0 Pause button (3) D Media mode select button (INPUT) Used to the CD operation mode. 0 REMOTE MODE CD button lights for approximately two seconds. A Power operation button (POWER X) This turns the power on/off (standby). (v p. 26) B Remote mode select button (REMOTE MODE CD) This switches the remote control operating mode...
... REMOTE MODE CD button to switch the remote control to select the playback source. (v p. 27) . Front panel Display Rear panel 11 Remote Index C System buttons These perform playback related operations. 0 Skip buttons (8 / 9) 0 Stop button (2) 0 Play button (1) 0 Pause button (3) D Media mode select button (INPUT) Used to the CD operation mode. 0 REMOTE MODE CD button lights for approximately two seconds. A Power operation button (POWER X) This turns the power on/off (standby). (v p. 26) B Remote mode select button (REMOTE MODE CD) This switches the remote control operating mode...

Owner s Manual In English
Page 13
... mode switching button (MODE) This switches the playback mode. O SETUP button This displays the setting menu on the display. (v p. 44) P CLEAR button This clears the program registration. (v p. 31) Q REPEAT A-B button This sets A-B repeat playback. (v p. 30) R REPEAT button (L) Switches the repeat playback. 0 The amp and tuner can be operated with the amp operation buttons even when the remote control mode is CD. . M Q.REPLAY button Rewinding tracks slightly to listen again. (v p. 32) N ENTER button This determines the selection. Front panel Display Rear panel 13 Remote Index...
... mode switching button (MODE) This switches the playback mode. O SETUP button This displays the setting menu on the display. (v p. 44) P CLEAR button This clears the program registration. (v p. 31) Q REPEAT A-B button This sets A-B repeat playback. (v p. 30) R REPEAT button (L) Switches the repeat playback. 0 The amp and tuner can be operated with the amp operation buttons even when the remote control mode is CD. . M Q.REPLAY button Rewinding tracks slightly to listen again. (v p. 32) N ENTER button This determines the selection. Front panel Display Rear panel 13 Remote Index...

Owner s Manual In English
Page 15
... a Marantz network audio player, press the REMOTE MODE NET button to switch the remote control to the network audio player operation mode. 0 REMOTE MODE NET button lights for approximately two seconds. A POWER button (X) B Remote mode select button (REMOTE MODE NET) C System buttons 0 Skip buttons (8 / 9) 0 Stop button (2) 0 Play button (1) 0 Pause button (3) D Media mode select button (INPUT) E Information button (INFO) F TOP MENU button G Cursor buttons (uio p) H ADD TO FAVORITES button I Number buttons (0 - 9, +10) J DIMMER button K RANDOM button (P) . Front panel Display Rear panel...
... a Marantz network audio player, press the REMOTE MODE NET button to switch the remote control to the network audio player operation mode. 0 REMOTE MODE NET button lights for approximately two seconds. A POWER button (X) B Remote mode select button (REMOTE MODE NET) C System buttons 0 Skip buttons (8 / 9) 0 Stop button (2) 0 Play button (1) 0 Pause button (3) D Media mode select button (INPUT) E Information button (INFO) F TOP MENU button G Cursor buttons (uio p) H ADD TO FAVORITES button I Number buttons (0 - 9, +10) J DIMMER button K RANDOM button (P) . Front panel Display Rear panel...

Owner s Manual In English
Page 16
Front panel Display Rear panel 16 Remote Index Q6 Q7 Q8 . Contents Connections Playback Q2 Q3 Q4 Q5 Settings Tips L MODE button M CALL FAVORITES button N ENTER button O SETUP button P CLEAR button Q SEARCH button R REPEAT button (L) Appendix 0 The amp and tuner can be operated with the amp operation buttons even when the remote control mode is "NET". 0 When using it, also refer to the operating instructions of the other devices.
Front panel Display Rear panel 16 Remote Index Q6 Q7 Q8 . Contents Connections Playback Q2 Q3 Q4 Q5 Settings Tips L MODE button M CALL FAVORITES button N ENTER button O SETUP button P CLEAR button Q SEARCH button R REPEAT button (L) Appendix 0 The amp and tuner can be operated with the amp operation buttons even when the remote control mode is "NET". 0 When using it, also refer to the operating instructions of the other devices.

Owner s Manual In English
Page 17
... Connecting to a stereo audio amplifier 18 Connecting to a device with digital audio input connectors 19 Connecting an iPod or USB memory device to connect. Audio cable (supplied) L L R R Remote connector cable (supplied) .... Doing so can result in the power cord until all connections have been completed. 0 Do not bundle power cords together with connection cables. Optical cable (Sold separately) Coaxial digital cable (Sold separately) Front panel Display Rear panel 17 Remote Index Settings Tips Appendix o Cables used for connections Provide necessary cables...
... Connecting to a stereo audio amplifier 18 Connecting to a device with digital audio input connectors 19 Connecting an iPod or USB memory device to connect. Audio cable (supplied) L L R R Remote connector cable (supplied) .... Doing so can result in the power cord until all connections have been completed. 0 Do not bundle power cords together with connection cables. Optical cable (Sold separately) Coaxial digital cable (Sold separately) Front panel Display Rear panel 17 Remote Index Settings Tips Appendix o Cables used for connections Provide necessary cables...

Owner s Manual In English
Page 22
... panel Display Rear panel 22 Remote Index Contents Connections Playback Settings Tips Appendix Connecting devices with remote control connectors When you use this unit to REMOTE CONTROL OUT connector of the amplifier. Next, configure the "Connection" and "Setting". Amplifier . Remote connector cable (supplied) Signal flow Set to "EXTERNAL". 0 To use this unit connected to a Marantz amplifier, this unit. 0 To operate the unit, point the remote control at the remote sensor of this unit by itself without connecting an amplifier, turn the switch to connect...
... panel Display Rear panel 22 Remote Index Contents Connections Playback Settings Tips Appendix Connecting devices with remote control connectors When you use this unit to REMOTE CONTROL OUT connector of the amplifier. Next, configure the "Connection" and "Setting". Amplifier . Remote connector cable (supplied) Signal flow Set to "EXTERNAL". 0 To use this unit connected to a Marantz amplifier, this unit. 0 To operate the unit, point the remote control at the remote sensor of this unit by itself without connecting an amplifier, turn the switch to connect...

Owner s Manual In English
Page 43
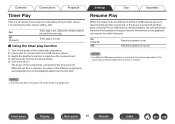
... when Q.REPLAY is turned off . Page 45 45 46 46 47 47 Front panel Display Rear panel 43 Remote Index Timer Play This unit can perform timer play by cooperating with your preferences. Auto Standby Sets whether to automatically switch the unit to the standby mode when the unit remains in the stop mode for more than 30 minutes. Digital Out Switched the digital audio output on/off and then...
... when Q.REPLAY is turned off . Page 45 45 46 46 47 47 Front panel Display Rear panel 43 Remote Index Timer Play This unit can perform timer play by cooperating with your preferences. Auto Standby Sets whether to automatically switch the unit to the standby mode when the unit remains in the stop mode for more than 30 minutes. Digital Out Switched the digital audio output on/off and then...

Owner s Manual In English
Page 45
... panel Display Rear panel 45 Remote Index Set this according to the impedance of the headphone amplifier to "MIDDLE". Set the gain of the connected headphones. On (Default): Off: Use the digital audio output connector. Do not use the digital audio output connector. It is recommended that this setting while listening to "LOW". NOTE 0 The headphone volume varies depending on the "HIGH" side if they have low impedance and on the "H/P AMP GAIN" setting. Settings Tips Appendix Digital...
... panel Display Rear panel 45 Remote Index Set this according to the impedance of the headphone amplifier to "MIDDLE". Set the gain of the connected headphones. On (Default): Off: Use the digital audio output connector. Do not use the digital audio output connector. It is recommended that this setting while listening to "LOW". NOTE 0 The headphone volume varies depending on the "HIGH" side if they have low impedance and on the "H/P AMP GAIN" setting. Settings Tips Appendix Digital...
Owner s Manual In English
Page 46
... power is turned off . Turn on and playback starts from the first track. On (Default): Off: Resume playback is set . Front panel Display Rear panel 46 Remote Index Contents Connections Playback Timer Play This unit can resume from after that point. Switch the amplifier's function to the timer turns off and then back on . Select the media mode to be used for the desired times. 5. o Using the timer play . Load a disc or connect an iPod...
... power is turned off . Turn on and playback starts from the first track. On (Default): Off: Resume playback is set . Front panel Display Rear panel 46 Remote Index Contents Connections Playback Timer Play This unit can resume from after that point. Switch the amplifier's function to the timer turns off and then back on . Select the media mode to be used for the desired times. 5. o Using the timer play . Load a disc or connect an iPod...

Owner s Manual In English
Page 49
... to use this unit's remote control to operate a Marantz network audio player 0 Press the REMOTE MODE NET button on a CD 0 Select the tracks that you want to skip in delete program playback mode. (v p. 31) I want to repeatedly listen to a specific section 0 Set A-B repeat playback. (v p. 30) I want to playback just the specified folder 0 The MODE button to set the playback range to "Folder". (v p. 41) I want to stop the iPod or USB...
... to use this unit's remote control to operate a Marantz network audio player 0 Press the REMOTE MODE NET button on a CD 0 Select the tracks that you want to skip in delete program playback mode. (v p. 31) I want to repeatedly listen to a specific section 0 Set A-B repeat playback. (v p. 30) I want to playback just the specified folder 0 The MODE button to set the playback range to "Folder". (v p. 41) I want to stop the iPod or USB...

Owner s Manual In English
Page 51
... than off . 0 Press the DIMMER button, and change the setting to "INTERNAL". o Display on this unit shows nothing Symptom Cause / Solution Display is exposed to strong light (direct sunlight, inverter type fluorescent bulb light, etc.). In this case, adjust the direction of this unit. 0 Press the REMOTE MODE CD button to switch the remote control operating mode to "CD". 0 When using a 3D video device, the remote control unit of this unit may...
... than off . 0 Press the DIMMER button, and change the setting to "INTERNAL". o Display on this unit shows nothing Symptom Cause / Solution Display is exposed to strong light (direct sunlight, inverter type fluorescent bulb light, etc.). In this case, adjust the direction of this unit. 0 Press the REMOTE MODE CD button to switch the remote control operating mode to "CD". 0 When using a 3D video device, the remote control unit of this unit may...

Owner s Manual In English
Page 53
... the play button is pressed, or cannot correctly play back a specific part of poor quality. " No Disc" is displayed. 0 " No Disc" is displayed if the disc is loaded upside-down or if no disc is loaded. Page 60 55 - 56 59 59 Page 20 - Front panel Display Rear panel 53 Remote Index Use a finalized disc. 0 This may be caused by using a USB cable other than the genuine cable, iPod may...
... the play button is pressed, or cannot correctly play back a specific part of poor quality. " No Disc" is displayed. 0 " No Disc" is displayed if the disc is loaded upside-down or if no disc is loaded. Page 60 55 - 56 59 59 Page 20 - Front panel Display Rear panel 53 Remote Index Use a finalized disc. 0 This may be caused by using a USB cable other than the genuine cable, iPod may...

Owner s Manual In English
Page 59
... periods of time, the surface of where labels have been repaired with adhesive, etc. 0 Do not use discs on which there are traces of the optical pickup may damage the player. 0 Do not push the disc tray in a room full of smoke from receiving signals properly. Front panel Display Rear panel 59 Remote Index Contents Connections Playback Cautions on which the sticky part of cellophane tape or...
... periods of time, the surface of where labels have been repaired with adhesive, etc. 0 Do not use discs on which there are traces of the optical pickup may damage the player. 0 Do not push the disc tray in a room full of smoke from receiving signals properly. Front panel Display Rear panel 59 Remote Index Contents Connections Playback Cautions on which the sticky part of cellophane tape or...
Product information Sheet
Page 1
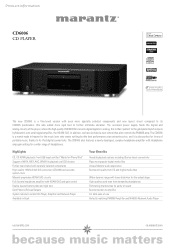
..., complex headphone amplifier with Headphone amp gain setting for purity of sound Best connection to amplifier For total ease-of-use Perfectly matching PM6006 Amplifier and NA6005 Network Audio Player us.marantz.com ca.marantz.com Highlights CD, CD-R/RW playback, Front USB input certified "Made for iPhone/iPod" Support of WAV, MP3, AAC, WMA file playback via USB devices Further sound tuned with carefully selected components High quality 192kHz...
..., complex headphone amplifier with Headphone amp gain setting for purity of sound Best connection to amplifier For total ease-of-use Perfectly matching PM6006 Amplifier and NA6005 Network Audio Player us.marantz.com ca.marantz.com Highlights CD, CD-R/RW playback, Front USB input certified "Made for iPhone/iPod" Support of WAV, MP3, AAC, WMA file playback via USB devices Further sound tuned with carefully selected components High quality 192kHz...

Product information Sheet
Page 2
... color: Black Metal Front Panel Remote Control Power Consumption Standby Consumption Auto power off Headphone Buffer OTHER Separated rectifier circuit for analog and digital Display: Dimmer / Off PLAYBACK Program Play (CD) Repeat Random Play INPUTS / OUTPUTS Analog Out (Cinch) Digital Optical Out Digital Coaxial Out Gold Plated Cinch D-Bus Headphone Out Headphone Volume Control SPECIFICATIONS D/A Conversion DAC IC Digital Filter Noise Shaper Low Pass Filter stage Output Buffer Headphone amp CDDA AUDIO Frequency Response Dynamic Range Signal to change by Marantz without notice.
... color: Black Metal Front Panel Remote Control Power Consumption Standby Consumption Auto power off Headphone Buffer OTHER Separated rectifier circuit for analog and digital Display: Dimmer / Off PLAYBACK Program Play (CD) Repeat Random Play INPUTS / OUTPUTS Analog Out (Cinch) Digital Optical Out Digital Coaxial Out Gold Plated Cinch D-Bus Headphone Out Headphone Volume Control SPECIFICATIONS D/A Conversion DAC IC Digital Filter Noise Shaper Low Pass Filter stage Output Buffer Headphone amp CDDA AUDIO Frequency Response Dynamic Range Signal to change by Marantz without notice.

