
Owners Manual
Page 4
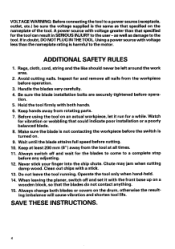
... the user-as well as that specified on the drum, otherwise the resulting imbalance will cause vibration and shorten t o o l life. When leaving the planer, switch off and wait for and remove all nails from the tool at all times. 11. A power source with a stick. 13. Handle the... both hands. 6. Avoid cutting nails. Always switch off and set it run for vibration or wobbling that could indicate poor installation or a poorly balanced blade. 8. Using a power sourcewith voltage lessthan the nameplate rating is turned on an actual workpiece, let it with the front base up on a wooden ...
... the user-as well as that specified on the drum, otherwise the resulting imbalance will cause vibration and shorten t o o l life. When leaving the planer, switch off and wait for and remove all nails from the tool at all times. 11. A power source with a stick. 13. Handle the... both hands. 6. Avoid cutting nails. Always switch off and set it run for vibration or wobbling that could indicate poor installation or a poorly balanced blade. 8. Using a power sourcewith voltage lessthan the nameplate rating is turned on an actual workpiece, let it with the front base up on a wooden ...
Owners Manual
Page 5
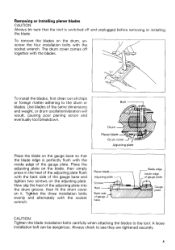
... is perfectly flush with the socket wrench. Now slip the heel of the gauge plate. Always check to the drum or blades. I Adjustingplate I Drum Planer blac Drum Adjusting plate Place the blade on the drum, unscrew the four installation bolts with the inside edge of the adjusting plate into the drum groove, then...
... is perfectly flush with the socket wrench. Now slip the heel of the gauge plate. Always check to the drum or blades. I Adjustingplate I Drum Planer blac Drum Adjusting plate Place the blade on the drum, unscrew the four installation bolts with the inside edge of the adjusting plate into the drum groove, then...
Owners Manual
Page 7
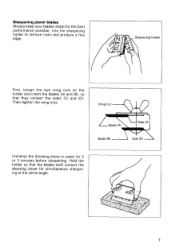
Sharpening planer blades Always keep your blades sharp for 2 or 3 minutes before sharpening. Wing nut Blade (A) Blade (6) Immerse the dressing stone in water for the best performance possible. Then tighten the wing nuts. Hold the holder so that they contact the sides (C) and (D). Sharpening holder First, loosen the two wing nuts on the holder and insert the blades (A) and (B), so that the blades both contact the dressing stone for simultaneous sharpening at the same angle. Use the sharpening holder to remove nicks and produce a fine edge. Side (C)
Sharpening planer blades Always keep your blades sharp for 2 or 3 minutes before sharpening. Wing nut Blade (A) Blade (6) Immerse the dressing stone in water for the best performance possible. Then tighten the wing nuts. Hold the holder so that they contact the sides (C) and (D). Sharpening holder First, loosen the two wing nuts on the holder and insert the blades (A) and (B), so that the blades both contact the dressing stone for simultaneous sharpening at the same angle. Use the sharpening holder to remove nicks and produce a fine edge. Side (C)
Owners Manual
Page 9
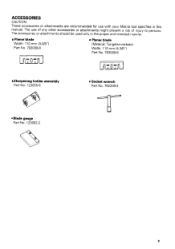
ACCESSORIES CAUTION These accessories or attachments are recommended for use with your Makita tool specified in this manual The use of any other accessories or attachments might present a risk of injury to persons The accessories or attachments should be used only in the proper and intended manner Planer blade Width 110 mm (4-3/8") Part No 793008-8 Planer blade (Material Tungsten-carbide) Width 110 m m (4-3/8") Part No 7930096 Sharpening holder assembly Part No. 123055-9 Socket wrench Part No. 782209-3 *Blade gauge Part No. 123062-2 9
ACCESSORIES CAUTION These accessories or attachments are recommended for use with your Makita tool specified in this manual The use of any other accessories or attachments might present a risk of injury to persons The accessories or attachments should be used only in the proper and intended manner Planer blade Width 110 mm (4-3/8") Part No 793008-8 Planer blade (Material Tungsten-carbide) Width 110 m m (4-3/8") Part No 7930096 Sharpening holder assembly Part No. 123055-9 Socket wrench Part No. 782209-3 *Blade gauge Part No. 123062-2 9
Owners Manual
Page 11
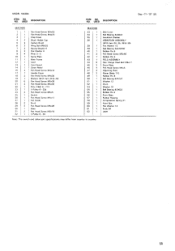
MODEL 1002BA ,&, DESCRIPTION O";'M EDDESCRIPTION Sep.-11-'97 US _ MA_ CHI_ NE 1 1 2 1 3 1 4 2 5 2 6 2 7 2 6 2 9 4 10 1 11 1 12 1 13 1 14 1 15 2 17 1 18 3 19 1 20 6 21 2 22 1 23 1 24 2 25 1 26 1 ... Bearing 6ZOlDDW Rubber Pin 6 Pan Head Screw M5x65 Rubber Pin 4 FIELD ASSEMBLY Hex Flange Head Bolt M6x17 Drum Plate Pan Head Screw M4x5 Adjusting Plate Planer Blade 11 0 Rubber Pm 6 Ball Bearing 620122 Washer 12 Drum Washer 10 Ball Bearing 620022 Rubber Pin 4 Front Base Rubber Packmg Compression Spring 21 Front Box...
MODEL 1002BA ,&, DESCRIPTION O";'M EDDESCRIPTION Sep.-11-'97 US _ MA_ CHI_ NE 1 1 2 1 3 1 4 2 5 2 6 2 7 2 6 2 9 4 10 1 11 1 12 1 13 1 14 1 15 2 17 1 18 3 19 1 20 6 21 2 22 1 23 1 24 2 25 1 26 1 ... Bearing 6ZOlDDW Rubber Pin 6 Pan Head Screw M5x65 Rubber Pin 4 FIELD ASSEMBLY Hex Flange Head Bolt M6x17 Drum Plate Pan Head Screw M4x5 Adjusting Plate Planer Blade 11 0 Rubber Pm 6 Ball Bearing 620122 Washer 12 Drum Washer 10 Ball Bearing 620022 Rubber Pin 4 Front Base Rubber Packmg Compression Spring 21 Front Box...
Parts Breakdown
Page 2
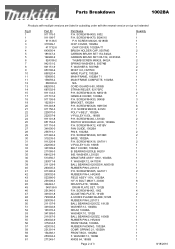
..., 1902 ADJUSTING PLATE, 1912B 4-3/8HSS PLANER BLADE,1912B RUBBER PIN 6,LS1013 BALL BEARING 6201ZZ, 1912B WASHER 12, 1002BA DRUM, 1002BA WASHER 10, 1912B BALL BEARING 6200ZZ, 1806B RUBBER PIN 4, HR2400 FRONT BASE, 1002BA RUBBER PACKING, 1002BA COMP. SCREW M4X12, 4301BV FAN GUIDE, 1002BA PIN 6, 1002BA P.H. WASHER, LS1020 ARMATURE ASS'Y 100V, 1002BA F. SCREW M4X30, 9045B BRACKET, 1002BA P.H. WASHER 12, 8411DW BALL...
..., 1902 ADJUSTING PLATE, 1912B 4-3/8HSS PLANER BLADE,1912B RUBBER PIN 6,LS1013 BALL BEARING 6201ZZ, 1912B WASHER 12, 1002BA DRUM, 1002BA WASHER 10, 1912B BALL BEARING 6200ZZ, 1806B RUBBER PIN 4, HR2400 FRONT BASE, 1002BA RUBBER PACKING, 1002BA COMP. SCREW M4X12, 4301BV FAN GUIDE, 1002BA PIN 6, 1002BA P.H. WASHER, LS1020 ARMATURE ASS'Y 100V, 1002BA F. SCREW M4X30, 9045B BRACKET, 1002BA P.H. WASHER 12, 8411DW BALL...


