

User manual, English (US)
Page 2
... DO NOT OPEN CAUTION: TO REDUCE THE RISK OF ELECTRIC SHOCK, DO NOT REMOVE COVER (OR BACK). Know these important benefits. So please mail it to protection by one of the best-built, best-backed products available today. Once your MAGNAVOX purchase is...operating and maintenance problems. WARNING: TO PREVENT FIRE OR SHOCK HAZARD, DO NOT EXPOSE THIS EQUIPMENT TO RAIN OR MOISTURE. CAUTION: To prevent electric shock, match wide blade of plug to your total satisfaction. Lawrence J. NO USER-SERVICEABLE PARTS INSIDE. Retain this is registered, you're eligible to receive...
... DO NOT OPEN CAUTION: TO REDUCE THE RISK OF ELECTRIC SHOCK, DO NOT REMOVE COVER (OR BACK). Know these important benefits. So please mail it to protection by one of the best-built, best-backed products available today. Once your MAGNAVOX purchase is...operating and maintenance problems. WARNING: TO PREVENT FIRE OR SHOCK HAZARD, DO NOT EXPOSE THIS EQUIPMENT TO RAIN OR MOISTURE. CAUTION: To prevent electric shock, match wide blade of plug to your total satisfaction. Lawrence J. NO USER-SERVICEABLE PARTS INSIDE. Retain this is registered, you're eligible to receive...

User manual, English (US)
Page 3
... 18 DVD Receiver System Menu Options System Menu 19 TV Display 20 Angle Mark, OSD Language 21 Video Out 22 Screen Saver, Speaker Delay 23 Test Tone, Digital Out 24 Dual Mono, Dynamic 25 TV Type (NTSC/PAL), Language Options 26 Parental Controls 27 Password 28 Defaults 29 Title, Angle 30 Zoom, Goto 31 Repeat, Repeat A-B 32 CD Features, Programming 33 Playback Control (PBC), Audio Channels 34 Audio and Surround Sound Options Sound...
... 18 DVD Receiver System Menu Options System Menu 19 TV Display 20 Angle Mark, OSD Language 21 Video Out 22 Screen Saver, Speaker Delay 23 Test Tone, Digital Out 24 Dual Mono, Dynamic 25 TV Type (NTSC/PAL), Language Options 26 Parental Controls 27 Password 28 Defaults 29 Title, Angle 30 Zoom, Goto 31 Repeat, Repeat A-B 32 CD Features, Programming 33 Playback Control (PBC), Audio Channels 34 Audio and Surround Sound Options Sound...

User manual, English (US)
Page 4
... sources such as power-supply cord or plug is intended for replacement of procedures other than the other limited viewing uses only unless otherwise authorized by the manufacturer. 12. aligned as set complies with the FCC-Rules, Part 15 and with dry cloth. 7. Federal Communications Commission (FCC) The set out in hazardous radiation exposure or other rights owners. CAUTION Use of controls or adjustments...
... sources such as power-supply cord or plug is intended for replacement of procedures other than the other limited viewing uses only unless otherwise authorized by the manufacturer. 12. aligned as set complies with the FCC-Rules, Part 15 and with dry cloth. 7. Federal Communications Commission (FCC) The set out in hazardous radiation exposure or other rights owners. CAUTION Use of controls or adjustments...

User manual, English (US)
Page 5
... Contents ● Remote Control and two (2) AA batteries ● Audio and Video (Composite) cables ● Five speakers, including speaker wires ● Subwoofer, including connection cable and power cable ● AM loop antenna and FM wire antenna ● Owner's manual, Quick-Use Guide and product registra- Do not wipe the Disc in order to avoid getting dust on this Home Cinema System. Always keep the disc tray closed to a region of this DVD Receiver. You cannot play a Disc. Maintenance and Cleaning...
... Contents ● Remote Control and two (2) AA batteries ● Audio and Video (Composite) cables ● Five speakers, including speaker wires ● Subwoofer, including connection cable and power cable ● AM loop antenna and FM wire antenna ● Owner's manual, Quick-Use Guide and product registra- Do not wipe the Disc in order to avoid getting dust on this Home Cinema System. Always keep the disc tray closed to a region of this DVD Receiver. You cannot play a Disc. Maintenance and Cleaning...

User manual, English (US)
Page 6
... available on page 34. SOURCE 1 2 3 SLEEP 4 5 6 7 8 9 >10 0 VOL MUTE SELECT DISPLAY MENU SET UP OK OPEN/ CLOSE I PREV REW PLAY/PAUSE STOP NEXT I FF TITLE ANGLE ZOOM GOTO LANGUAGE SUBTITLE N/P DIM REPEAT A/B SHUFFLE PROGRAM DISC SKIP DISC NO SLOW/MEM CD MODE ST/MONO LISTENING AUDIO MAGNOVOX Standby or Power y Button Press to turn the DVD Receiver on page 35. 9 8 ; : Buttons Press to access or remove a DVD Disc Menu (remote must be in random...
... available on page 34. SOURCE 1 2 3 SLEEP 4 5 6 7 8 9 >10 0 VOL MUTE SELECT DISPLAY MENU SET UP OK OPEN/ CLOSE I PREV REW PLAY/PAUSE STOP NEXT I FF TITLE ANGLE ZOOM GOTO LANGUAGE SUBTITLE N/P DIM REPEAT A/B SHUFFLE PROGRAM DISC SKIP DISC NO SLOW/MEM CD MODE ST/MONO LISTENING AUDIO MAGNOVOX Standby or Power y Button Press to turn the DVD Receiver on page 35. 9 8 ; : Buttons Press to access or remove a DVD Disc Menu (remote must be in random...

User manual, English (US)
Page 7
... Button Press to select a different camera angle. ANGLE Button: Press to turn off . Press to a radio station. In TUNER Mode, press to tune to tune the radio in the disc playback. Details are on page 33. Press to select a sound source for the DVD Receiver's display panel. DISC NO. Details are on page 21. Details are on page 31. Remote Control, cont'd 7 SOURCE 1 2 3 SLEEP 4 5 6 7 8 9 >10 0 VOL MUTE SELECT DISPLAY MENU SET UP OK OPEN/ CLOSE I PREV REW PLAY/PAUSE...
... Button Press to select a different camera angle. ANGLE Button: Press to turn off . Press to a radio station. In TUNER Mode, press to tune to tune the radio in the disc playback. Details are on page 33. Press to select a sound source for the DVD Receiver's display panel. DISC NO. Details are on page 21. Details are on page 31. Remote Control, cont'd 7 SOURCE 1 2 3 SLEEP 4 5 6 7 8 9 >10 0 VOL MUTE SELECT DISPLAY MENU SET UP OK OPEN/ CLOSE I PREV REW PLAY/PAUSE...

User manual, English (US)
Page 8
..., make adjustments. TV•AUX Button Press to select TV or AUX mode, MUTE Button Press to stop Disc playback. or temporarily interrupt playback. DVD VIDEO DIGITAL SURROUND SYSTEM Power ON-OFF STANDBY ON iR Sensor DISC 1 DISC 2 DISC 3 DISC 4 DISC 5 5 DISC DIRECT PLAY OPEN¥CLOSE STOP DVD/CD TUNER•BAND TV/AUX MUTE SELECT PREVIOUS NEXT PLAY•PAUSE Display Screen Information about the current activity of the DVD Receiver appears here. VOLUME 5 DVD CHANGER STOP 7 Button Press to mute playback sound.. In TUNER mode, press...
..., make adjustments. TV•AUX Button Press to select TV or AUX mode, MUTE Button Press to stop Disc playback. or temporarily interrupt playback. DVD VIDEO DIGITAL SURROUND SYSTEM Power ON-OFF STANDBY ON iR Sensor DISC 1 DISC 2 DISC 3 DISC 4 DISC 5 5 DISC DIRECT PLAY OPEN¥CLOSE STOP DVD/CD TUNER•BAND TV/AUX MUTE SELECT PREVIOUS NEXT PLAY•PAUSE Display Screen Information about the current activity of the DVD Receiver appears here. VOLUME 5 DVD CHANGER STOP 7 Button Press to mute playback sound.. In TUNER mode, press...

User manual, English (US)
Page 10
...; 4 Connect the speakers and Subwoofer to the DVD Receiver as detailed below. 3 Connect the DVD Receiver to a Television using one video connection between the DVD Receiver and the TV. See your electronics retailer or contact Magnavox for area stations. markings on your TV only has a single Antenna In(put) jack, you have a button or switch that chooses different Video modes. Use the best connection available with equipment connected to a power outlet. 2 Put the batteries in the remote control...
...; 4 Connect the speakers and Subwoofer to the DVD Receiver as detailed below. 3 Connect the DVD Receiver to a Television using one video connection between the DVD Receiver and the TV. See your electronics retailer or contact Magnavox for area stations. markings on your TV only has a single Antenna In(put) jack, you have a button or switch that chooses different Video modes. Use the best connection available with equipment connected to a power outlet. 2 Put the batteries in the remote control...

User manual, English (US)
Page 12
Match the cable colors to the jack colors. 2 To hear TV channels through the DVD Home Cinema System, connect the supplied red and white audio cables to the DVD Receiver's red/white, right/left (TV) AUDIO IN jacks and to a TV with Component Video In Jacks 2 FR FL C SR SL SPEAKERS (8‰) CENTER LINE OUT WOOFER LINE OUT AUDIO OUT AUDIO IN VIDEO OUT L AM/FM ANTENA R AM TV AUX S- BluePb/Cb; You will disappear. 6 Set VIDEO OUT...
Match the cable colors to the jack colors. 2 To hear TV channels through the DVD Home Cinema System, connect the supplied red and white audio cables to the DVD Receiver's red/white, right/left (TV) AUDIO IN jacks and to a TV with Component Video In Jacks 2 FR FL C SR SL SPEAKERS (8‰) CENTER LINE OUT WOOFER LINE OUT AUDIO OUT AUDIO IN VIDEO OUT L AM/FM ANTENA R AM TV AUX S- BluePb/Cb; You will disappear. 6 Set VIDEO OUT...

User manual, English (US)
Page 13
... SPEAKERS (8‰) CENTER LINE OUT WOOFER LINE OUT AUDIO OUT AUDIO IN VIDEO OUT L AM/FM ANTENA R AM TV AUX S- Helpful Hints • You only need an S-Video cable (not supplied). 2 To hear TV channels through the DVD Home Cinema System, connect the supplied red and white audio cables to the DVD Receiver's red/white, right/left AUDIO IN jacks and to adjust the VIDEO OUT setting. VIDEO OUT FM (75‰) 3 Pr/Cr Pb/Cb Y COAXIAL OPTICAL COMPONENT VIDEO OUT DIGITAL...
... SPEAKERS (8‰) CENTER LINE OUT WOOFER LINE OUT AUDIO OUT AUDIO IN VIDEO OUT L AM/FM ANTENA R AM TV AUX S- Helpful Hints • You only need an S-Video cable (not supplied). 2 To hear TV channels through the DVD Home Cinema System, connect the supplied red and white audio cables to the DVD Receiver's red/white, right/left AUDIO IN jacks and to adjust the VIDEO OUT setting. VIDEO OUT FM (75‰) 3 Pr/Cr Pb/Cb Y COAXIAL OPTICAL COMPONENT VIDEO OUT DIGITAL...
User manual, English (US)
Page 14
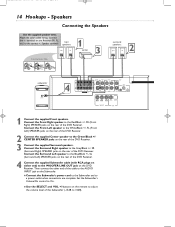
... (Surround Right) SPEAKER jacks on the rear of the DVD Receiver. 4 Connect the supplied Subwoofer cable (with RCA plugs on the DVD Receiver. Speaker terminals. Set the Subwoofer's Volume/On control to On. ● Use the SELECT and VOL +/-buttons on the remote to adjust the volume level of the cable to the AUDIO INPUT jack on the Subwoofer. ● Connect the Subwoofer's power cord to the Subwoofer and to the WOOFER LINE OUT jack on either end) to a power outlet when connections are complete. Speakers Connecting the Speakers Use the supplied speaker wires...
... (Surround Right) SPEAKER jacks on the rear of the DVD Receiver. 4 Connect the supplied Subwoofer cable (with RCA plugs on the DVD Receiver. Speaker terminals. Set the Subwoofer's Volume/On control to On. ● Use the SELECT and VOL +/-buttons on the remote to adjust the volume level of the cable to the AUDIO INPUT jack on the Subwoofer. ● Connect the Subwoofer's power cord to the Subwoofer and to the WOOFER LINE OUT jack on either end) to a power outlet when connections are complete. Speakers Connecting the Speakers Use the supplied speaker wires...

User manual, English (US)
Page 15
... the DVD Receiver. Helpful Hints • If you to make analog Stereo (two channel, right and left) recordings. 3 Or, connect either of the other sound features. VIDEO OUT FM (75‰) Pr/Cr Pb/Cb Y COAXIAL OPTICAL COMPONENT VIDEO OUT DIGITAL OUT Rear of TV (example only) 1 S-Video Cable FR FL C SR SL SPEAKERS (8‰) CENTER LINE OUT WOOFER LINE OUT AUDIO OUT AUDIO IN VIDEO OUT L AM/FM ANTENA R AM TV AUX S-
... the DVD Receiver. Helpful Hints • If you to make analog Stereo (two channel, right and left) recordings. 3 Or, connect either of the other sound features. VIDEO OUT FM (75‰) Pr/Cr Pb/Cb Y COAXIAL OPTICAL COMPONENT VIDEO OUT DIGITAL OUT Rear of TV (example only) 1 S-Video Cable FR FL C SR SL SPEAKERS (8‰) CENTER LINE OUT WOOFER LINE OUT AUDIO OUT AUDIO IN VIDEO OUT L AM/FM ANTENA R AM TV AUX S-
User manual, English (US)
Page 16
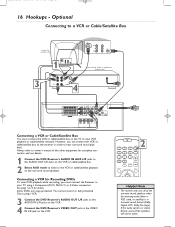
... dub protected Discs using a VCR. 3 Connect the DVD Receiver's AUDIO OUT L/R jacks to the AUDIO IN L/R jacks on the VCR. mrd250book 2/14/03 10:49 AM Page 16 16 Hookups - If the audio signal is in stereo format, some of the surround sound speakers when the incoming audio (from a VCR, cable, or satellite) is in order to view VCR playback or cable/satellite channels. Connecting a VCR for details. SOURCE 2 1 2 3 SLEEP 4 5 6 7 8 9 >10 0 VOL MUTE SELECT DISPLAY MENU OK Helpful Hints...
... dub protected Discs using a VCR. 3 Connect the DVD Receiver's AUDIO OUT L/R jacks to the AUDIO IN L/R jacks on the VCR. mrd250book 2/14/03 10:49 AM Page 16 16 Hookups - If the audio signal is in stereo format, some of the surround sound speakers when the incoming audio (from a VCR, cable, or satellite) is in order to view VCR playback or cable/satellite channels. Connecting a VCR for details. SOURCE 2 1 2 3 SLEEP 4 5 6 7 8 9 >10 0 VOL MUTE SELECT DISPLAY MENU OK Helpful Hints...

User manual, English (US)
Page 17
.... DVD Disc Menus DVD Disc Menus vary among DVDs. Otherwise, the general DVD Disc Menu will show the selected source (TV/AV, AUX, AM/FM, etc.). ● Press DIM on the remote to adjust the brightness of the DVD Receiver's display panel. 3 Turn on the front of the side you to select an item, then press OK. Load your TV and set it by Parental Control, you want to play Discs that have a region code...
.... DVD Disc Menus DVD Disc Menus vary among DVDs. Otherwise, the general DVD Disc Menu will show the selected source (TV/AV, AUX, AM/FM, etc.). ● Press DIM on the remote to adjust the brightness of the DVD Receiver's display panel. 3 Turn on the front of the side you to select an item, then press OK. Load your TV and set it by Parental Control, you want to play Discs that have a region code...

User manual, English (US)
Page 18
... DVD Receiver or Remote Control. SOURCE 1 2 3 SLEEP 4 5 6 7 8 9 >10 0 VOL MUTE SELECT DISPLAY MENU SET UP OK OPEN/ CLOSE I PREV REW PLAY/PAUSE STOP NEXT I FF TITLE ANGLE ZOOM GOTO LANGUAGE SUBTITLE N/P DIM REPEAT A/B SHUFFLE PROGRAM DISC SKIP DISC NO SLOW/MEM CD MODE ST/MONO LISTENING AUDIO MAGNOVOX Helpful Hints • During Repeat playback, pressing H or G will replay the same Track or Chapter. • Opening the disc tray or turning...
... DVD Receiver or Remote Control. SOURCE 1 2 3 SLEEP 4 5 6 7 8 9 >10 0 VOL MUTE SELECT DISPLAY MENU SET UP OK OPEN/ CLOSE I PREV REW PLAY/PAUSE STOP NEXT I FF TITLE ANGLE ZOOM GOTO LANGUAGE SUBTITLE N/P DIM REPEAT A/B SHUFFLE PROGRAM DISC SKIP DISC NO SLOW/MEM CD MODE ST/MONO LISTENING AUDIO MAGNOVOX Helpful Hints • During Repeat playback, pressing H or G will replay the same Track or Chapter. • Opening the disc tray or turning...

User manual, English (US)
Page 20
... the DVD Disc menu. This looks like the picture you to change the Audio or Subtitle language in a theater. SOURCE 1 2 3 SLEEP 4 5 6 7 8 9 >10 0 VOL MUTE SELECT DISPLAY MENU 1,5 SETUP OK 2-4 OPEN/ CLOSE I PREV REW PLAY/PAUSE STOP NEXT I FF TITLE ANGLE ZOOM GOTO LANGUAGE SUBTITLE N/P DIM Pan & Scan Letterbox SETUP MENU -- MAIN PAGE GENERAL SETUP SPEAKER SETUP AUDIO SETUP -- This setting is recorded in the letterbox or widescreen format. GENERAL PAGE -- Refer to the DVD's Disc menu...
... the DVD Disc menu. This looks like the picture you to change the Audio or Subtitle language in a theater. SOURCE 1 2 3 SLEEP 4 5 6 7 8 9 >10 0 VOL MUTE SELECT DISPLAY MENU 1,5 SETUP OK 2-4 OPEN/ CLOSE I PREV REW PLAY/PAUSE STOP NEXT I FF TITLE ANGLE ZOOM GOTO LANGUAGE SUBTITLE N/P DIM Pan & Scan Letterbox SETUP MENU -- MAIN PAGE GENERAL SETUP SPEAKER SETUP AUDIO SETUP -- This setting is recorded in the letterbox or widescreen format. GENERAL PAGE -- Refer to the DVD's Disc menu...
User manual, English (US)
Page 35
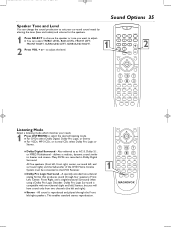
... right, center, surround left, and surround right) and the Subwoofer of the DVD Home Cinema System must be connected to select the desired listening mode. ● For DVDs select Dobly Digital, Dolby Pro Logic, or Stereo ● For VCDs, MP-3 CDs, or normal CDs select Dolby Pro Logic or Stereo. ● Dolby Digital Surround - DISPLAY MENU SET UP OK OPEN/ CLOSE PREV REW PLAY/PAUSE STOP NEXT I Listening Mode Select a listening mode which matches your surround sound needs by altering the tone (bass and...
... right, center, surround left, and surround right) and the Subwoofer of the DVD Home Cinema System must be connected to select the desired listening mode. ● For DVDs select Dobly Digital, Dolby Pro Logic, or Stereo ● For VCDs, MP-3 CDs, or normal CDs select Dolby Pro Logic or Stereo. ● Dolby Digital Surround - DISPLAY MENU SET UP OK OPEN/ CLOSE PREV REW PLAY/PAUSE STOP NEXT I Listening Mode Select a listening mode which matches your surround sound needs by altering the tone (bass and...

User manual, English (US)
Page 39
... the DVD Disc Menu, if available, and adjust as such and are on page 35. • Adjust the volume. Or, change channels down until you see the DVD screen on the DVD Receiver's remote control to choose the equipment that you connected the DVD Receiver's power cord to play Discs again. Press TV/AV, DISC, TUNER, or AUX on the TV. • You only need one video connection between the DVD Receiver and the remote. Details are on the TV remote control...
... the DVD Disc Menu, if available, and adjust as such and are on page 35. • Adjust the volume. Or, change channels down until you see the DVD screen on the DVD Receiver's remote control to choose the equipment that you connected the DVD Receiver's power cord to play Discs again. Press TV/AV, DISC, TUNER, or AUX on the TV. • You only need one video connection between the DVD Receiver and the remote. Details are on the TV remote control...

User manual, English (US)
Page 40
... video to the correct frequency. If the Disc does not include a letterbox format , selecting Letterbox may not be available on the display panel. S-Video: Produces a clear picture by different companies. or REAR+/- It may cause interference. DTS: Digital Theater Systems. This is a surround sound system, but it for the best reception. • Connect an outdoor FM or AM antenna. • Turn off other side playing in a normal format.) OPTICAL Jack: Converts electrical signals...
... video to the correct frequency. If the Disc does not include a letterbox format , selecting Letterbox may not be available on the display panel. S-Video: Produces a clear picture by different companies. or REAR+/- It may cause interference. DTS: Digital Theater Systems. This is a surround sound system, but it for the best reception. • Connect an outdoor FM or AM antenna. • Turn off other side playing in a normal format.) OPTICAL Jack: Converts electrical signals...

User manual, English (US)
Page 42
...7 Programming Tracks 33 Radio Stations 37 Region Codes 5 Repeat Button 6, 32 S-Video 9, 13, 22, 40 Safety Information 4 Satellite Box 16 Screen Saver 23 Search Buttons 8 Searching 18 Select Button 6, 8 Setup Button 7 Shuffle Button 6, 33 Sleep Button 6, 38 Slow/Mem Button 6 Source Buttons 7 Speaker Settings 35 Speaker Delay 23 Speakers 9, 14 Specifications 41 ST/Mono Button 7, 38 Standby Button 6, 8 Standby LED indicator 8 Stop C Button 6, 8 Subtitle 7 Subtitle Language 26 Subwoofer 14 System Setup 19 Table of Contents 3 Test Tone 24 Title Button 6, 30 Tuner 37...
...7 Programming Tracks 33 Radio Stations 37 Region Codes 5 Repeat Button 6, 32 S-Video 9, 13, 22, 40 Safety Information 4 Satellite Box 16 Screen Saver 23 Search Buttons 8 Searching 18 Select Button 6, 8 Setup Button 7 Shuffle Button 6, 33 Sleep Button 6, 38 Slow/Mem Button 6 Source Buttons 7 Speaker Settings 35 Speaker Delay 23 Speakers 9, 14 Specifications 41 ST/Mono Button 7, 38 Standby Button 6, 8 Standby LED indicator 8 Stop C Button 6, 8 Subtitle 7 Subtitle Language 26 Subwoofer 14 System Setup 19 Table of Contents 3 Test Tone 24 Title Button 6, 30 Tuner 37...


