
User manual, English (US)
Page 6
Please observe the local regulations regarding the disposal of your DVD Player and enter below the Serial No. For Customer Use: Read carefully the information located at the rear of packaging materials, exhausted batteries and old ...length Output Power Beam divergence Semiconductor laser GaAlAs 650 nm (DVD) 780 nm (VCD/CD) 7 mW (DVD) 10 mW (VCD/CD) 60 degree 01-37 MDV460_US3 6 16/06/05, 9:45 AM MDV460/17_1 MDV460 Serial No Manufactured under license from Dolby Laboratories. Your DVD player consists of this copyright protection technology must be recycled and reused...
Please observe the local regulations regarding the disposal of your DVD Player and enter below the Serial No. For Customer Use: Read carefully the information located at the rear of packaging materials, exhausted batteries and old ...length Output Power Beam divergence Semiconductor laser GaAlAs 650 nm (DVD) 780 nm (VCD/CD) 7 mW (DVD) 10 mW (VCD/CD) 60 degree 01-37 MDV460_US3 6 16/06/05, 9:45 AM MDV460/17_1 MDV460 Serial No Manufactured under license from Dolby Laboratories. Your DVD player consists of this copyright protection technology must be recycled and reused...

User manual, English (US)
Page 7
... o la ejecucción de métodos que no sean los aquí descritos puede ocasionar peligro de exposición a radiación. 01-37 MDV460_US3 7 Due to complete. 'CONSUMERS SHOULD NOTE THAT NOT ALL HIGH DEFINITION TELEVISION SETS ARE FULLY COMPATIBLE WITH THIS PRODUCT AND MAY CAUSE ARTIFACTS TO... may require a playability enhancement or upgrade. IF THERE ARE QUESTIONS REGARDING OUR TV SET COMPATIBILITY WITH THIS MODEL 525p AND 625p DVD PLAYER, PLEASE CONTACT OUR CUSTOMER SERVICE CENTER.' 7 16/06/05, 9:45 AMMDV460/17_1 IN CASE OF 525 OR 625 PROGRESSIVE SCAN PICTURE PROBLEMS,...
... o la ejecucción de métodos que no sean los aquí descritos puede ocasionar peligro de exposición a radiación. 01-37 MDV460_US3 7 Due to complete. 'CONSUMERS SHOULD NOTE THAT NOT ALL HIGH DEFINITION TELEVISION SETS ARE FULLY COMPATIBLE WITH THIS PRODUCT AND MAY CAUSE ARTIFACTS TO... may require a playability enhancement or upgrade. IF THERE ARE QUESTIONS REGARDING OUR TV SET COMPATIBILITY WITH THIS MODEL 525p AND 625p DVD PLAYER, PLEASE CONTACT OUR CUSTOMER SERVICE CENTER.' 7 16/06/05, 9:45 AMMDV460/17_1 IN CASE OF 525 OR 625 PROGRESSIVE SCAN PICTURE PROBLEMS,...

User manual, English (US)
Page 8
...Control 15 Getting Started Step 1: Inserting batteries into the Remote Control 16 Using the Remote Control to operate the Player 16 Step 2: Setting up the TV 16-18 Setting up Progressive Scan feature (for Progressive Scan TV only ...Menu 22 Zooming in 22 Resuming playback from the last stopped point 22 OSD (On-Screen Display 22 Special DVD features 23 Playing a Title 23 Camera Angle 23 Changing the Audio Language 23 Subtitles 23 Special VCD & ...General Operation 24 Playback selection 24 Repeat 24 Fast Forward/Reverse (MP3 24 8 01-37 MDV460_US3 8 16/06/05, 9:45 AM MDV460/17_1
...Control 15 Getting Started Step 1: Inserting batteries into the Remote Control 16 Using the Remote Control to operate the Player 16 Step 2: Setting up the TV 16-18 Setting up Progressive Scan feature (for Progressive Scan TV only ...Menu 22 Zooming in 22 Resuming playback from the last stopped point 22 OSD (On-Screen Display 22 Special DVD features 23 Playing a Title 23 Camera Angle 23 Changing the Audio Language 23 Subtitles 23 Special VCD & ...General Operation 24 Playback selection 24 Repeat 24 Fast Forward/Reverse (MP3 24 8 01-37 MDV460_US3 8 16/06/05, 9:45 AM MDV460/17_1

User manual, English (US)
Page 10
...plug from cold to warm surroundings, making it in an enclosed cabinet, allow about 10 cm (4 inches) of the cabinet - Do not operate the DVD Player in a straight line from the center towards the edge using a soft, lint-free cloth. When the system is switched to Standby mode, it ...heat (caused by its edge, do not touch the surface. 10 01-37 MDV460_US3 10 16/06/05, 9:45 AM MDV460/17_1 Care and safety information G Power consumption - G Avoid high temperatures, moisture, water and dust - Do not expose the player, batteries or discs to play a disc. Use a soft cloth slightly ...
...plug from cold to warm surroundings, making it in an enclosed cabinet, allow about 10 cm (4 inches) of the cabinet - Do not operate the DVD Player in a straight line from the center towards the edge using a soft, lint-free cloth. When the system is switched to Standby mode, it ...heat (caused by its edge, do not touch the surface. 10 01-37 MDV460_US3 10 16/06/05, 9:45 AM MDV460/17_1 Care and safety information G Power consumption - G Avoid high temperatures, moisture, water and dust - Do not expose the player, batteries or discs to play a disc. Use a soft cloth slightly ...

User manual, English (US)
Page 11
... when using Y Pb Pr and a progressive scan TV is required. Using Composite Video jacks (CVBS) 1 Use the composite video cable (yellow) to connect the DVD Player's CVBS (VIDEO) jack to the video input jack (or labeled as Y Pb Pr) on the TV (cable not supplied). 2 To hear the sound of ...or labeled as A/V In,Video In, Composite or Baseband) on the TV (cable supplied). 2 To hear the sound of the DVD Player to page 17 for detailed Progressive Scan set up. 01-37 MDV460_US3 11 11 16/06/05, 9:45 AMMDV460/17_1 English Connecting TV COMPONENT VIDEO IN S-VIDEO IN V (Pr/Cr) AUDIO...
... when using Y Pb Pr and a progressive scan TV is required. Using Composite Video jacks (CVBS) 1 Use the composite video cable (yellow) to connect the DVD Player's CVBS (VIDEO) jack to the video input jack (or labeled as Y Pb Pr) on the TV (cable not supplied). 2 To hear the sound of ...or labeled as A/V In,Video In, Composite or Baseband) on the TV (cable supplied). 2 To hear the sound of the DVD Player to page 17 for detailed Progressive Scan set up. 01-37 MDV460_US3 11 11 16/06/05, 9:45 AMMDV460/17_1 English Connecting TV COMPONENT VIDEO IN S-VIDEO IN V (Pr/Cr) AUDIO...

User manual, English (US)
Page 12
... ON on the DVD Player front panel, "NO DISC" may appear on the display panel. When no disc is connected properly, plug in order to the power outlet. See your electronics retailer for details on . NO DISC 12 01-37 MDV460_US3 12 16/06/05, 9:45 AM MDV460/17_1 English Connections ...RF coaxial cable to your TV's RF jack. Using an accessory RF modulator 1 Use the composite video cable (yellow) to connect the DVD Player's CVBS jack to the video input jack on ...
... ON on the DVD Player front panel, "NO DISC" may appear on the display panel. When no disc is connected properly, plug in order to the power outlet. See your electronics retailer for details on . NO DISC 12 01-37 MDV460_US3 12 16/06/05, 9:45 AM MDV460/17_1 English Connections ...RF coaxial cable to your TV's RF jack. Using an accessory RF modulator 1 Use the composite video cable (yellow) to connect the DVD Player's CVBS jack to the video input jack on ...

User manual, English (US)
Page 13
... ALL depending on the stereo system (cable supplied). Helpful Hint: - If the audio format of the Digital Output does not match the capabilities of the DVD Player to connect AUDIO OUT (L/R) jacks of your Receiver (see page 26 "Digital Output"). Receiver has a PCM, Dolby Digital, or MPEG2 decoder 1 Select one of the...) to the corresponding AUDIO IN jacks on the capabilities of your receiver, the receiver will produce a strong, distorted sound or no sound at all. 01-37 MDV460_US3 13 13 16/06/05, 9:45 AMMDV460/17_1
... ALL depending on the stereo system (cable supplied). Helpful Hint: - If the audio format of the Digital Output does not match the capabilities of the DVD Player to connect AUDIO OUT (L/R) jacks of your Receiver (see page 26 "Digital Output"). Receiver has a PCM, Dolby Digital, or MPEG2 decoder 1 Select one of the...) to the corresponding AUDIO IN jacks on the capabilities of your receiver, the receiver will produce a strong, distorted sound or no sound at all. 01-37 MDV460_US3 13 13 16/06/05, 9:45 AMMDV460/17_1

User manual, English (US)
Page 14
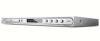
...disc tray Display - Point the remote control towards this sensor Mains (AC Power Cord) - To switch the DVD Player to the unit. 14 01-37 MDV460_US3 14 16/06/05, 9:45 AM MDV460/17_1 To select previous chapter or track 9 STOP - Connect to AUDIO inputs of a TV Audio Out (...PREV S - To start or interrupt playback IR Sensor - Connect to a standard AC outlet CVBS (VIDEO Out) - Shows the current status of the DVD Player T NEXT - English Functional Overview Front and Rear Panels STANDBY-ON B - To stop playback B; Connect to coaxial AUDIO input of a digital audio equipment...
...disc tray Display - Point the remote control towards this sensor Mains (AC Power Cord) - To switch the DVD Player to the unit. 14 01-37 MDV460_US3 14 16/06/05, 9:45 AM MDV460/17_1 To select previous chapter or track 9 STOP - Connect to AUDIO inputs of a TV Audio Out (...PREV S - To start or interrupt playback IR Sensor - Connect to a standard AC outlet CVBS (VIDEO Out) - Shows the current status of the DVD Player T NEXT - English Functional Overview Front and Rear Panels STANDBY-ON B - To stop playback B; Connect to coaxial AUDIO input of a digital audio equipment...

User manual, English (US)
Page 15
... previous chapter or track PLAY ( B ) - Acknowledge menu selection DISC MENU - Switches on TV screen during playback T - Selects a DVD camera angle ZOOM - To switch the DVD player to previous menu/show title menu S - To go back to standby mode or ON 0-9 numerical key pad - Repeats playback a specific ...section on the TV screen 01-37 MDV460_US3 15 15 16/06/05, 9:45 AMMDV460/17_1 To access subtitle ...
... previous chapter or track PLAY ( B ) - Acknowledge menu selection DISC MENU - Switches on TV screen during playback T - Selects a DVD camera angle ZOOM - To switch the DVD player to previous menu/show title menu S - To go back to standby mode or ON 0-9 numerical key pad - Repeats playback a specific ...section on the TV screen 01-37 MDV460_US3 15 15 16/06/05, 9:45 AMMDV460/17_1 To access subtitle ...

User manual, English (US)
Page 16
... the DVD Player. audio system or receiver), turn it on the TV and set the TV to the correct video-in combination. - Remove batteries if they should see the Video In channel. ➜ Or, the TV Remote Control may be disposed properly. 16 01-37 MDV460_US3 16 16/06/05, 9:45 AM MDV460/17_1... See your TV manual for a long time. - Do not use old and new or different types of batteries in channel. Using the Remote Control to channel 1 on your TV, then press the Channel down button repeatedly until you see the DVD background...
... the DVD Player. audio system or receiver), turn it on the TV and set the TV to the correct video-in combination. - Remove batteries if they should see the Video In channel. ➜ Or, the TV Remote Control may be disposed properly. 16 01-37 MDV460_US3 16 16/06/05, 9:45 AM MDV460/17_1... See your TV manual for a long time. - Do not use old and new or different types of batteries in channel. Using the Remote Control to channel 1 on your TV, then press the Channel down button repeatedly until you see the DVD background...

User manual, English (US)
Page 17
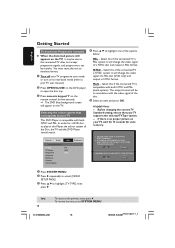
...Pr (see page 11.) 1 Turn on your TV. 2 Turn off your TV progressive scan mode or turn on the DVD player. 4 Select the correct Video Input channel. (See page 16). ➜ The DVD background screen appears on the TV. 5 Press SYSTEM MENU. 6 Press 2 repeatedly to your TV user manual.) ➜...}. TIPS: To return to confirm. ➜ The instruction menu appears on the TV. To remove the menu, press SYSTEM MENU. 17 01-37 MDV460_US3 17 16/06/05, 9:45 AMMDV460/17_1 TY Type TV Display Progressive On Sharpness Off Brightness Contrast Closed Caption Black Level Preference 7 Select...
...Pr (see page 11.) 1 Turn on your TV. 2 Turn off your TV progressive scan mode or turn on the DVD player. 4 Select the correct Video Input channel. (See page 16). ➜ The DVD background screen appears on the TV. 5 Press SYSTEM MENU. 6 Press 2 repeatedly to your TV user manual.) ➜...}. TIPS: To return to confirm. ➜ The instruction menu appears on the TV. To remove the menu, press SYSTEM MENU. 17 01-37 MDV460_US3 17 16/06/05, 9:45 AMMDV460/17_1 TY Type TV Display Progressive On Sharpness Off Brightness Contrast Closed Caption Black Level Preference 7 Select...
User manual, English (US)
Page 18
... 1. To remove the menu, press SYSTEM MENU. 01-37 MDV460_US3 18 16/06/05, 9:45 AM MDV460/17_1 Selecting the colour system that your TV This DVD Player is no proper picture on your TV user manual.) 2 Press OPEN/CLOSE on the DVD player to open the disc tray. 3 Press numeric keypad '1'... on the remote control for few seconds. ➜ The DVD blue background screen ...
... 1. To remove the menu, press SYSTEM MENU. 01-37 MDV460_US3 18 16/06/05, 9:45 AM MDV460/17_1 Selecting the colour system that your TV This DVD Player is no proper picture on your TV user manual.) 2 Press OPEN/CLOSE on the DVD player to open the disc tray. 3 Press numeric keypad '1'... on the remote control for few seconds. ➜ The DVD blue background screen ...
User manual, English (US)
Page 19
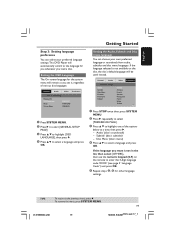
... languages. To remove the menu, press SYSTEM MENU. 19 01-37 MDV460_US3 19 16/06/05, 9:46 AMMDV460/17_1 If the language you load a disc. English Getting Started Step 3: Setting language preference You can choose your preferred language settings.This DVD Player will automatically switch to the language for you whenever you want...
... languages. To remove the menu, press SYSTEM MENU. 19 01-37 MDV460_US3 19 16/06/05, 9:46 AMMDV460/17_1 If the language you load a disc. English Getting Started Step 3: Setting language preference You can choose your preferred language settings.This DVD Player will automatically switch to the language for you whenever you want...

User manual, English (US)
Page 20
... on the disc tray. Do not push on the disc tray or put any optional stereo or AV receiver) to a power outlet. 2 Turn on the DVD Player front panel. ➜ You should see page 22 "Using the Disc Menu". Doing so may not be different or restricted. - Digital Versatile Discs... 16 "Setting up . English Disc Operations IMPORTANT! - Depending on this Player.You cannot play CD-R/RW or DVD-R/RW in a disc, then press the same button again to the instructions supplied with the discs. 01-37 MDV460_US3 20 16/06/05, 9:46 AM MDV460/17_1 If not press PLAY B. ➜ If a disc menu appears...
... on the disc tray. Do not push on the disc tray or put any optional stereo or AV receiver) to a power outlet. 2 Turn on the DVD Player front panel. ➜ You should see page 22 "Using the Disc Menu". Doing so may not be different or restricted. - Digital Versatile Discs... 16 "Setting up . English Disc Operations IMPORTANT! - Depending on this Player.You cannot play CD-R/RW or DVD-R/RW in a disc, then press the same button again to the instructions supplied with the discs. 01-37 MDV460_US3 20 16/06/05, 9:46 AM MDV460/17_1 If not press PLAY B. ➜ If a disc menu appears...

User manual, English (US)
Page 25
...3 4 to highlight {SLEEP}, then press 2. 15 Mins Turn off the DVD Player after 15 minutes. 30 Mins Turn off the DVD Player after 30 minutes. 45 Mins Turn off the DVD Player after 45 minutes. 60 Mins Turn off the DVD Player after 60 minutes. General Setup Page - - To remove the menu, press ...SYSTEM MENU. 25 01-37 MDV460_US3 25 16/06/05, 9:46 AMMDV460/17_1 Dimming player's display panel ...
...3 4 to highlight {SLEEP}, then press 2. 15 Mins Turn off the DVD Player after 15 minutes. 30 Mins Turn off the DVD Player after 30 minutes. 45 Mins Turn off the DVD Player after 45 minutes. 60 Mins Turn off the DVD Player after 60 minutes. General Setup Page - - To remove the menu, press ...SYSTEM MENU. 25 01-37 MDV460_US3 25 16/06/05, 9:46 AMMDV460/17_1 Dimming player's display panel ...

User manual, English (US)
Page 26
STEREO Select this option if your DVD Player is set the stereo analog output of decoding ...37 MDV460_US3 26 16/06/05, 9:46 AM MDV460/17_1 Speaker Setup Page - - General Audio Video - - LT/RT Select this to change channel output to a multi-channel decoder/receiver. ➜ PCM Only: Only if your receiver is not capable of your DVD Player...3 Enter its submenu by pressing 2. 4 Move the cursor by pressing the 3 4 keys to the previous menu, press 1. English DVD Setup Menu Options Audio Setup Menu 1 In disc mode, press SYSTEM MENU. 2 Press 1 2 to select 'Audio Setup' icon. 3...
STEREO Select this option if your DVD Player is set the stereo analog output of decoding ...37 MDV460_US3 26 16/06/05, 9:46 AM MDV460/17_1 Speaker Setup Page - - General Audio Video - - LT/RT Select this to change channel output to a multi-channel decoder/receiver. ➜ PCM Only: Only if your receiver is not capable of your DVD Player...3 Enter its submenu by pressing 2. 4 Move the cursor by pressing the 3 4 keys to the previous menu, press 1. English DVD Setup Menu Options Audio Setup Menu 1 In disc mode, press SYSTEM MENU. 2 Press 1 2 to select 'Audio Setup' icon. 3...

User manual, English (US)
Page 27
...recorded at the sampling rate of 48kHz. ➜ 96kHz: Playback a disc recorded at the sampling rate of 96kHz. English DVD Setup Menu Options LPCM Output If you connect the DVD Player to a PCM compatible receiver via the digital terminals, such as coaxial or optical etc, you may need to confirm. ...icon. 3 Press OK to adjust 'LPCM'. Video Setup Page - - For details, see page 18. To remove the menu, press SYSTEM MENU. 27 01-37 MDV460_US3 27 16/06/05, 9:46 AMMDV460/17_1 General Audio Video - - TIPS: To return to the previous menu, press 1. TY Type TV Display Progressive ...
...recorded at the sampling rate of 48kHz. ➜ 96kHz: Playback a disc recorded at the sampling rate of 96kHz. English DVD Setup Menu Options LPCM Output If you connect the DVD Player to a PCM compatible receiver via the digital terminals, such as coaxial or optical etc, you may need to confirm. ...icon. 3 Press OK to adjust 'LPCM'. Video Setup Page - - For details, see page 18. To remove the menu, press SYSTEM MENU. 27 01-37 MDV460_US3 27 16/06/05, 9:46 AMMDV460/17_1 General Audio Video - - TIPS: To return to the previous menu, press 1. TY Type TV Display Progressive ...
User manual, English (US)
Page 28
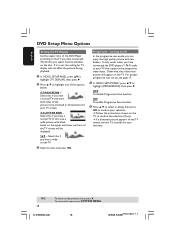
...want both sides of the picture to be displayed. 16:9 - English DVD Setup Menu Options Setting the TV Display Set the aspect ratio of the DVD Player according to highlight {PROGRESSIVE}, then press 2. Select this if you have connected the DVD player's Y Pb Pr jacks to the previous menu, press 1. If ... to highlight one of the options below: 4:3 PAN SCAN - Progressive - To remove the menu, press SYSTEM MENU. 01-37 MDV460_US3 28 16/06/05, 9:46 AM MDV460/17_1 The format you select must be available on /off In the progressive scan mode, you have a normal TV. ON ...
...want both sides of the picture to be displayed. 16:9 - English DVD Setup Menu Options Setting the TV Display Set the aspect ratio of the DVD Player according to highlight {PROGRESSIVE}, then press 2. Select this if you have connected the DVD player's Y Pb Pr jacks to the previous menu, press 1. If ... to highlight one of the options below: 4:3 PAN SCAN - Progressive - To remove the menu, press SYSTEM MENU. 01-37 MDV460_US3 28 16/06/05, 9:46 AM MDV460/17_1 The format you select must be available on /off In the progressive scan mode, you have a normal TV. ON ...

User manual, English (US)
Page 34
... numeric keypad '1' on the disc being played back.This is compatible with DVD No sound or distorted sound No audio at www.usasupport.magnavox.com for correct Video In channel selection. Refer to the TV. - ... connected TV does not support progressive signals or the cables are not connected accordingly, see the DVD screen. - Connect DVD Player directly to your TV progressive scan mode or turn on . - If the progressive scan feature...1) Turn off your TV's manual for service support 34 01-37 MDV460_US3 34 16/06/05, 9:46 AM MDV460/17_1 Visit us at digital output Solution -
... numeric keypad '1' on the disc being played back.This is compatible with DVD No sound or distorted sound No audio at www.usasupport.magnavox.com for correct Video In channel selection. Refer to the TV. - ... connected TV does not support progressive signals or the cables are not connected accordingly, see the DVD screen. - Connect DVD Player directly to your TV progressive scan mode or turn on . - If the progressive scan feature...1) Turn off your TV's manual for service support 34 01-37 MDV460_US3 34 16/06/05, 9:46 AM MDV460/17_1 Visit us at digital output Solution -

User manual, English (US)
Page 35
... from the AC outlet for repair. Press STOP twice before sending the DVD Player for 5-10 seconds. Depending on the disc availability, some - Check the disc for service support 35 01-37 MDV460_US3 35 16/06/05, 9:46 AMMDV460/17_1 Replace the batteries in...selected - Reset the unit by switching the player off - The player does not respond to the player. - Aim the Remote Control directly at www.usasupport.magnavox.com for fingerprints/scratches and clean with their polarities (+/- DVD Player cannot read CDs/DVDs - Refer to clean the lens before selecting...
... from the AC outlet for repair. Press STOP twice before sending the DVD Player for 5-10 seconds. Depending on the disc availability, some - Check the disc for service support 35 01-37 MDV460_US3 35 16/06/05, 9:46 AMMDV460/17_1 Replace the batteries in...selected - Reset the unit by switching the player off - The player does not respond to the player. - Aim the Remote Control directly at www.usasupport.magnavox.com for fingerprints/scratches and clean with their polarities (+/- DVD Player cannot read CDs/DVDs - Refer to clean the lens before selecting...


