
Manual - English
Page 43
...created if you could press NAV to close the POI database and return to the last viewed Map screen. To prevent accidental deletion, a confirmation window will be displayed in locating the POI. 1. Use the Arrow joystick to highlight View on Map. 10. Press ENTER. Press MENU. 2. ... by highlighting Yes, or cancel the deletion by highlighting No. 11. Locate the file where the POI has been saved and press ENTER. (The eXplorist will automatically open the default file.) 8. Press ENTER. 11. Press MENU. 2. Highlight the POI and press ENTER. 9. Use the Arrow joystick up...
...created if you could press NAV to close the POI database and return to the last viewed Map screen. To prevent accidental deletion, a confirmation window will be displayed in locating the POI. 1. Use the Arrow joystick to highlight View on Map. 10. Press ENTER. Press MENU. 2. ... by highlighting Yes, or cancel the deletion by highlighting No. 11. Locate the file where the POI has been saved and press ENTER. (The eXplorist will automatically open the default file.) 8. Press ENTER. 11. Press MENU. 2. Highlight the POI and press ENTER. 9. Use the Arrow joystick up...
Manual - English
Page 69
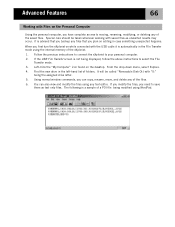
...care should be called "Removable Disk (X:) with "X:" being modified using WordPad. Find the new drive in the left-hand list of the eXplorist. 1. The following is automatically in case something unexpected happens. Left-click the "My Computer" icon found on while connected with the USB... being displayed, follow the above instructions to select the File Transfer mode. 3. Using normal window commands, you need to your personal computer. 2. Follow the previous instructions to connect the eXplorist to save them as unwanted results may occur. If you modify the files, you can also...
...care should be called "Removable Disk (X:) with "X:" being modified using WordPad. Find the new drive in the left-hand list of the eXplorist. 1. The following is automatically in case something unexpected happens. Left-click the "My Computer" icon found on while connected with the USB... being displayed, follow the above instructions to select the File Transfer mode. 3. Using normal window commands, you need to your personal computer. 2. Follow the previous instructions to connect the eXplorist to save them as unwanted results may occur. If you modify the files, you can also...
Manual - English
Page 70
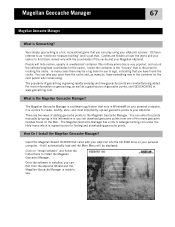
...something new in Windows® on the Web. What is ready to the Magellan Geocache Manager. How Do I Install the Magellan Geocache Manager? Once the software is installed, you can download geocache points from the eXplorist Wizard and the Magellan Geocache Manager is the Magellan Geocache Manager? ... may be displayed. Magellan Geocache Manager 67 Magellan Geocache Manager What is just that. It's been referred to find them, armed only with your eXplorist into the CD-ROM drive on "Install software" and follow the instructions to your eXplorist receiver. There are two ways...
...something new in Windows® on the Web. What is ready to the Magellan Geocache Manager. How Do I Install the Magellan Geocache Manager? Once the software is installed, you can download geocache points from the eXplorist Wizard and the Magellan Geocache Manager is the Magellan Geocache Manager? ... may be displayed. Magellan Geocache Manager 67 Magellan Geocache Manager What is just that. It's been referred to find them, armed only with your eXplorist into the CD-ROM drive on "Install software" and follow the instructions to your eXplorist receiver. There are two ways...

Manual - English
Page 71
The common tools are displayed as icons at the top of geocache points is displayed. 4. Under "Programs" select 'Magellan > eXplorist 210 > Magellan Geocache Manager'. 3. Magellan Geocache Manager 68 Using the Magellan Geocache Manager 1. The Magellan Geocache Manager will open and an empty list of the display. You can access the function by using one of the hotkey shortcuts. Access the Magellan Geocache Manager by clicking on the icon, selecting from the menu, or using the Start button on the Windows toolbar. 2.
The common tools are displayed as icons at the top of geocache points is displayed. 4. Under "Programs" select 'Magellan > eXplorist 210 > Magellan Geocache Manager'. 3. Magellan Geocache Manager 68 Using the Magellan Geocache Manager 1. The Magellan Geocache Manager will open and an empty list of the display. You can access the function by using one of the hotkey shortcuts. Access the Magellan Geocache Manager by clicking on the icon, selecting from the menu, or using the Start button on the Windows toolbar. 2.
Manual - English
Page 72
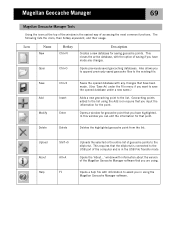
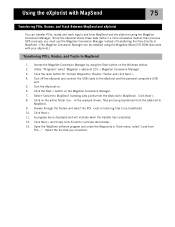
... or the entire list of geocache points to the USB port of the computer and is in using . window with information about the version of the Magellan Geocache Manager software that point. This closes the active database, with any changes that you input the information...This requires that you have highlighted. In this window you to append previously saved geocache files to the list. Magellan Geocache Manager 69 Magellan Geocache Manager Tools Using the icons at the top of the window is connected to the eXplorist. Opens a window for saving geocache points. The following lists the...
... or the entire list of geocache points to the USB port of the computer and is in using . window with information about the version of the Magellan Geocache Manager software that point. This closes the active database, with any changes that you input the information...This requires that you have highlighted. In this window you to append previously saved geocache files to the list. Magellan Geocache Manager 69 Magellan Geocache Manager Tools Using the icons at the top of the window is connected to the eXplorist. Opens a window for saving geocache points. The following lists the...
Manual - English
Page 73
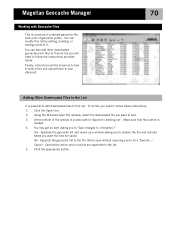
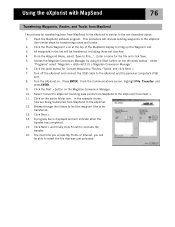
... file you want to add. 3. Appends the geocache list and opens up a window asking you to rename the file and indicate where you want the new file saved...is open without requiring you will be shown as to how to select files and upload them to your eXplorist. 70 Adding Other Downloaded Files to the List It is possible to add downloaded files to this you ...also add other downloaded geocache point files to this list but you to do this list. At the bottom of the window is a picture of a sample geocache file with Geocache Files This is a radio button 'Append to existing list'....
... file you want to add. 3. Appends the geocache list and opens up a window asking you to rename the file and indicate where you want the new file saved...is open without requiring you will be shown as to how to select files and upload them to your eXplorist. 70 Adding Other Downloaded Files to the List It is possible to add downloaded files to this you ...also add other downloaded geocache point files to this list but you to do this list. At the bottom of the window is a picture of a sample geocache file with Geocache Files This is a radio button 'Append to existing list'....
Manual - English
Page 75
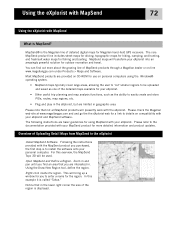
...for a link to be used. Right-click inside the region. MapSend maps will bring up a window for you are provided on CD-ROM for use on personal computers using MapSend with your eXplorist and MapSend software. Please refer to enter a name for the region. For this example it is...in and pan until you purchased, the first step is the Magellan line of detailed digital maps for Magellan hand-held GPS receivers. Using the Draw New Region tool, define the region. Using the eXplorist with MapSend 72 Using the eXplorist with your MapSend product for more about the growing line of ...
...for a link to be used. Right-click inside the region. MapSend maps will bring up a window for you are provided on CD-ROM for use on personal computers using MapSend with your eXplorist and MapSend software. Please refer to enter a name for the region. For this example it is...in and pan until you purchased, the first step is the Magellan line of detailed digital maps for Magellan hand-held GPS receivers. Using the Draw New Region tool, define the region. Using the eXplorist with MapSend 72 Using the eXplorist with your MapSend product for more about the growing line of ...
Manual - English
Page 76
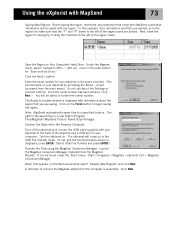
... clicking the checkbox to the left of the eXplorist and a USB port on your eXplorist in the space provided. Save the Region to GPS..." (Ctrl+U). This can be saved with MapSend to set what information will be found on the ...the "T" and "P" boxes to Update window is : Local Disk C:\Program Files\Magellan\'MapSend Product Name'\Export\Images. Connect the eXplorist to confirm the serial number. Turn the eXplorist on the Welcome window select 'Transfer Map Regions' and click Next. Start > Programs > Magellan > eXplorist 210 > Magellan Conversion Manager. When first opened, on...
... clicking the checkbox to the left of the eXplorist and a USB port on your eXplorist in the space provided. Save the Region to GPS..." (Ctrl+U). This can be saved with MapSend to set what information will be found on the ...the "T" and "P" boxes to Update window is : Local Disk C:\Program Files\Magellan\'MapSend Product Name'\Export\Images. Connect the eXplorist to confirm the serial number. Turn the eXplorist on the Welcome window select 'Transfer Map Regions' and click Next. Start > Programs > Magellan > eXplorist 210 > Magellan Conversion Manager. When first opened, on...
Manual - English
Page 77
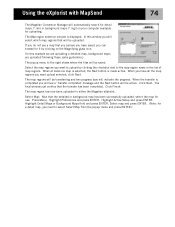
Using the eXplorist with MapSend 74 The Magellan Conversion Manager will be active. The final window just verifies that will be saved. Click Finish. Highlight Active Setup and press ENTER. The Map region selection window is made active. Select the map regions you... select the map for a detail map, you want to upload by clicking on the Magnifying glass icon. (In this window you do not see a 'Transfer completed' message and the Next button will automatically search for detail maps (*.imi) or...you can browse for it by clicking the checkbox next to either the Magellan eXplorist.
Using the eXplorist with MapSend 74 The Magellan Conversion Manager will be active. The final window just verifies that will be saved. Click Finish. Highlight Active Setup and press ENTER. The Map region selection window is made active. Select the map regions you... select the map for a detail map, you want to upload by clicking on the Magnifying glass icon. (In this window you do not see a 'Transfer completed' message and the Next button will automatically search for detail maps (*.imi) or...you can browse for it by clicking the checkbox next to either the Magellan eXplorist.
Manual - English
Page 78
... a more accessible manner than previous GPS receivers, you converted. Turn the eXplorist on the active folder icon. Click on . 6. Under "Programs" select 'Magellan > eXplorist 210 > Magellan Conversion Manager'. 3. Open the MapSend software program and under the Waypoints or Track menu, select 'Load from the eXplorist to MapSend. 9. Click the Next > button on the Windows toolbar. 2. Click Next >. 8. In the...
... a more accessible manner than previous GPS receivers, you converted. Turn the eXplorist on the active folder icon. Click on . 6. Under "Programs" select 'Magellan > eXplorist 210 > Magellan Conversion Manager'. 3. Open the MapSend software program and under the Waypoints or Track menu, select 'Load from the eXplorist to MapSend. 9. Click the Next > button on the Windows toolbar. 2. Click Next >. 8. In the...
Manual - English
Page 79
... the Windows toolbar. Click the Place Waypoint icon at the top of Interest, you will be transferred. 13. This procedure will be transferred, including those not checked. 4. All waypoints in the list will discuss sending waypoints to the eXplorist. A progress bar is similar to the one described above. 1. Under "Programs" select 'Magellan > eXplorist 210 > Magellan Conversion...
... the Windows toolbar. Click the Place Waypoint icon at the top of Interest, you will be transferred. 13. This procedure will be transferred, including those not checked. 4. All waypoints in the list will discuss sending waypoints to the eXplorist. A progress bar is similar to the one described above. 1. Under "Programs" select 'Magellan > eXplorist 210 > Magellan Conversion...
User Manual
Page 3
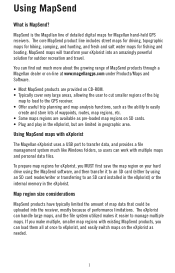
.... • Most MapSend products are limited in the eXplorist. Using MapSend What is the Magellan line of detailed digital maps for Magellan hand-held GPS receivers. To prepare map regions for fishing and boating. The core MapSend product line includes street maps for driving, topographic maps for hiking, camping, and hunting, and fresh and salt water...
.... • Most MapSend products are limited in the eXplorist. Using MapSend What is the Magellan line of detailed digital maps for Magellan hand-held GPS receivers. To prepare map regions for fishing and boating. The core MapSend product line includes street maps for driving, topographic maps for hiking, camping, and hunting, and fresh and salt water...
User Manual
Page 5
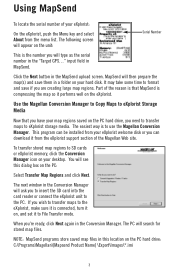
...on the PC hard drive, you wish to transfer maps to eXplorist storage media. input field in the MapSend upload screen. The next window in the Conversion Manager will type as the serial number in the "Target GPS..." When you will ask you are creating large map regions. The...your map regions saved on the PC hard drive: C:\Programs\Magellan\[Mapsend Product Name] \Export\Images\*.imi 3 Using MapSend To locate the serial number of your eXplorist: On the eXplorist, push the Menu key and select About from the eXplorist support section of the reason is the number you 're...
...on the PC hard drive, you wish to transfer maps to eXplorist storage media. input field in the MapSend upload screen. The next window in the Conversion Manager will type as the serial number in the "Target GPS..." When you will ask you are creating large map regions. The...your map regions saved on the PC hard drive: C:\Programs\Magellan\[Mapsend Product Name] \Export\Images\*.imi 3 Using MapSend To locate the serial number of your eXplorist: On the eXplorist, push the Menu key and select About from the eXplorist support section of the reason is the number you 're...