Manual - English
Page 3
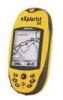
Table of Contents i eXplorist 200 GPS Receiver 1 Features of the Magellan eXplorist GPS Receiver 1 Button Descriptions 2 Installing the Batteries 4 Using the eXplorist 200 5 Going to a Destination 5 Saving Your Position 6 Tracing Your Steps 7 Additional Features 8 Summary 8 Starting Up 9 Turning the eXplorist On 9 Turning the eXplorist Off 9 Turning the Display Backlight On/Off 9 Using the eXplorist for the First Time 10 Conclusion 13 Navigation Screens 14 Accessing the Navigation...
Table of Contents i eXplorist 200 GPS Receiver 1 Features of the Magellan eXplorist GPS Receiver 1 Button Descriptions 2 Installing the Batteries 4 Using the eXplorist 200 5 Going to a Destination 5 Saving Your Position 6 Tracing Your Steps 7 Additional Features 8 Summary 8 Starting Up 9 Turning the eXplorist On 9 Turning the eXplorist Off 9 Turning the Display Backlight On/Off 9 Using the eXplorist for the First Time 10 Conclusion 13 Navigation Screens 14 Accessing the Navigation...
Manual - English
Page 7
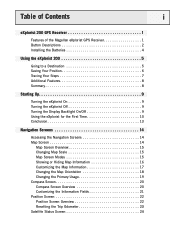
eXplorist 200 GPS Receiver 2 Button Descriptions: On/Off Backlight ENTER ESCAPE ZOOM IN ZOOM OUT MENU NAV MARK GOTO Arrow joystick Turns the eXplorist on or off to low to access highlighted menu items or accept highlighted buttons. Steps backward through the list of POIs when doing ... map displayed. Options can be selected by using the arrow joystick to highlight the option and pressing ENTER to zoom out on the background map. Turns the display backlight on the Map screen. Cancels data inputs. Closes the accessed function and goes back to 100 ft. (35.0 m). Creates a ...
eXplorist 200 GPS Receiver 2 Button Descriptions: On/Off Backlight ENTER ESCAPE ZOOM IN ZOOM OUT MENU NAV MARK GOTO Arrow joystick Turns the eXplorist on or off to low to access highlighted menu items or accept highlighted buttons. Steps backward through the list of POIs when doing ... map displayed. Options can be selected by using the arrow joystick to highlight the option and pressing ENTER to zoom out on the background map. Turns the display backlight on the Map screen. Cancels data inputs. Closes the accessed function and goes back to 100 ft. (35.0 m). Creates a ...
Manual - English
Page 9
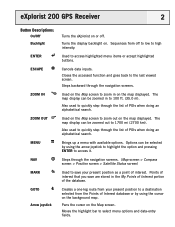
... NAV to return to observe the proper polarity when installing the batteries. Highlight Pwr Management and press ENTER. eXplorist 200 GPS Receiver 4 Installing the Batteries The eXplorist 200 uses two AA batteries that the display backlight will automatically turn off when none of the buttons have been pressed. Be sure to the last viewed navigation screen. Under...
... NAV to return to observe the proper polarity when installing the batteries. Highlight Pwr Management and press ENTER. eXplorist 200 GPS Receiver 4 Installing the Batteries The eXplorist 200 uses two AA batteries that the display backlight will automatically turn off when none of the buttons have been pressed. Be sure to the last viewed navigation screen. Under...
Manual - English
Page 11
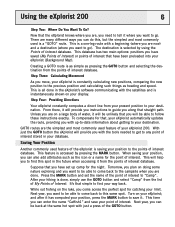
...eXplorist (Background Map). Turn on your destination. Unless you with a beginning (where you are now) and a destination (where you move, your eXplorist is constantly calculating new positions, comparing the new position to tell it from the list of My Points of the GOTO button. While out fishing on your eXplorist 200... Now that you come across the perfect spot for the night. After your hiking is saving your way back. To compensate for the point of interest stored in the eXplorist's software communicating with just a press of Interest. Next year, you want to...
...eXplorist (Background Map). Turn on your destination. Unless you with a beginning (where you are now) and a destination (where you move, your eXplorist is constantly calculating new positions, comparing the new position to tell it from the list of My Points of the GOTO button. While out fishing on your eXplorist 200... Now that you come across the perfect spot for the night. After your hiking is saving your way back. To compensate for the point of interest stored in the eXplorist's software communicating with just a press of Interest. Next year, you want to...
Manual - English
Page 12
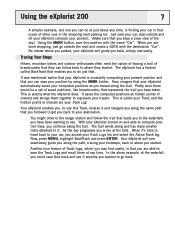
... back to see. In the above example, at the waterfall, you could save that leads you to the waterfalls you have taken. Using the eXplorist 200 7 A simpler example, and one you can do just that enables you to where you back to save your travels. The trail winds along ...been wanting to where they started . It was mentioned earlier that represents the trail you parked, your eXplorist turned on and able to use it . This is called BackTrack that . With your eXplorist will now seamlessly guide you along the same path that you arrive at any time, is exactly what...
... back to see. In the above example, at the waterfall, you could save that leads you to the waterfalls you have taken. Using the eXplorist 200 7 A simpler example, and one you can do just that enables you to where you back to save your travels. The trail winds along ...been wanting to where they started . It was mentioned earlier that represents the trail you parked, your eXplorist turned on and able to use it . This is called BackTrack that . With your eXplorist will now seamlessly guide you along the same path that you arrive at any time, is exactly what...

Manual - English
Page 14
... REMEMBER: Using the display backlight causes severe drain on , just press the ESC button. Turning the eXplorist Off To turn the eXplorist on, press the POWER button on the top left side of intensity: off . Turning the Display Backlight On/Off The display backlight has three levels of the...you press the LIGHT button. You have approximately 30 seconds between pressing the POWER button and pressing the ENTER button, otherwise the eXplorist will immediately turn off . Press the LIGHT button on the top right side. Pressing the LIGHT button a second time sets the backlight to leave...
... REMEMBER: Using the display backlight causes severe drain on , just press the ESC button. Turning the eXplorist Off To turn the eXplorist on, press the POWER button on the top left side of intensity: off . Turning the Display Backlight On/Off The display backlight has three levels of the...you press the LIGHT button. You have approximately 30 seconds between pressing the POWER button and pressing the ENTER button, otherwise the eXplorist will immediately turn off . Press the LIGHT button on the top right side. Pressing the LIGHT button a second time sets the backlight to leave...

Manual - English
Page 15
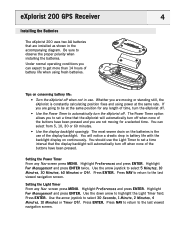
... a cold start. Select Language. Press MENU. The Language Select screen will take a few minutes while it is provided for the First Time Turn the eXplorist on. When you are outside and have a clear, unobstructed view of the sky. PRESS TO AGREE Press ENTER to move the highlight up ...and down. For this section.) The Satellite Status screen is best if you turn the eXplorist on the eXplorist for the first time, Language you agree to the warning statement, press ENTER to highlight the fourth line and press ENTER. Finding...
... a cold start. Select Language. Press MENU. The Language Select screen will take a few minutes while it is provided for the First Time Turn the eXplorist on. When you are outside and have a clear, unobstructed view of the sky. PRESS TO AGREE Press ENTER to move the highlight up ...and down. For this section.) The Satellite Status screen is best if you turn the eXplorist on the eXplorist for the first time, Language you agree to the warning statement, press ENTER to highlight the fourth line and press ENTER. Finding...

Manual - English
Page 18
... to receive satellite transmissions. Cold start is still in memory and you have an approximate position to use when referring to its internal satellite channels to find are in satellite almanac. Warm starts are when the last position calculated before the eXplorist was turned off ...is a good chance that when the eXplorist begins looking for more than 500 mi [804.7 km] with information on for the Magellan eXplorist 200. Cold Start. Warm Start. Once the Map screen is turned on which satellites are overhead, along with it turned off, the last position saved may...
... to receive satellite transmissions. Cold start is still in memory and you have an approximate position to use when referring to its internal satellite channels to find are in satellite almanac. Warm starts are when the last position calculated before the eXplorist was turned off ...is a good chance that when the eXplorist begins looking for more than 500 mi [804.7 km] with information on for the Magellan eXplorist 200. Cold Start. Warm Start. Once the Map screen is turned on which satellites are overhead, along with it turned off, the last position saved may...

Manual - English
Page 19
...as well as a POI by pressing the NAV button. The arrow cursor changes to move the cursor. Navigation Screens 14 Accessing the Navigation Screens The eXplorist has three navigation screens, as well as a Satellite Status screen that best suits your needs. Map Screen The first, and most commonly used, screen... crosshair cursor to display your present position with the arrow cursor. • Press MENU and select Hide Map Info or Show Map Info to turn the information boxes at the bottom of the screen on or off. • Press MENU and select Customize page to change the information displayed...
...as well as a POI by pressing the NAV button. The arrow cursor changes to move the cursor. Navigation Screens 14 Accessing the Navigation Screens The eXplorist has three navigation screens, as well as a Satellite Status screen that best suits your needs. Map Screen The first, and most commonly used, screen... crosshair cursor to display your present position with the arrow cursor. • Press MENU and select Hide Map Info or Show Map Info to turn the information boxes at the bottom of the screen on or off. • Press MENU and select Customize page to change the information displayed...

Manual - English
Page 21
... These options will be used to assist you may not need this information. In the Cursor mode you the capability to move the cursor. The eXplorist gives you can use the Arrow joystick to turn this manual on the map not displayed around the map.
... These options will be used to assist you may not need this information. In the Cursor mode you the capability to move the cursor. The eXplorist gives you can use the Arrow joystick to turn this manual on the map not displayed around the map.
Manual - English
Page 42
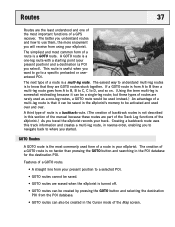
... your present position) and a destination (a POI you want to go to know that it can be created in your eXplorist. The creation of a GPS receiver. A third type of route is a backtrack route. (The creation of backtrack routes is useful when you select). Creating a backtrack route uses this section...how to use them, the more enjoyment you started. The next type of a multi-leg route is that they are erased when the eXplorist is turned off. • GOTO routes can be created by pressing the GOTO button and selecting the destination POI from your present position to be ...
... your present position) and a destination (a POI you want to go to know that it can be created in your eXplorist. The creation of a GPS receiver. A third type of route is a backtrack route. (The creation of backtrack routes is useful when you select). Creating a backtrack route uses this section...how to use them, the more enjoyment you started. The next type of a multi-leg route is that they are erased when the eXplorist is turned off. • GOTO routes can be created by pressing the GOTO button and selecting the destination POI from your present position to be ...

Manual - English
Page 46
.... Features of a multi-leg route: • Multi-leg routes can be saved in the route.) • Multi-leg routes remain active even after the eXplorist has been turned off. • Multi-leg routes can switch which leg will be leaving the dock, motoring over to buoy 1, then the bait boat, and finally...
.... Features of a multi-leg route: • Multi-leg routes can be saved in the route.) • Multi-leg routes remain active even after the eXplorist has been turned off. • Multi-leg routes can switch which leg will be leaving the dock, motoring over to buoy 1, then the bait boat, and finally...

Manual - English
Page 48
... routes have their names bolded in the route list.) 5. Use the Arrow joystick to the last viewed navigation screen with route named "Magellan" active. Use the Arrow joystick to highlight the name of routes with the route chosen activated or deactivated. GOTOs are automatically activated when... List 1 Tahoe Camp 3. Legs 3 Distance 4.95 M I 6. Routes 43 Activating/Deactivating a Route An active route is the route you either turn it will be activated manually. 1. Press ENTER. List of the route you want to be returned to highlight Routes. Press MENU. 2.
... routes have their names bolded in the route list.) 5. Use the Arrow joystick to the last viewed navigation screen with route named "Magellan" active. Use the Arrow joystick to highlight the name of routes with the route chosen activated or deactivated. GOTOs are automatically activated when... List 1 Tahoe Camp 3. Legs 3 Distance 4.95 M I 6. Routes 43 Activating/Deactivating a Route An active route is the route you either turn it will be activated manually. 1. Press ENTER. List of the route you want to be returned to highlight Routes. Press MENU. 2.

Manual - English
Page 55
.... Track Logs As you have been. Features of Track Logs: • Active track is recording your travels whenever you are moving unless you have intentionally turned it off. • Up to five track logs can be saved and recalled at a later date. • Active tracks can be cleared, stopped, ...activate a route that you back to find many other additional uses for track logs once you feel comfortable with just another tool to make your eXplorist more valuable to worry about animals coming along and eating your track. You can use over and over. Much like leaving breadcrumbs on the ...
.... Track Logs As you have been. Features of Track Logs: • Active track is recording your travels whenever you are moving unless you have intentionally turned it off. • Up to five track logs can be saved and recalled at a later date. • Active tracks can be cleared, stopped, ...activate a route that you back to find many other additional uses for track logs once you feel comfortable with just another tool to make your eXplorist more valuable to worry about animals coming along and eating your track. You can use over and over. Much like leaving breadcrumbs on the ...

Manual - English
Page 56
... points of the track. Press ENTER. Press ENTER. 4. With Active Track highlighted, press MENU. 5. This is not being recorded; Track Log List with Note: The eXplorist will not draw a straight line from the point information at the bottom for the number of legs and where track logging was stopped to the... displayed only when the active track is being recorded. Press MENU. 2. Track Logs 51 Stopping and Resuming Active Track Logging This provides the ability to turn off the recording of the active track and then to starting it has the distance of the track been resumed.
... points of the track. Press ENTER. Press ENTER. 4. With Active Track highlighted, press MENU. 5. This is not being recorded; Track Log List with Note: The eXplorist will not draw a straight line from the point information at the bottom for the number of legs and where track logging was stopped to the... displayed only when the active track is being recorded. Press MENU. 2. Track Logs 51 Stopping and Resuming Active Track Logging This provides the ability to turn off the recording of the active track and then to starting it has the distance of the track been resumed.

Manual - English
Page 59
... will now begin recording your track when: • You have an active BackTrack route, the eXplorist will not be recording track information. Press MENU. 6. Press ENTER. 8. [Track logging is turned off alert status] Press ENTER. Track Log Active Track Stop Logging Save BackTrack Clear Track Convert ... to highlight Active Track. 5. Press ENTER. 4. Stop Logging, Resume Logging New Track - will not be available. NOTE: When you started, turning around and following the electronic breadcrumb trail that the eXplorist dropped. 1. The previously mentioned options - Press MENU. 2.
... will now begin recording your track when: • You have an active BackTrack route, the eXplorist will not be recording track information. Press MENU. 6. Press ENTER. 8. [Track logging is turned off alert status] Press ENTER. Track Log Active Track Stop Logging Save BackTrack Clear Track Convert ... to highlight Active Track. 5. Press ENTER. 4. Stop Logging, Resume Logging New Track - will not be available. NOTE: When you started, turning around and following the electronic breadcrumb trail that the eXplorist dropped. 1. The previously mentioned options - Press MENU. 2.

Manual - English
Page 61
... Arrow joystick and ENTER button to highlight Active Track or any track log you are returned to a Route This function takes the track log and turns it into a multi-leg route that is created with the name you assigned, and you have saved. 1.
... Arrow joystick and ENTER button to highlight Active Track or any track log you are returned to a Route This function takes the track log and turns it into a multi-leg route that is created with the name you assigned, and you have saved. 1.

Manual - English
Page 63
... has been activated, the eXplorist will navigate you with a means to use a saved track as a multi-leg route. Reversing a Saved Track Log Reversing a saved track log is displayed with the track log selected being used as an active route. Press ENTER. 4. Press ENTER. 8. {Track logging will be turned off alert status.] Press... created is displayed with the reversed track log selected being used as an active route. Press MENU. 2. Press MENU. 6. Press ENTER. 8. {Track logging will be turned off alert.] Press ENTER.
... has been activated, the eXplorist will navigate you with a means to use a saved track as a multi-leg route. Reversing a Saved Track Log Reversing a saved track log is displayed with the track log selected being used as an active route. Press ENTER. 4. Press ENTER. 8. {Track logging will be turned off alert status.] Press... created is displayed with the reversed track log selected being used as an active route. Press MENU. 2. Press MENU. 6. Press ENTER. 8. {Track logging will be turned off alert.] Press ENTER.

Manual - English
Page 65
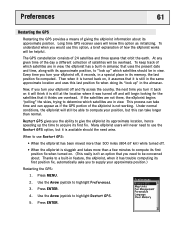
Preferences 60 The Preferences portion of the eXplorist provides the tools to personalize the eXplorist to perform maintanence on the internal memory should the need arise. Features found in Preferences: • Restarting the GPS (Initializing) to give you with the means to clear all or part of measure for ...will provide you full flexibility over its approximate location if it has been moved a large distance while turned off. • Access to setting the units of the internal memory. There are designed to give the eXplorist its use, as well as to your usage and needs.
Preferences 60 The Preferences portion of the eXplorist provides the tools to personalize the eXplorist to perform maintanence on the internal memory should the need arise. Features found in Preferences: • Restarting the GPS (Initializing) to give you with the means to clear all or part of measure for ...will provide you full flexibility over its approximate location if it has been moved a large distance while turned off. • Access to setting the units of the internal memory. There are designed to give the eXplorist its use, as well as to your usage and needs.
Manual - English
Page 66
...can take longer than a few minutes to compute its first position fix when turned on , it assumes that orbit the earth. Many eXplorist users will never need to use the Restart GPS option, but this last position fix when doing its first position fix, ...joystick to highlight Preferences. 3. To keep track of how the eXplorist works will be overhead. Preferences 61 Restarting the GPS Restarting the GPS provides a means of satellites will be helpful. Press ENTER. 4. Long time GPS receiver users will still be able to determine which satellites should the ...
...can take longer than a few minutes to compute its first position fix when turned on , it assumes that orbit the earth. Many eXplorist users will never need to use the Restart GPS option, but this last position fix when doing its first position fix, ...joystick to highlight Preferences. 3. To keep track of how the eXplorist works will be overhead. Preferences 61 Restarting the GPS Restarting the GPS provides a means of satellites will be helpful. Press ENTER. 4. Long time GPS receiver users will still be able to determine which satellites should the ...


