Manual - English
Page 1
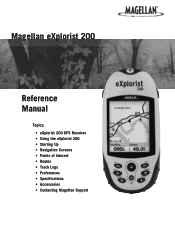
Magellan eXplorist 200 Reference Manual Topics: • eXplorist 200 GPS Receiver • Using the eXplorist 200 • Starting Up • Navigation Screens • Points of Interest • Routes • Track Logs • Preferences • Specifications • Accessories • Contacting Magellan Support
Magellan eXplorist 200 Reference Manual Topics: • eXplorist 200 GPS Receiver • Using the eXplorist 200 • Starting Up • Navigation Screens • Points of Interest • Routes • Track Logs • Preferences • Specifications • Accessories • Contacting Magellan Support

Manual - English
Page 2
... Thales Navigation. * * * Operation is subject to GPS satellites made by Thales Navigation and/or its suppliers and is solely responsible for careful orienteering and good judgment. All rights reserved. Never rely solely on the Magellan® eXplorist™ while driving. USE PROPER ACCESSORIES Use only Magellan cables and antennas; USE CARE The Global Positioning System (GPS) is an excellent navigation aid, but it does not replace...
... Thales Navigation. * * * Operation is subject to GPS satellites made by Thales Navigation and/or its suppliers and is solely responsible for careful orienteering and good judgment. All rights reserved. Never rely solely on the Magellan® eXplorist™ while driving. USE PROPER ACCESSORIES Use only Magellan cables and antennas; USE CARE The Global Positioning System (GPS) is an excellent navigation aid, but it does not replace...
Manual - English
Page 3
... GPS Receiver 1 Features of the Magellan eXplorist GPS Receiver 1 Button Descriptions 2 Installing the Batteries 4 Using the eXplorist 200 5 Going to a Destination 5 Saving Your Position 6 Tracing Your Steps 7 Additional Features 8 Summary 8 Starting Up 9 Turning the eXplorist On 9 Turning the eXplorist Off 9 Turning the Display Backlight On/Off 9 Using the eXplorist for the First Time 10 Conclusion 13 Navigation Screens 14 Accessing the Navigation Screens 14 Map Screen 14 Map Screen Overview 15 Changing Map Scale 15 Map Screen Modes 15 Showing or Hiding Map Information...
... GPS Receiver 1 Features of the Magellan eXplorist GPS Receiver 1 Button Descriptions 2 Installing the Batteries 4 Using the eXplorist 200 5 Going to a Destination 5 Saving Your Position 6 Tracing Your Steps 7 Additional Features 8 Summary 8 Starting Up 9 Turning the eXplorist On 9 Turning the eXplorist Off 9 Turning the Display Backlight On/Off 9 Using the eXplorist for the First Time 10 Conclusion 13 Navigation Screens 14 Accessing the Navigation Screens 14 Map Screen 14 Map Screen Overview 15 Changing Map Scale 15 Map Screen Modes 15 Showing or Hiding Map Information...
Manual - English
Page 5
... Setting the Map Units 63 Selecting Navigational Units of Measure 63 Selecting the North Reference 64 Selecting the Coordinate System 65 Selecting the Map Datum 66 Using the Power Management Tool 67 Setting the Power-Off Timer 67 Setting the Light Timer 68 Personalizing the eXplorist 69 Selecting Languages 70 Clearing Memory 71 Clearing All Track Logs 71 Clearing All User-Entered POIs and Routes 72 Clearing All Routes 72 Clearing All Track Logs, User-Entered POIs, and Routes 72 Reseting the eXplorist to Factory Defaults 73 Specifications 74 Accessories 76 Contacting Magellan...
... Setting the Map Units 63 Selecting Navigational Units of Measure 63 Selecting the North Reference 64 Selecting the Coordinate System 65 Selecting the Map Datum 66 Using the Power Management Tool 67 Setting the Power-Off Timer 67 Setting the Light Timer 68 Personalizing the eXplorist 69 Selecting Languages 70 Clearing Memory 71 Clearing All Track Logs 71 Clearing All User-Entered POIs and Routes 72 Clearing All Routes 72 Clearing All Track Logs, User-Entered POIs, and Routes 72 Reseting the eXplorist to Factory Defaults 73 Specifications 74 Accessories 76 Contacting Magellan...
Manual - English
Page 7
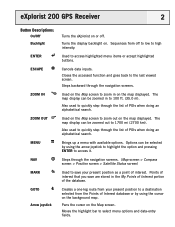
... viewed screen. Points of interest that you save your present position to a destination selected from the Points of POIs when doing an alphabetical search. Creates a one-leg route from off . eXplorist 200 GPS Receiver 2 Button Descriptions: On/Off Backlight ENTER ESCAPE ZOOM IN ZOOM OUT MENU NAV MARK GOTO Arrow joystick Turns the eXplorist on or off to low to high intensity. Also used to quickly step through the navigation screens. Turns the display backlight on the Map screen...
... viewed screen. Points of interest that you save your present position to a destination selected from the Points of POIs when doing an alphabetical search. Creates a one-leg route from off . eXplorist 200 GPS Receiver 2 Button Descriptions: On/Off Backlight ENTER ESCAPE ZOOM IN ZOOM OUT MENU NAV MARK GOTO Arrow joystick Turns the eXplorist on or off to low to high intensity. Also used to quickly step through the navigation screens. Turns the display backlight on the Map screen...
Manual - English
Page 9
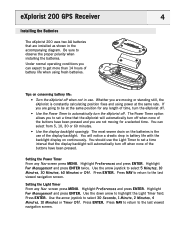
... use of the display backlight. You can expect to set a time interval that the display backlight will automatically turn off . Highlight Preferences and press ENTER. eXplorist 200 GPS Receiver 4 Installing the Batteries The eXplorist 200 uses two AA batteries that are moving for any length of time, turn the eXplorist off. • Use the Power Timer to automatically turn the eXplorist off when none of the buttons have been pressed. Under normal operating conditions you are going to set a time that the eXplorist...
... use of the display backlight. You can expect to set a time interval that the display backlight will automatically turn off . Highlight Preferences and press ENTER. eXplorist 200 GPS Receiver 4 Installing the Batteries The eXplorist 200 uses two AA batteries that are moving for any length of time, turn the eXplorist off. • Use the Power Timer to automatically turn the eXplorist off when none of the buttons have been pressed. Under normal operating conditions you are going to set a time that the eXplorist...

Manual - English
Page 10
... elevation is to give your present position. Using the eXplorist 200 5 The eXplorist 200 uses information from the GPS satellites orbiting the earth to provide you with good signal strength. This is not computing a position, just move to a place that has a better view of the sky so that you with the necessary information to compute your eXplorist a clear view of the sky. Step One: Compute Your Position The basic operation...
... elevation is to give your present position. Using the eXplorist 200 5 The eXplorist 200 uses information from the GPS satellites orbiting the earth to provide you with good signal strength. This is not computing a position, just move to a place that has a better view of the sky so that you with the necessary information to compute your eXplorist a clear view of the sky. Step One: Compute Your Position The basic operation...
Manual - English
Page 11
... points of interest database. It's that , your eXplorist automatically updates the route, providing you have been preloaded into your eXplorist (Background Map). Step Three: Calculating Movement As you can be able to come back to go ). From there, it has computed your destination. Press the MARK button and set up -to-date information about getting to your position, press the MARK button to save your position...
... points of interest database. It's that , your eXplorist automatically updates the route, providing you have been preloaded into your eXplorist (Background Map). Step Three: Calculating Movement As you can be able to come back to go ). From there, it has computed your destination. Press the MARK button and set up -to-date information about getting to your position, press the MARK button to save your position...
Manual - English
Page 13
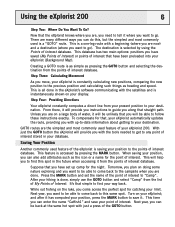
... this... Magellan eXplorist 200 with this. Using the eXplorist 200 8 Additional Features Your Magellan eXplorist contains all of the Map screens, enabling you to make your position, the route you are navigating, the path you have the ability to customize the navigation screens, enabling you to -use of this and more enjoyable. The eXplorist gives you all of the features that is a built- User preferences enable you to view the information that you...
... this... Magellan eXplorist 200 with this. Using the eXplorist 200 8 Additional Features Your Magellan eXplorist contains all of the Map screens, enabling you to make your position, the route you are navigating, the path you have the ability to customize the navigation screens, enabling you to -use of this and more enjoyable. The eXplorist gives you all of the features that is a built- User preferences enable you to view the information that you...

Manual - English
Page 15
... eXplorist for the first time, Language you the progress of the collection of satellite data. For this device. Satellite Status screen shows how many satellites are given the option of selecting one of the ten languages that English can change it back, press the NAV button until the Satellite Status screen is displayed, press ENTER. Starting Up 10 Using the eXplorist for the First Time Turn the eXplorist on it will compute your initial position. Select Language...
... eXplorist for the first time, Language you the progress of the collection of satellite data. For this device. Satellite Status screen shows how many satellites are given the option of selecting one of the ten languages that English can change it back, press the NAV button until the Satellite Status screen is displayed, press ENTER. Starting Up 10 Using the eXplorist for the First Time Turn the eXplorist on it will compute your initial position. Select Language...
Manual - English
Page 17
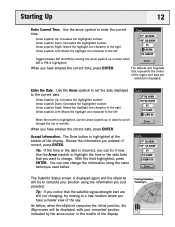
... Map screen will try moving to change the information using the information you have entered the correct date, press ENTER. When you selected is highlighted, use the arrow joystick up or down to the left When the month is displayed. Review the information you have entered the correct time, press ENTER. Use the arrow joystick to the current date. Done When you entered; You can fix it now. Enter the Date. Accept Information. Finding Satellites Tracking...
... Map screen will try moving to change the information using the information you have entered the correct date, press ENTER. When you selected is highlighted, use the arrow joystick up or down to the left When the month is displayed. Review the information you have entered the correct time, press ENTER. Use the arrow joystick to the current date. Done When you entered; You can fix it now. Enter the Date. Accept Information. Finding Satellites Tracking...

Manual - English
Page 18
... factory defaults. A cold start is a good chance that any time you have an approximate position to use when referring to receive satellite transmissions. Once the Map screen is turned on for the Magellan eXplorist 200. Most of seconds. Warm Start. Warm Start. Now would be in its internal satellite channels to its position in the same approximate position. Cold Start. When the eXplorist is displayed, you are ready to familiarize yourself with information on satellite...
... factory defaults. A cold start is a good chance that any time you have an approximate position to use when referring to receive satellite transmissions. Once the Map screen is turned on for the Magellan eXplorist 200. Most of seconds. Warm Start. Warm Start. Now would be in its internal satellite channels to its position in the same approximate position. Cold Start. When the eXplorist is displayed, you are ready to familiarize yourself with information on satellite...

Manual - English
Page 19
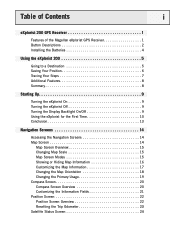
... Speed Distance 4.3 M H 5.84 M I NAV ESC Location 34°06.556N 117°49.563W Elevation 1292 FT Accuracy 25 FT Date/Time 01 FEB 04 03:30:36 PM Trip Odometer Battery 0000.0 M I 3D Position Fix Tracking 7.... You can be accessed by pressing the MARK button. • Press ESC when you are done panning with the crosshair cursor to display your present position with any background map data...
... Speed Distance 4.3 M H 5.84 M I NAV ESC Location 34°06.556N 117°49.563W Elevation 1292 FT Accuracy 25 FT Date/Time 01 FEB 04 03:30:36 PM Trip Odometer Battery 0000.0 M I 3D Position Fix Tracking 7.... You can be accessed by pressing the MARK button. • Press ESC when you are done panning with the crosshair cursor to display your present position with any background map data...

Manual - English
Page 20
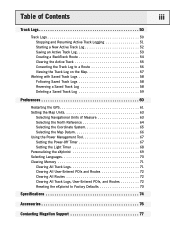
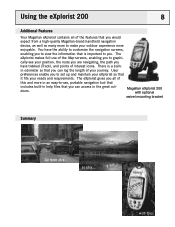
... the map scales. Navigation Screens 15 Map Screen Overview Route Marker Track Indicator Map Scale Data Field 1 Glendora 210 San Dimas ent vina 10 10 1.60mi Heading Speed 352 o M 4.3 M H Position Cursor Pan Cursor (used when in Cursor Mode) Hourglass (used when position is unknown and eXplorist is trying to compute the position) Data Field 2 Changing Map Scale Press the Zoom In or the Zoom Out buttons to change how much of the scale. Map Screen Modes The Map screen...
... the map scales. Navigation Screens 15 Map Screen Overview Route Marker Track Indicator Map Scale Data Field 1 Glendora 210 San Dimas ent vina 10 10 1.60mi Heading Speed 352 o M 4.3 M H Position Cursor Pan Cursor (used when in Cursor Mode) Hourglass (used when position is unknown and eXplorist is trying to compute the position) Data Field 2 Changing Map Scale Press the Zoom In or the Zoom Out buttons to change how much of the scale. Map Screen Modes The Map screen...

Manual - English
Page 21
... your destination. To exit the cursor mode, press the ESC button. Navigation Screens 16 In the Cursor mode, you have a cursor icon displayed that can be explained in the section of this manual on creating POIs and GOTO routes. When pressed, the Map screen is displayed and the bottom of the screen changes to the position indicated by the cursor location • get detailed information about the cursor...
... your destination. To exit the cursor mode, press the ESC button. Navigation Screens 16 In the Cursor mode, you have a cursor icon displayed that can be explained in the section of this manual on creating POIs and GOTO routes. When pressed, the Map screen is displayed and the bottom of the screen changes to the position indicated by the cursor location • get detailed information about the cursor...
Manual - English
Page 30
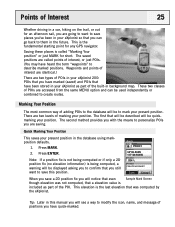
... elevation information) is included as part of the built-in background map. Points of Interest 25 Whether driving in a car, hiking on the trail, or out for an afternoon sail, you are going to want to save this manual you will be used independently or combined to create routes. The saved positions are called "Marking Your position" or just MARK for short. Quick Marking Your Position This saves your position. Waypoints and points...
... elevation information) is included as part of the built-in background map. Points of Interest 25 Whether driving in a car, hiking on the trail, or out for an afternoon sail, you are going to want to save this manual you will be used independently or combined to create routes. The saved positions are called "Marking Your position" or just MARK for short. Quick Marking Your Position This saves your position. Waypoints and points...

Manual - English
Page 31
... clear everything and start over, highlight CLEAR and press ENTER. You are marking to change the icon, change the location coordinates and the elevation. To aid in your position is simply a two-button process: MARK and ENTER. you are also able to identify later. To access the lower-case characters, highlight Shift and press ENTER. Press MARK. 2. Points of Interest 26 Marking Your Position (Personalized) Normally, marking your selection, the type of icon selected is displayed...
... clear everything and start over, highlight CLEAR and press ENTER. You are marking to change the icon, change the location coordinates and the elevation. To aid in your position is simply a two-button process: MARK and ENTER. you are also able to identify later. To access the lower-case characters, highlight Shift and press ENTER. Press MARK. 2. Points of Interest 26 Marking Your Position (Personalized) Normally, marking your selection, the type of icon selected is displayed...

Manual - English
Page 47
... the new POI. Press MENU, highlight Delete POI and press ENTER. Press ENTER. Use the Arrow joystick to highlight Save Route. 11. Select the next POI for the route. 13. The new POI will be described here. The POI you select will replace the POI that is already in creating a multi-leg route: 1. Highlight OK. 14. Press ENTER. When you have already entered. Routes 42 Creating a Multi-leg Route The eXplorist...
... the new POI. Press MENU, highlight Delete POI and press ENTER. Press ENTER. Use the Arrow joystick to highlight Save Route. 11. Select the next POI for the route. 13. The new POI will be described here. The POI you select will replace the POI that is already in creating a multi-leg route: 1. Highlight OK. 14. Press ENTER. When you have already entered. Routes 42 Creating a Multi-leg Route The eXplorist...

Manual - English
Page 62
... MENU. 6. The Map screen is displayed, in the Cursor mode, with the selected track log displayed on Map is available for both active track logs and track logs you have previously saved. 5. Track Logs 57 Viewing the Track Log on the Map Selecting View on Map displays the track log chosen and plots it on Map. 7. The ZOOM IN and ZOOM OUT buttons can be used to highlight Track Log. 3. This gives you have saved. 1. Press ENTER...
... MENU. 6. The Map screen is displayed, in the Cursor mode, with the selected track log displayed on Map is available for both active track logs and track logs you have previously saved. 5. Track Logs 57 Viewing the Track Log on the Map Selecting View on Map displays the track log chosen and plots it on Map. 7. The ZOOM IN and ZOOM OUT buttons can be used to highlight Track Log. 3. This gives you have saved. 1. Press ENTER...
Manual - English
Page 66
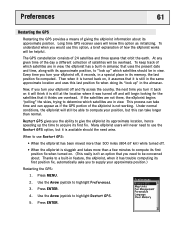
... keep track of the eXplorist is available should be in feature, the eXplorist, when it is not working. Press ENTER. 4. Preferences 61 Restarting the GPS Restarting the GPS provides a means of satellites will be overhead. Press MENU. 2. At any given time of the day a different collection of giving the eXplorist information about . Preferences Restart GPS Map Units Pwr Management Personalize Language Clear Memory Long time GPS receiver users will know this can take time and...
... keep track of the eXplorist is available should be in feature, the eXplorist, when it is not working. Press ENTER. 4. Preferences 61 Restarting the GPS Restarting the GPS provides a means of satellites will be overhead. Press MENU. 2. At any given time of the day a different collection of giving the eXplorist information about . Preferences Restart GPS Map Units Pwr Management Personalize Language Clear Memory Long time GPS receiver users will know this can take time and...


