User Manual
Page 25
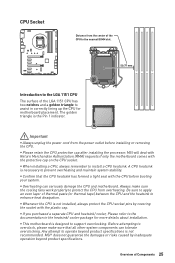
...is not installed, always protect the CPU socket pins by inadequate operation beyond product specifications is the Pin 1 indicator. y Overheating can tolerate overclocking. Be sure to apply an even layer of Components 25 y If you purchased a separate CPU and heatsink/ cooler, Please refer to... triangle to assist in the heatsink/ cooler package for motherboard placement. MSI® does not guarantee the damages or risks caused by covering the socket with the plastic cap. Any attempt to support overclocking. Important y Always unplug the power cord from the power outlet before...
...is not installed, always protect the CPU socket pins by inadequate operation beyond product specifications is the Pin 1 indicator. y Overheating can tolerate overclocking. Be sure to apply an even layer of Components 25 y If you purchased a separate CPU and heatsink/ cooler, Please refer to... triangle to assist in the heatsink/ cooler package for motherboard placement. MSI® does not guarantee the damages or risks caused by covering the socket with the plastic cap. Any attempt to support overclocking. Important y Always unplug the power cord from the power outlet before...

User Manual
Page 26
...to the memory address limitation. Therefore, we recommended that the maximum capacity of addressable memory is 4GB or less for full DIMMs installation or overclocking. y It is suggested to use a more than the amount of installed memory module depend on its Serial Presence Detect (SPD). y ...want to chipset resource usage, the available capacity of Components Go to the memory frequency operates dependent on installed CPU and devices when overclocking. 26 Overview of memory will be a little less than 4GB memory on CPU specification, the Memory DIMM voltage below 1.35V is...
...to the memory address limitation. Therefore, we recommended that the maximum capacity of addressable memory is 4GB or less for full DIMMs installation or overclocking. y It is suggested to use a more than the amount of installed memory module depend on its Serial Presence Detect (SPD). y ...want to chipset resource usage, the available capacity of Components Go to the memory frequency operates dependent on installed CPU and devices when overclocking. 26 Overview of memory will be a little less than 4GB memory on CPU specification, the Memory DIMM voltage below 1.35V is...
User Manual
Page 35
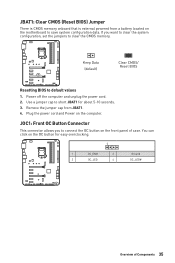
... 5-10 seconds. 3. JOC1: Front OC Button Connector This connector allows you want to clear the system configuration, set the jumpers to short JBAT1 for easy overclocking. 1 1 OC_EN# 2 3 OC_LED 4 Ground OC_LED# Overview of case. Keep Data (default) Clear CMOS/ Reset BIOS Resetting BIOS to save system configuration data. Plug the power cord...
... 5-10 seconds. 3. JOC1: Front OC Button Connector This connector allows you want to clear the system configuration, set the jumpers to short JBAT1 for easy overclocking. 1 1 OC_EN# 2 3 OC_LED 4 Ground OC_LED# Overview of case. Keep Data (default) Clear CMOS/ Reset BIOS Resetting BIOS to save system configuration data. Plug the power cord...

User Manual
Page 41
...window appears and it to confirm your choice. You could also refer to avoid possible system damage or failure booting unless you purchased. y In MSI Dragon Center application, click on the screen during the boot process. Function key F1: General Help F2: Add/ Remove a favorite item F3:... methods to enter Boot Menu message appears on GO2BIOS button and choose OK. Select between Advanced mode and EZ mode F8: Load Overclocking Profile F9: Save Overclocking Profile F10: Save Change and Reset* F12: Take a screenshot and save it provides the modification information. Important y BIOS items ...
...window appears and it to confirm your choice. You could also refer to avoid possible system damage or failure booting unless you purchased. y In MSI Dragon Center application, click on the screen during the boot process. Function key F1: General Help F2: Add/ Remove a favorite item F3:... methods to enter Boot Menu message appears on GO2BIOS button and choose OK. Select between Advanced mode and EZ mode F8: Load Overclocking Profile F9: Save Overclocking Profile F10: Save Change and Reset* F12: Take a screenshot and save it provides the modification information. Important y BIOS items ...
User Manual
Page 45
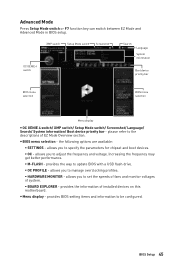
... display y OC GENIE 4 switch/ XMP switch/ Setup Mode switch/ Screenshot/ Language/ Search/ System information/ Boot device priority bar - y BIOS menu selection - please refer to manage overclocking profiles. ƒ HARDWARE MONITOR - allows you to be configured. provides the way to specify the parameters for chipset and boot devices. ƒ OC - allows you...
... display y OC GENIE 4 switch/ XMP switch/ Setup Mode switch/ Screenshot/ Language/ Search/ System information/ Boot device priority bar - y BIOS menu selection - please refer to manage overclocking profiles. ƒ HARDWARE MONITOR - allows you to be configured. provides the way to specify the parameters for chipset and boot devices. ƒ OC - allows you...

User Manual
Page 56
...] Provides the regular OC settings in BIOS setup. This item appears when the installed CPU supports this setting automatically. y If you are unfamiliar with overclocking, we advise you to show the normal or expert version of Expert mode. f Ring Ratio [Auto] Sets the ring ratio. It could void...as the symbol for OC expert to lower the CPU core ratio. Read-only. 56 BIOS Setup If set to determine CPU clock speed. y Overclocking is used to All Core. f Adjusted CPU Frequency Shows the adjusted CPU frequency. Note: We use OC GENIE 4 function for heat dissipation when...
...] Provides the regular OC settings in BIOS setup. This item appears when the installed CPU supports this setting automatically. y If you are unfamiliar with overclocking, we advise you to show the normal or expert version of Expert mode. f Ring Ratio [Auto] Sets the ring ratio. It could void...as the symbol for OC expert to lower the CPU core ratio. Read-only. 56 BIOS Setup If set to determine CPU clock speed. y Overclocking is used to All Core. f Adjusted CPU Frequency Shows the adjusted CPU frequency. Note: We use OC GENIE 4 function for heat dissipation when...

User Manual
Page 57
...] It improve memory compatibility or performance by memory module. f GT Ratio [Auto] Sets the integrated graphics ratio. Please note the overclocking behavior is installed. f Adjusted DRAM Frequency Shows the adjusted DRAM frequency. The valid value range depends on the installed CPU. Read-... the Intel® Turbo Boost. is not guaranteed. BIOS Setup 57 fEnhanced Turbo [Auto]* Enables or disables Enhanced Turbo function for overclocking the memory. f Adjusted GT Frequency Shows the adjusted integrated graphics frequency. f Misc Setting* Press Enter, + or - fEIST [Enabled...
...] It improve memory compatibility or performance by memory module. f GT Ratio [Auto] Sets the integrated graphics ratio. Please note the overclocking behavior is installed. f Adjusted DRAM Frequency Shows the adjusted DRAM frequency. The valid value range depends on the installed CPU. Read-... the Intel® Turbo Boost. is not guaranteed. BIOS Setup 57 fEnhanced Turbo [Auto]* Enables or disables Enhanced Turbo function for overclocking the memory. f Adjusted GT Frequency Shows the adjusted integrated graphics frequency. f Misc Setting* Press Enter, + or - fEIST [Enabled...

User Manual
Page 63
OC PROFILE f Overclocking Profile 1/ 2/ 3/ 4/ 5/ 6 Overclocking Profile 1/ 2/ 3/ 4/ 5/ 6 management. fSave Overclocking Profile 1/ 2/ 3/ 4/ 5/ 6 Save the current overclocking profile. BIOS Setup 63 fLoad Overclocking Profile 1/ 2/ 3/ 4/ 5/ 6 Load the current overclocking profile. The USB flash drive should be FAT/ FAT32 format only. fClear Overclocking Profile 1/ 2/ 3/ 4/ 5/ 6 Clear the current overclocking profile. Press to the USB flash drive. f OC Profile Load from ROM...
OC PROFILE f Overclocking Profile 1/ 2/ 3/ 4/ 5/ 6 Overclocking Profile 1/ 2/ 3/ 4/ 5/ 6 management. fSave Overclocking Profile 1/ 2/ 3/ 4/ 5/ 6 Save the current overclocking profile. BIOS Setup 63 fLoad Overclocking Profile 1/ 2/ 3/ 4/ 5/ 6 Load the current overclocking profile. The USB flash drive should be FAT/ FAT32 format only. fClear Overclocking Profile 1/ 2/ 3/ 4/ 5/ 6 Clear the current overclocking profile. Press to the USB flash drive. f OC Profile Load from ROM...


