
User Manual
Page 13
...CPU Chipset Memory Expansion Slot Onboard Graphics Multi-GPU Storage Supports Intel® Core™ 9000 Series family/ 8th Gen Intel® Core™ / Pentium® Gold / Celeron® processors for LGA 1151 socket * Please go to www.intel.com for more compatibility information. Continued on compatible memory. Intel® Z390...3000(OC) / 2800(OC)/ 2666/ 2400/ 2133 MHz* y Supports Dual-Channel mode y Supports non-ECC, un-buffered memory y Supports Intel® Extreme Memory Profile (XMP) * Please refer www.msi.com for more information on next page Specifications 13 y ...
...CPU Chipset Memory Expansion Slot Onboard Graphics Multi-GPU Storage Supports Intel® Core™ 9000 Series family/ 8th Gen Intel® Core™ / Pentium® Gold / Celeron® processors for LGA 1151 socket * Please go to www.intel.com for more compatibility information. Continued on compatible memory. Intel® Z390...3000(OC) / 2800(OC)/ 2666/ 2400/ 2133 MHz* y Supports Dual-Channel mode y Supports non-ECC, un-buffered memory y Supports Intel® Extreme Memory Profile (XMP) * Please refer www.msi.com for more information on next page Specifications 13 y ...

User Manual
Page 15
... 6-pin ATX 12V power connector y 6x SATA 6Gb/s connectors y 2x M.2 slots (1 M-Key slot,1 E-Key slot) y 2x USB 3.1 Gen1 connectors (supports additional 4 USB 3.1 Gen1 ports) y 2x USB 2.0 connectors (supports additional 4 USB 2.0 ports) y 1x 4-pin CPU fan connector y 1x 4-pin Water Pump connector y 5x 4-pin system fan connectors y 1x Front panel audio connector y 2x System...
... 6-pin ATX 12V power connector y 6x SATA 6Gb/s connectors y 2x M.2 slots (1 M-Key slot,1 E-Key slot) y 2x USB 3.1 Gen1 connectors (supports additional 4 USB 3.1 Gen1 ports) y 2x USB 2.0 connectors (supports additional 4 USB 2.0 ports) y 1x 4-pin CPU fan connector y 1x 4-pin Water Pump connector y 5x 4-pin system fan connectors y 1x Front panel audio connector y 2x System...
User Manual
Page 25
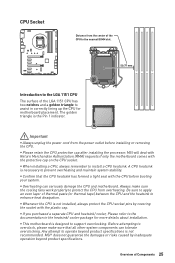
The golden triangle is designed to support overclocking. Important y Always unplug the power cord from overheating. y This motherboard is the Pin 1 indicator. MSI® does not guarantee the damages or risks caused by covering the socket with the plastic cap. y Please retain the CPU protective cap after installing the processor. y Overheating can tolerate overclocking...
The golden triangle is designed to support overclocking. Important y Always unplug the power cord from overheating. y This motherboard is the Pin 1 indicator. MSI® does not guarantee the damages or risks caused by covering the socket with the plastic cap. y Please retain the CPU protective cap after installing the processor. y Overheating can tolerate overclocking...
User Manual
Page 27
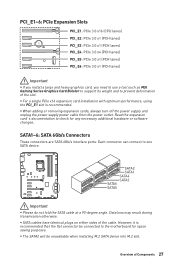
... SATA1 SATA4 SATA3 SATA6 SATA5 Important y Please do not fold the SATA cable at a 90-degree angle. BAT1 PCI_E1~6: PCIe Expansion Slots PCI_E1: PCIe 3.0 x16 (CPU lanes) PCI_E2: PCIe 3.0 x1 (PCH lanes) PCI_E3: PCIe 3.0 x1 (PCH lanes) PCI_E4: PCIe 3.0 x4 (PCH lanes) PCI_E5: PCIe 3.0 x1 (PCH lanes) PCI_E6...3.0 x1 (PCH lanes) Important y If you install a large and heavy graphics card, you need to use a tool such as MSI Gaming Series Graphics Card Bolster to support its weight and to one SATA device. Data loss may result during transmission otherwise. y The SATA2 will be connected to check for...
... SATA1 SATA4 SATA3 SATA6 SATA5 Important y Please do not fold the SATA cable at a 90-degree angle. BAT1 PCI_E1~6: PCIe Expansion Slots PCI_E1: PCIe 3.0 x16 (CPU lanes) PCI_E2: PCIe 3.0 x1 (PCH lanes) PCI_E3: PCIe 3.0 x1 (PCH lanes) PCI_E4: PCIe 3.0 x4 (PCH lanes) PCI_E5: PCIe 3.0 x1 (PCH lanes) PCI_E6...3.0 x1 (PCH lanes) Important y If you install a large and heavy graphics card, you need to use a tool such as MSI Gaming Series Graphics Card Bolster to support its weight and to one SATA device. Data loss may result during transmission otherwise. y The SATA2 will be connected to check for...
User Manual
Page 36
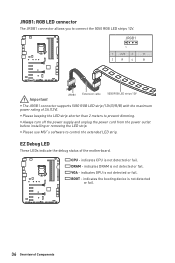
... - BOOT - indicates CPU is not detected or fail. JRGB1: RGB LED connector The JRGB1 connector allows you to control the extended LED strip. y Please use MSI's software to connect the 5050 RGB LED strips 12V. JRGB1 1 1 +12V 2 G 3 R 4 B Important 1 JRGB1 Extension cable 5050 RGB LED strips 12V y The JRGB1 connector supports 5050 RGB LED...
... - BOOT - indicates CPU is not detected or fail. JRGB1: RGB LED connector The JRGB1 connector allows you to control the extended LED strip. y Please use MSI's software to connect the 5050 RGB LED strips 12V. JRGB1 1 1 +12V 2 G 3 R 4 B Important 1 JRGB1 Extension cable 5050 RGB LED strips 12V y The JRGB1 connector supports 5050 RGB LED...
User Manual
Page 43
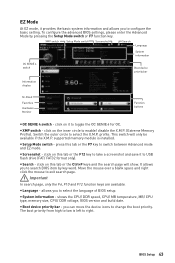
y XMP switch - Important In search page, only the F6, F10 and F12 function keys are available. shows the CPU/ DDR speed, CPU/ MB temperature, MB/ CPU type, memory size, CPU/ DDR voltage, BIOS version and build date. click on it to toggle the OC GENIE 4 for OC. allows you to configure the basic ... enter the Advanced Mode by key word. click on this tab or the Ctrl+F keys and the search page will only be available if the X.M.P. supported memory module is left to right. y Setup Mode switch - y Language - Switch the outer circle to switch between Advanced mode and EZ mode....
y XMP switch - Important In search page, only the F6, F10 and F12 function keys are available. shows the CPU/ DDR speed, CPU/ MB temperature, MB/ CPU type, memory size, CPU/ DDR voltage, BIOS version and build date. click on it to toggle the OC GENIE 4 for OC. allows you to configure the basic ... enter the Advanced Mode by key word. click on this tab or the Ctrl+F keys and the search page will only be available if the X.M.P. supported memory module is left to right. y Setup Mode switch - y Language - Switch the outer circle to switch between Advanced mode and EZ mode....
User Manual
Page 47
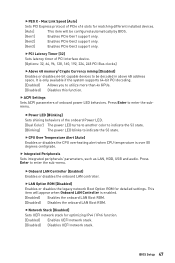
...-bit PCI decoding. [Enabled] Allows you to be configured automatically by BIOS. [Gen1] Enables PCIe Gen1 support only. [Gen2] Enables PCIe Gen2 support only. [Gen3] Enables PCIe Gen3 support only. fLAN Option ROM [Disabled] Enables or disables the legacy network Boot Option ROM for optimizing IPv4 ... to utilize more than 4x GPUs. [Disabled] Disables this function. fCPU Over Temperature Alert [Auto] Enables or disables the CPU overheating alert when CPU temperature is over 80 degrees centigrade. Press Enter to enter the submenu. fNetwork Stack [Disabled] Sets UEFI network stack for...
...-bit PCI decoding. [Enabled] Allows you to be configured automatically by BIOS. [Gen1] Enables PCIe Gen1 support only. [Gen2] Enables PCIe Gen2 support only. [Gen3] Enables PCIe Gen3 support only. fLAN Option ROM [Disabled] Enables or disables the legacy network Boot Option ROM for optimizing IPv4 ... to utilize more than 4x GPUs. [Disabled] Disables this function. fCPU Over Temperature Alert [Auto] Enables or disables the CPU overheating alert when CPU temperature is over 80 degrees centigrade. Press Enter to enter the submenu. fNetwork Stack [Disabled] Sets UEFI network stack for...

User Manual
Page 56
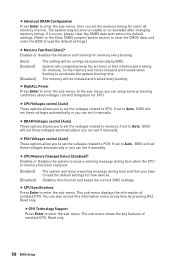
... regular OC settings in BIOS setup. [Expert] Provides the advanced OC settings for heat dissipation when running AVX instruction set to lower the CPU core ratio. If set to use * as the symbol for advanced users. y Overclocking is used to configure in BIOS setup. This ... is not guaranteed, and if done improperly, it could be helpful for OC expert to determine CPU clock speed. f Ring Ratio [Auto] Sets the ring ratio. This item appears when the installed CPU supports this setting automatically. f Adjusted Ring Frequency Shows the adjusted Ring frequency. f OC Explore Mode ...
... regular OC settings in BIOS setup. [Expert] Provides the advanced OC settings for heat dissipation when running AVX instruction set to lower the CPU core ratio. If set to use * as the symbol for advanced users. y Overclocking is used to configure in BIOS setup. This ... is not guaranteed, and if done improperly, it could be helpful for OC expert to determine CPU clock speed. f Ring Ratio [Auto] Sets the ring ratio. This item appears when the installed CPU supports this setting automatically. f Adjusted Ring Frequency Shows the adjusted Ring frequency. f OC Explore Mode ...

User Manual
Page 57
...open or close the following 3 items related to adjust CPU voltage and core frequency dynamically. This item appears when the installed CPU supports this function. [Enabled] Enables this function to boost CPU performance automatically above rated specifications when system request the ...+ or - f DRAM Frequency [Auto] Sets the DRAM frequency. BIOS Setup 57 Please note that support X.M.P. Read-only. This item appears when the installed CPU supports this function. [Auto] This setting will be configured automatically by adjusting this function. This item will ...
...open or close the following 3 items related to adjust CPU voltage and core frequency dynamically. This item appears when the installed CPU supports this function. [Enabled] Enables this function to boost CPU performance automatically above rated specifications when system request the ...+ or - f DRAM Frequency [Auto] Sets the DRAM frequency. BIOS Setup 57 Please note that support X.M.P. Read-only. This item appears when the installed CPU supports this function. [Auto] This setting will be configured automatically by adjusting this function. This item will ...
User Manual
Page 58
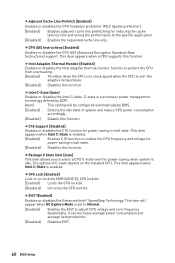
... [Disabled] The setting will be configured automatically by pressing [F4]. If it manually. System will completely keep the archives of installed CPU. f CPU Voltages control [Auto] These options allows you can also access this function and keeps the current BIOS settings. This sub-menu displays ... and trained when booting to enter the sub-menu. f DigitALL Power Press Enter to accelerate the system booting time. fCPU Technology Support Press Enter to load the default settings for each/ all memory channel. User can set it manually. f PCH Voltages control [...
... [Disabled] The setting will be configured automatically by pressing [F4]. If it manually. System will completely keep the archives of installed CPU. f CPU Voltages control [Auto] These options allows you can also access this function and keeps the current BIOS settings. This sub-menu displays ... and trained when booting to enter the sub-menu. f DigitALL Power Press Enter to accelerate the system booting time. fCPU Technology Support Press Enter to load the default settings for each/ all memory channel. User can set it manually. f PCH Voltages control [...

User Manual
Page 59
...In this information menu at any time by pressing [F5]. The system can function as multi logical processors that do not support the processor with extended CPUID value. [Disabled] Use the actual maximum CPUID input value. You can execute instructions simultaneously. ...that can also access this way, the system performance is highly improved. f CPU Features Press Enter to run multiple operating systems in independent partitions. This item appears when the installed CPU supports this technology. [Enable] Enables Intel Hyper-Threading technology. [Disabled] Disables ...
...In this information menu at any time by pressing [F5]. The system can function as multi logical processors that do not support the processor with extended CPUID value. [Disabled] Use the actual maximum CPUID input value. You can execute instructions simultaneously. ...that can also access this way, the system performance is highly improved. f CPU Features Press Enter to run multiple operating systems in independent partitions. This item appears when the installed CPU supports this technology. [Enable] Enables Intel Hyper-Threading technology. [Disabled] Disables ...
User Manual
Page 60
This item appears when a CPU supports this function. fIntel Adaptive Thermal Monitor [Enabled] Enables or disables the Intel adaptive thermal monitor function to protect the CPU from overheating. [Enabled] Throttles down the CPU core clock speed when the CPU is a processor power management technology defined by... BIOS. [Enabled] Detects the idle state of C-state depend on the installed CPU. C-state is over the adaptive temperature. [Disabled] Disables this function. fC1E Support [Disabled] Enables or disables the C1E function for power-saving when system is enabled. ...
This item appears when a CPU supports this function. fIntel Adaptive Thermal Monitor [Enabled] Enables or disables the Intel adaptive thermal monitor function to protect the CPU from overheating. [Enabled] Throttles down the CPU core clock speed when the CPU is a processor power management technology defined by... BIOS. [Enabled] Detects the idle state of C-state depend on the installed CPU. C-state is over the adaptive temperature. [Disabled] Disables this function. fC1E Support [Disabled] Enables or disables the C1E function for power-saving when system is enabled. ...
User Manual
Page 61
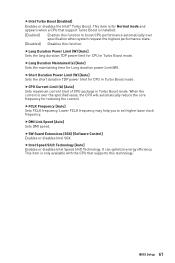
...Intel SGX. fLong Duration Power Limit (W) [Auto] Sets the long duration TDP power limit for CPU in Turbo Boost mode. This item is only available with the CPU that support Turbo Boost is installed. [Enabled] Enables this function to set higher base clock frequency. fIntel ...Sets FCLK frequency. Lower FCLK frequency may help you to boost CPU performance automatically over the specified value, the CPU will automatically reduce the core frequency for Normal mode and appears when a CPU that supports this function. fDMI Link Speed [Auto] Sets DMI speed. It...
...Intel SGX. fLong Duration Power Limit (W) [Auto] Sets the long duration TDP power limit for CPU in Turbo Boost mode. This item is only available with the CPU that support Turbo Boost is installed. [Enabled] Enables this function to set higher base clock frequency. fIntel ...Sets FCLK frequency. Lower FCLK frequency may help you to boost CPU performance automatically over the specified value, the CPU will automatically reduce the core frequency for Normal mode and appears when a CPU that supports this function. fDMI Link Speed [Auto] Sets DMI speed. It...

User Manual
Page 72
... BIOS. y DO NOT revert back to prevent seriously damage your operating system, please follow the cautions listed below. Reboot System. y DO NOT replace the CPU that is not supported by Intel® Optane™ Memory. 72 Intel® Optane™ Memory Configuration y DO NOT remove the Intel® Optane™...
... BIOS. y DO NOT revert back to prevent seriously damage your operating system, please follow the cautions listed below. Reboot System. y DO NOT replace the CPU that is not supported by Intel® Optane™ Memory. 72 Intel® Optane™ Memory Configuration y DO NOT remove the Intel® Optane™...


