

User Manual
Page 3
Preface 1-3 Right Side View ...2-14 Left Side View...2-15 Rear Side View...2-17 Bottom Side View ...2-18 Getting Started Power Management ...3-2 AC Adapter ...3-2 Battery Pack ...3-4 Using the Battery Pack...3-7 Basic Operations ...3-9 Safety and Comfort Tips...3-9 Having a Good Work Habit...3-10 Knowing the Keyboard ...3-11 Knowing the Touchpad ...3-15 About Hard Disk Drive...3-18 Using the Optical Storage Device 3-19 Connecting the External Devices 3-22 Connecting the Peripheral Devices 3-22 Connecting the Communication Devices 3-25 Safely Remove Hardware ...3-27
Preface 1-3 Right Side View ...2-14 Left Side View...2-15 Rear Side View...2-17 Bottom Side View ...2-18 Getting Started Power Management ...3-2 AC Adapter ...3-2 Battery Pack ...3-4 Using the Battery Pack...3-7 Basic Operations ...3-9 Safety and Comfort Tips...3-9 Having a Good Work Habit...3-10 Knowing the Keyboard ...3-11 Knowing the Touchpad ...3-15 About Hard Disk Drive...3-18 Using the Optical Storage Device 3-19 Connecting the External Devices 3-22 Connecting the Peripheral Devices 3-22 Connecting the Communication Devices 3-25 Safely Remove Hardware ...3-27
User Manual
Page 5
... generates, uses and radiates radio frequency energy, and, if not installed and used in accordance with the limits for a Class B digital device, pursuant to part 15 of the following measures: „ Reorient or relocate the receiving antenna. „ Increase the separation between the equipment and receiver. „ Connect the equipment into...
... generates, uses and radiates radio frequency energy, and, if not installed and used in accordance with the limits for a Class B digital device, pursuant to part 15 of the following measures: „ Reorient or relocate the receiving antenna. „ Increase the separation between the equipment and receiver. „ Connect the equipment into...

User Manual
Page 6
Preface 1-6 Š Shield interface cables and AC power cord, if any interference received, including interference that may not cause harmful interference. „ This device must accept any , must be used in order to the following two conditions: „ This device may cause undesired operation. Operation is subject to comply with part 15 of the FCC Rules. FCC Conditions This device complies with the emission limits.
Preface 1-6 Š Shield interface cables and AC power cord, if any interference received, including interference that may not cause harmful interference. „ This device must accept any , must be used in order to the following two conditions: „ This device may cause undesired operation. Operation is subject to comply with part 15 of the FCC Rules. FCC Conditions This device complies with the emission limits.

User Manual
Page 26
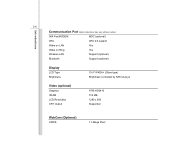
Introductions 2-5 Power AC Adapter Battery Type RTC Battery Storage HDD form factor Optical Device I/O Port Monitor (VGA) USB Mic-in Line-in S/PDIF Internal Microphone RJ11 RJ45 Card Reader 90W, 19V 6 cells 9 cells (optional) Yes 2.5", 9.5 mm High, 5400rpm, SATA DVD Combo/ Super Multi (Devices listed here may vary without notice) 15 pin D-Sub x 1 x 4 (USB version 2.0) x 1 x 1 x 1(Share with headphone-out) x 1 x 1 (optional) x 1 x 1 (SD/ MMC/ MS/ MS Pro) The supported memory cards may vary without notice.
Introductions 2-5 Power AC Adapter Battery Type RTC Battery Storage HDD form factor Optical Device I/O Port Monitor (VGA) USB Mic-in Line-in S/PDIF Internal Microphone RJ11 RJ45 Card Reader 90W, 19V 6 cells 9 cells (optional) Yes 2.5", 9.5 mm High, 5400rpm, SATA DVD Combo/ Super Multi (Devices listed here may vary without notice) 15 pin D-Sub x 1 x 4 (USB version 2.0) x 1 x 1 x 1(Share with headphone-out) x 1 x 1 (optional) x 1 x 1 (SD/ MMC/ MS/ MS Pro) The supported memory cards may vary without notice.
User Manual
Page 27
2-6 Introductions Communication Port (Items listed here may vary without notice) 56K Fax/MODEM MDC (optional) Wfm Wfm 2.0 support Wake on LAN Yes Wake on Ring Yes Wireless LAN Bluetooth Support (optional) Support (optional) Display LCD Type Brightness 15.4" WXGA+ (Glare type) Brightness controlled by K/B hot-keys Video (optional) Graphics VRAM LCD Resolution CRT Output ATI® HD3410 512 MB 1280 x 800 Supported WebCam (Optional) CMOS 1.3 Mega Pixel
2-6 Introductions Communication Port (Items listed here may vary without notice) 56K Fax/MODEM MDC (optional) Wfm Wfm 2.0 support Wake on LAN Yes Wake on Ring Yes Wireless LAN Bluetooth Support (optional) Support (optional) Display LCD Type Brightness 15.4" WXGA+ (Glare type) Brightness controlled by K/B hot-keys Video (optional) Graphics VRAM LCD Resolution CRT Output ATI® HD3410 512 MB 1280 x 800 Supported WebCam (Optional) CMOS 1.3 Mega Pixel
User Manual
Page 35
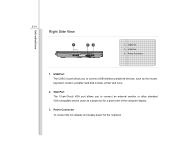
USB Port 2. VGA Port 3. USB Port The USB 2.0 port allows you to connect USB-interface peripheral devices, such as a projector) for the notebook. Introductions 2-14 Right Side View 1 23 1. VGA Port The 15-pin-D-sub VGA port allows you to connect an external monitor or other standard VGA-compatible device (such as the mouse, keyboard, modem, portable hard disk module, printer and more. 2. Power Connector 1. Power Connector To connect the AC adapter and supply power for a great view of the computer display. 3.
USB Port 2. VGA Port 3. USB Port The USB 2.0 port allows you to connect USB-interface peripheral devices, such as a projector) for the notebook. Introductions 2-14 Right Side View 1 23 1. VGA Port The 15-pin-D-sub VGA port allows you to connect an external monitor or other standard VGA-compatible device (such as the mouse, keyboard, modem, portable hard disk module, printer and more. 2. Power Connector 1. Power Connector To connect the AC adapter and supply power for a great view of the computer display. 3.

User Manual
Page 36
... Connector 3. USB Port 5. RJ-45 Connector The 10/100/1000 Ethernet connector is used to connect an RJ-11 telephone line Optical Device Drive 1. Introductions 2-15 Left Side View 12 34 5 1. RJ-11 Connector (optional) 4. Kensington Lock 2. Kensington Lock This notebook provides a Kensington Lock hole, which allows the whole cable to...
... Connector 3. USB Port 5. RJ-45 Connector The 10/100/1000 Ethernet connector is used to connect an RJ-11 telephone line Optical Device Drive 1. Introductions 2-15 Left Side View 12 34 5 1. RJ-11 Connector (optional) 4. Kensington Lock 2. Kensington Lock This notebook provides a Kensington Lock hole, which allows the whole cable to...
User Manual
Page 55
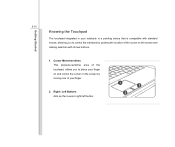
Right / Left Buttons Acts as the mouse's right/ left button. 1 2 2 Cursor Movement Area This pressure-sensitive area of the touchpad, allows you to place your finger on and control the cursor on the screen and making selection with its two buttons. 1. Getting Started 3-15 Knowing the Touchpad The touchpad integrated in your notebook is a pointing device that is compatible with standard mouse, allowing you to control the notebook by moving one of the cursor on the screen by pointing the location of your finger. 2.
Right / Left Buttons Acts as the mouse's right/ left button. 1 2 2 Cursor Movement Area This pressure-sensitive area of the touchpad, allows you to place your finger on and control the cursor on the screen and making selection with its two buttons. 1. Getting Started 3-15 Knowing the Touchpad The touchpad integrated in your notebook is a pointing device that is compatible with standard mouse, allowing you to control the notebook by moving one of the cursor on the screen by pointing the location of your finger. 2.

User Manual
Page 63
Getting Started 3-23 Connecting the External Display Devices This notebook provides a VGA port for a great view of the notebook display. The 15-pin-D-sub VGA port allows users to connect an external monitor or other standard VGA-compatible device (such as a projector) for connecting a larger display with higher resolution.
Getting Started 3-23 Connecting the External Display Devices This notebook provides a VGA port for a great view of the notebook display. The 15-pin-D-sub VGA port allows users to connect an external monitor or other standard VGA-compatible device (such as a projector) for connecting a larger display with higher resolution.