User Manual
Page 2
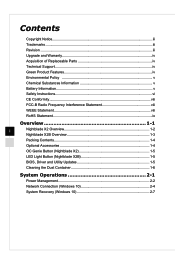
... of Replaceable Parts iv Technical Support iv Green Product Features iv Environmental Policy v Chemical Substances Information v Battery Information v Safety Instructions vi CE Conformity viii FCC-B Radio Frequency Interference Statement viii WEEE Statement viii RoHS Statement ix Overview 1-1 ii Nightblade X2 Overview 1-2 Nightblade X2B Overview 1-3 Packing Contents 1-4 Optional Accessories 1-4 OC Genie Button (Nightblade X2 1-5 LED Light Button (Nightblade X2B 1-5 BIOS, Driver and Utility Updates 1-5 Cleaning the Dust Container 1-6 System Operations 2-1 Power...
... of Replaceable Parts iv Technical Support iv Green Product Features iv Environmental Policy v Chemical Substances Information v Battery Information v Safety Instructions vi CE Conformity viii FCC-B Radio Frequency Interference Statement viii WEEE Statement viii RoHS Statement ix Overview 1-1 ii Nightblade X2 Overview 1-2 Nightblade X2B Overview 1-3 Packing Contents 1-4 Optional Accessories 1-4 OC Genie Button (Nightblade X2 1-5 LED Light Button (Nightblade X2B 1-5 BIOS, Driver and Utility Updates 1-5 Cleaning the Dust Container 1-6 System Operations 2-1 Power...
User Manual
Page 4
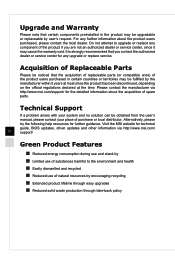
... manufacturer via http://www.msi.com/ iv support/ Green Product Features ◙◙ Reduced energy consumption during use and stand-by ◙◙ Limited use of substances harmful to upgrade or replace any upgrade or replace service. Visit the MSI website for technical guide, BIOS updates, driver updates and other information via http://www.msi.com/support/ for the detailed information about the product users purchased, please contact the...
... manufacturer via http://www.msi.com/ iv support/ Green Product Features ◙◙ Reduced energy consumption during use and stand-by ◙◙ Limited use of substances harmful to upgrade or replace any upgrade or replace service. Visit the MSI website for technical guide, BIOS updates, driver updates and other information via http://www.msi.com/support/ for the detailed information about the product users purchased, please contact the...

User Manual
Page 5
... equivalent type recommended by the manufacturer. Please use the public collection system to enable proper reuse of parts and recycling and should contact the local authorized point of collection for recycling and disposing of their end-of-life products. ◙◙ Visit the MSI website and locate a nearby distributor for further recycling information. ◙◙ Users may...
... equivalent type recommended by the manufacturer. Please use the public collection system to enable proper reuse of parts and recycling and should contact the local authorized point of collection for recycling and disposing of their end-of-life products. ◙◙ Visit the MSI website and locate a nearby distributor for further recycling information. ◙◙ Users may...
User Manual
Page 6
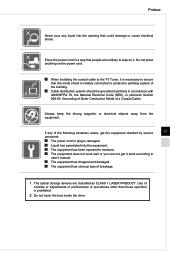
... power cord or switch the wall socket off if the equipment would be noted. Lay this equipment away from the plug. NOTE: The maximum operating temperature is within its safety range and has been adjusted properly to the power outlet. Keep the User's Guide that the power voltage is around 40OC. Do not cover the ventilator. vi ◙◙ Make...
... power cord or switch the wall socket off if the equipment would be noted. Lay this equipment away from the plug. NOTE: The maximum operating temperature is within its safety range and has been adjusted properly to the power outlet. Keep the User's Guide that the power voltage is around 40OC. Do not cover the ventilator. vi ◙◙ Make...
User Manual
Page 7
... lens inside the drive. Do not place anything on the power cord. ◙◙ When installing the coaxial cable to protective earthing system of the building. ◙◙ Cable distribution system should be grounded (earthed) in accordance with ANSI/NFPA 70, the National Electrical Code (NEC), in a way that could damage or cause electrical shock. The optical storage devices...
... lens inside the drive. Do not place anything on the power cord. ◙◙ When installing the coaxial cable to protective earthing system of the building. ◙◙ Cable distribution system should be grounded (earthed) in accordance with ANSI/NFPA 70, the National Electrical Code (NEC), in a way that could damage or cause electrical shock. The optical storage devices...
User Manual
Page 8
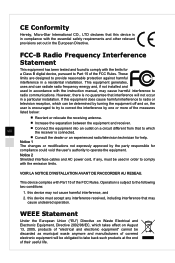
... interface cables and AC power cord, if any interference received, including interference that interference will be discarded as municipal waste anymore and manufacturers of their useful life. This device complies with the instruction manual, may cause harmful interference to radio communications. this device is in accordance with Part 15 of the FCC Rules. CE Conformity Hereby, Micro-Star International...
... interface cables and AC power cord, if any interference received, including interference that interference will be discarded as municipal waste anymore and manufacturers of their useful life. This device complies with the instruction manual, may cause harmful interference to radio communications. this device is in accordance with Part 15 of the FCC Rules. CE Conformity Hereby, Micro-Star International...

User Manual
Page 9
... substances The equipment complies with the "India E-waste (Management and Handling) Rule 2011" and prohibits use of the Rule. http://www.msi.com/html/popup/csr/cemm_jp.html http://tw.msi.com/html/popup/csr_tw/cemm_jp.html India RoHS This product complies with requirements of the Technical Regulation, approved by the Resolution of Cabinet of...
... substances The equipment complies with the "India E-waste (Management and Handling) Rule 2011" and prohibits use of the Rule. http://www.msi.com/html/popup/csr/cemm_jp.html http://tw.msi.com/html/popup/csr_tw/cemm_jp.html India RoHS This product complies with requirements of the Technical Regulation, approved by the Resolution of Cabinet of...
User Manual
Page 12
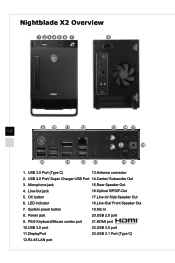
Optical S/PDIF-Out 5. Power jack 20. HDMI port 10. USB 3.1 Port (Type C) 12. Center/ Subwoofer Out 3. OC button 17. USB 2.0 port 9. PS/2 Keyboard/Mouse combo port 21. Rear Speaker Out 4. Line-In/ Side Speaker Out 6. Line-Out/ Front Speaker Out 7. Antenna connector 2. DisplayPort 23. RJ-45 LAN port Microphone jack 15. LED indicator 18. Mic In 8. System power button 19. USB 3.0 port 22. Line-Out jack 16. USB 3.0 port 11. USB 3.0 Port (Type C) 13. USB 2.0 Port/ Super Charger USB Port 14. Nightblade X2 Overview 1 2345 6 7 ...
Optical S/PDIF-Out 5. Power jack 20. HDMI port 10. USB 3.1 Port (Type C) 12. Center/ Subwoofer Out 3. OC button 17. USB 2.0 port 9. PS/2 Keyboard/Mouse combo port 21. Rear Speaker Out 4. Line-In/ Side Speaker Out 6. Line-Out/ Front Speaker Out 7. Antenna connector 2. DisplayPort 23. RJ-45 LAN port Microphone jack 15. LED indicator 18. Mic In 8. System power button 19. USB 3.0 port 22. Line-Out jack 16. USB 3.0 port 11. USB 3.0 Port (Type C) 13. USB 2.0 Port/ Super Charger USB Port 14. Nightblade X2 Overview 1 2345 6 7 ...
User Manual
Page 13
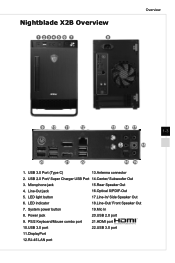
Center/ Subwoofer Out 3. Rear Speaker Out 4. Optical S/PDIF-Out 5. Microphone jack 15. LED indicator 18. Line-Out/ Front Speaker Out 7. System power button 19. USB 2.0 port 9. USB 2.0 Port/ Super Charger USB Port 14. PS/2 Keyboard/Mouse combo port 21. USB 3.0 port 11. RJ-45 LAN port Nightblade X2B Overview 1 2345 6 7 8 Overview 9 10 11 12 13 14 17 1-3 15 18 20 21 22 16 19 1. Power jack 20. HDMI port 10. Line-Out jack 16. Antenna connector 2. USB 3.0 port 22...
Center/ Subwoofer Out 3. Rear Speaker Out 4. Optical S/PDIF-Out 5. Microphone jack 15. LED indicator 18. Line-Out/ Front Speaker Out 7. System power button 19. USB 2.0 port 9. USB 2.0 Port/ Super Charger USB Port 14. PS/2 Keyboard/Mouse combo port 21. USB 3.0 port 11. RJ-45 LAN port Nightblade X2B Overview 1 2345 6 7 8 Overview 9 10 11 12 13 14 17 1-3 15 18 20 21 22 16 19 1. Power jack 20. HDMI port 10. Line-Out jack 16. Antenna connector 2. USB 3.0 port 22...
User Manual
Page 14
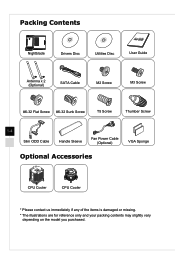
Packing Contents Nightblade Drivers Disc Utilities Disc User Guide Antenna x 2 (Optional) SATA Cable M2 Screw M3 Screw #6-32 Flat Screw #6-32 Sunk Screw T5 Screw Thumber Screw 1-4 Slim ODD Cable Handle Sleeve Fan Power Cable (Optional) VGA Sponge Optional Accessories CPU Cooler CPU Cooler * Please contact us immediately if any of the items is damaged or missing. * The illustrations are for reference only and your packing contents may slightly vary depending on the model you purchased.
Packing Contents Nightblade Drivers Disc Utilities Disc User Guide Antenna x 2 (Optional) SATA Cable M2 Screw M3 Screw #6-32 Flat Screw #6-32 Sunk Screw T5 Screw Thumber Screw 1-4 Slim ODD Cable Handle Sleeve Fan Power Cable (Optional) VGA Sponge Optional Accessories CPU Cooler CPU Cooler * Please contact us immediately if any of the items is damaged or missing. * The illustrations are for reference only and your packing contents may slightly vary depending on the model you purchased.
User Manual
Page 15
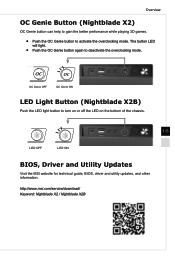
... OC Genie button again to turn on or off the LED on the bottom of the chassis. 1-5 LED OFF LED ON BIOS, Driver and Utility Updates Visit the MSI website for technical guide, BIOS, driver and utility updates, and other information. http://www.msi.com/service/download/ Keyword: Nightblade X2 / Nightblade X2B OC Genie OFF OC Genie ON LED Light Button (Nightblade X2B) Push the LED light button to deactivate the overclocking mode. Overview OC Genie Button (Nightblade X2) OC Genie button can help...
... OC Genie button again to turn on or off the LED on the bottom of the chassis. 1-5 LED OFF LED ON BIOS, Driver and Utility Updates Visit the MSI website for technical guide, BIOS, driver and utility updates, and other information. http://www.msi.com/service/download/ Keyword: Nightblade X2 / Nightblade X2B OC Genie OFF OC Genie ON LED Light Button (Nightblade X2B) Push the LED light button to deactivate the overclocking mode. Overview OC Genie Button (Nightblade X2) OC Genie button can help...
User Manual
Page 18
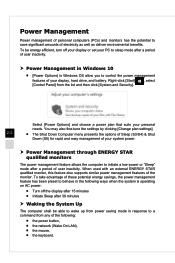
... network (Wake On LAN), ■■ the mouse, ■■ the keyboard. hh Power Management through ENERGY STAR qualified monitors The power management feature allows the computer to control the power management features of your display, hard drive, and battery. hh Power Management in Windows 10 ■■ [Power Options] in Windows OS allow you to initiate a low-power or "Sleep" mode after a period of user inactivity. When used with an external ENERGY STAR qualified monitor, this feature also supports similar power management...
... network (Wake On LAN), ■■ the mouse, ■■ the keyboard. hh Power Management through ENERGY STAR qualified monitors The power management feature allows the computer to control the power management features of your display, hard drive, and battery. hh Power Management in Windows 10 ■■ [Power Options] in Windows OS allow you to initiate a low-power or "Sleep" mode after a period of user inactivity. When used with an external ENERGY STAR qualified monitor, this feature also supports similar power management...

User Manual
Page 19
System Operations Energy Saving Tips: ■■ Turn off the monitor by pressing the monitor power button after a period of user inactivity. ■■ Tune the settings in Power Options under Windows OS to optimize your PC's power management. ■■ Install power saving software to manage your PC's energy consumption. ■■ Always disconnect the AC power cord or switch the wall socket off if your PC would be left unused for a certain time to achieve zero energy consumption. 2-3
System Operations Energy Saving Tips: ■■ Turn off the monitor by pressing the monitor power button after a period of user inactivity. ■■ Tune the settings in Power Options under Windows OS to optimize your PC's power management. ■■ Install power saving software to manage your PC's energy consumption. ■■ Always disconnect the AC power cord or switch the wall socket off if your PC would be left unused for a certain time to achieve zero energy consumption. 2-3

User Manual
Page 20
Select [Set up a new connection or network]. Right-click [Start] and select [Control Panel] from the list. 2. Network Connection (Windows 10) hh Wired Network 1. Select [View network status and tasks] under [Network and Internet]. 2-4 3.
Select [Set up a new connection or network]. Right-click [Start] and select [Control Panel] from the list. 2. Network Connection (Windows 10) hh Wired Network 1. Select [View network status and tasks] under [Network and Internet]. 2-4 3.

User Manual
Page 21
Choose [Connect to establish your Internet Service Provider (ISP) and click [Connect] to the Internet] and click [Next]. 5. System Operations 4. Type the information from your LAN connection. 2-5 Select [Broadband (PPPoE)] to connect using DSL or cable that requires a user name and password. 6.
Choose [Connect to establish your Internet Service Provider (ISP) and click [Connect] to the Internet] and click [Next]. 5. System Operations 4. Type the information from your LAN connection. 2-5 Select [Broadband (PPPoE)] to connect using DSL or cable that requires a user name and password. 6.
User Manual
Page 22
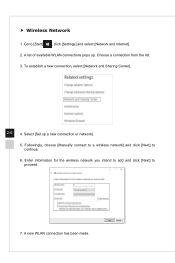
Followingly, choose [Manually connect to a wireless network] and click [Next] to proceed. 7. Enter information for the wireless network you intend to add and click [Next] to continue. 6. hh Wireless Network 1. A list of available WLAN connections pops up a new connection or network]. 5. To establish a new connection, select [Network and Sharing Center]. 2-6 4. A new WLAN connection has been made. Select [Set up . Go to [Start] , click [Settings] and select [Network and Internet]. 2. Choose a connection from the list. 3.
Followingly, choose [Manually connect to a wireless network] and click [Next] to proceed. 7. Enter information for the wireless network you intend to add and click [Next] to continue. 6. hh Wireless Network 1. A list of available WLAN connections pops up a new connection or network]. 5. To establish a new connection, select [Network and Sharing Center]. 2-6 4. A new WLAN connection has been made. Select [Set up . Go to [Start] , click [Settings] and select [Network and Internet]. 2. Choose a connection from the list. 3.
User Manual
Page 23
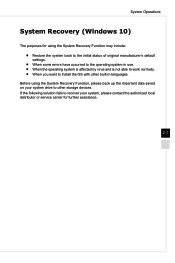
System Operations System Recovery (Windows 10) The purposes for further assistance. 2-7 Before using the System Recovery Function may include: ■■ Restore the system back to the initial status of original manufacturer's default settings. ■■ When some errors have occurred to the operating system in languages. If the following solution fails to recover your system, please contact the authorized local...
System Operations System Recovery (Windows 10) The purposes for further assistance. 2-7 Before using the System Recovery Function may include: ■■ Restore the system back to the initial status of original manufacturer's default settings. ■■ When some errors have occurred to the operating system in languages. If the following solution fails to recover your system, please contact the authorized local...
User Manual
Page 24
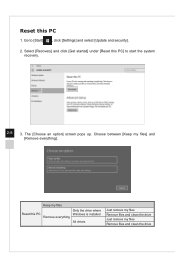
Select [Recovery] and click [Get started] under [Reset this PC] to [Start] , click [Settings] and select [Update and security]. 2. Keep my files Only the drive where Reset this PC 1. Go to start the system recovery. 2-8 3. The [Choose an option] screen pops up. Choose between [Keep my files] and [Remove everything All drives Just remove my files Remove files and clean the drive Just remove my files Remove files and clean the drive Reset this PC Windows is installed Remove everything ].
Select [Recovery] and click [Get started] under [Reset this PC] to [Start] , click [Settings] and select [Update and security]. 2. Keep my files Only the drive where Reset this PC 1. Go to start the system recovery. 2-8 3. The [Choose an option] screen pops up. Choose between [Keep my files] and [Remove everything All drives Just remove my files Remove files and clean the drive Just remove my files Remove files and clean the drive Reset this PC Windows is installed Remove everything ].

User Manual
Page 25
Click [Next] to start the system reset. Select [Keep my files]. The next screen will need to be reinstalled from the web or installation discs. hh Keep my files 1. The [Your apps will be removed] screen shows a list of apps that will show the changes to be made during the process. Click [Reset] to continue. 2-9 3. System Operations 2.
Click [Next] to start the system reset. Select [Keep my files]. The next screen will need to be reinstalled from the web or installation discs. hh Keep my files 1. The [Your apps will be removed] screen shows a list of apps that will show the changes to be made during the process. Click [Reset] to continue. 2-9 3. System Operations 2.

User Manual
Page 26
Select [Remove everything 1. Then select between [Only the drive where Windows is installed] and [All drives]. 3. The next screen will pop up, asking you have multiple hard drives, a screen will show the changes to start the system reset. Click [Reset] to be made during the process. If you to choose between [Just remove my files] and [Remove files and clean the drive]. 2-10 4. hh Remove everything ]. 2.
Select [Remove everything 1. Then select between [Only the drive where Windows is installed] and [All drives]. 3. The next screen will pop up, asking you have multiple hard drives, a screen will show the changes to start the system reset. Click [Reset] to be made during the process. If you to choose between [Just remove my files] and [Remove files and clean the drive]. 2-10 4. hh Remove everything ]. 2.


