
User Manual
Page 11
... 800 SDRAM (total 16 GB Max) ■ 4 DDR3 DIMMs (240-pin/ 1.5V) *(For more information on compatible components, please visit http://www.msi.com/index.php?func=testreport) LAN ■ Supports Gb LAN (10/100/1000) Realtek® RTL8211CL 1394 (optional) ■ Chip integrated by VIA&#...sensing ■ Compliant with Azalia 1.0 Spec IDE ■ 1 IDE port ■ Supports Ultra DMA 66/100/133 mode ■ Supports PIO, Bus Master operation mode SATA ■ 6 SATAII ports ■ Supports storage and data transfers at up to 3 Gb/s RAID ■ 6 SATAII ports support RAID 0/ 1/ 0+1/ 5 or JBOD...
... 800 SDRAM (total 16 GB Max) ■ 4 DDR3 DIMMs (240-pin/ 1.5V) *(For more information on compatible components, please visit http://www.msi.com/index.php?func=testreport) LAN ■ Supports Gb LAN (10/100/1000) Realtek® RTL8211CL 1394 (optional) ■ Chip integrated by VIA&#...sensing ■ Compliant with Azalia 1.0 Spec IDE ■ 1 IDE port ■ Supports Ultra DMA 66/100/133 mode ■ Supports PIO, Bus Master operation mode SATA ■ 6 SATAII ports ■ Supports storage and data transfers at up to 3 Gb/s RAID ■ 6 SATAII ports support RAID 0/ 1/ 0+1/ 5 or JBOD...

User Manual
Page 14
If you need to purchase accessories and request the part numbers, you purchased. Packing Checklist MS-7612 MSI mainboard MSI Driver/Utility DVD SATA Cable (Optional) Power Cable USB Bracket (Optional) Standard Cable for IDE Devices Back IO Shield User's Guide * The pictures are for reference only and may vary from the packing contents of the product you could search the product web page and find details on our web address http://www.msi.com/index.php 1-5
If you need to purchase accessories and request the part numbers, you purchased. Packing Checklist MS-7612 MSI mainboard MSI Driver/Utility DVD SATA Cable (Optional) Power Cable USB Bracket (Optional) Standard Cable for IDE Devices Back IO Shield User's Guide * The pictures are for reference only and may vary from the packing contents of the product you could search the product web page and find details on our web address http://www.msi.com/index.php 1-5

User Manual
Page 17
▍ Hardware Setup Quick Components Guide SYSFAN1, p.2-13 CPUFAN1, p.2-13 PWR1, p.2-8 CPU, p.2-3 DDR3, p.2-6 SYSFAN3, p.2-13 Back Panel, p.2-9 IDE1, p.2-11 ATX1, p.2-8 JCI1, p.2-12 PCIE, p.2-21 PCI, p.2-21 JAUD1, p.2-15 JCD1, p.2-13 OCSWITCH1, p.2-20 FDD1, p.2-11 JLPT1, p.2-16 JCOM1, p.2-16 JSPI, p.2-14 JBAT1, p.2-19 SYSFAN2, p.2-13 JTPM1, p.2-18 SATA, p.2-12 J1394_1, p.2-17 JFP2/ JFP1, p.2-14 JUSB1~4, p.2-15 2-2
▍ Hardware Setup Quick Components Guide SYSFAN1, p.2-13 CPUFAN1, p.2-13 PWR1, p.2-8 CPU, p.2-3 DDR3, p.2-6 SYSFAN3, p.2-13 Back Panel, p.2-9 IDE1, p.2-11 ATX1, p.2-8 JCI1, p.2-12 PCIE, p.2-21 PCI, p.2-21 JAUD1, p.2-15 JCD1, p.2-13 OCSWITCH1, p.2-20 FDD1, p.2-11 JLPT1, p.2-16 JCOM1, p.2-16 JSPI, p.2-14 JBAT1, p.2-19 SYSFAN2, p.2-13 JTPM1, p.2-18 SATA, p.2-12 J1394_1, p.2-17 JFP2/ JFP1, p.2-14 JUSB1~4, p.2-15 2-2
User Manual
Page 48
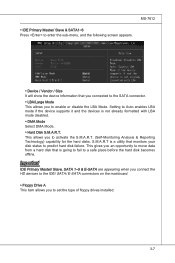
... formatted with LBA mode disabled. ▶ DMA Mode Select DMA Mode. ▶ Hard Disk S.M.A.R.T. Important IDE Primary Master/ Slave, SATA 1~5 & E-SATA are appearing when you connect the HD devices to the IDE/ SATA/ E-SATA connectors on the mainboard. ▶ Floppy Drive A This item allows you to enable or disable the LBA Mode. MS-7612... to enter the sub-menu, and the following screen appears. ▶ Device / Vendor / Size It will show the device information that you connected to the SATA connector. ▶ LBA/Large Mode This allows you to set the type of floppy drives installed. 3-7
... formatted with LBA mode disabled. ▶ DMA Mode Select DMA Mode. ▶ Hard Disk S.M.A.R.T. Important IDE Primary Master/ Slave, SATA 1~5 & E-SATA are appearing when you connect the HD devices to the IDE/ SATA/ E-SATA connectors on the mainboard. ▶ Floppy Drive A This item allows you to enable or disable the LBA Mode. MS-7612... to enter the sub-menu, and the following screen appears. ▶ Device / Vendor / Size It will show the device information that you connected to the SATA connector. ▶ LBA/Large Mode This allows you to set the type of floppy drives installed. 3-7

User Manual
Page 54
...allows you to enable/ disable BIOS to used PCI busmastering for reading/ writing to IDE drives. ▶ On-Chip SATA Controller This item allows users to enable or disable the SATA controller. ▶ RAID Mode This item is used to support both the ECP and EPP modes simultaneously. 3-13 By... choosing [ECP], the onboard parallel port will allow the onboard parallel port to select mode for SATA connectors. ▶ I /O chipset that provides Standard, ECP, and EPP features. To operate the onboard parallel port in ECP mode only. It has the...
...allows you to enable/ disable BIOS to used PCI busmastering for reading/ writing to IDE drives. ▶ On-Chip SATA Controller This item allows users to enable or disable the SATA controller. ▶ RAID Mode This item is used to support both the ECP and EPP modes simultaneously. 3-13 By... choosing [ECP], the onboard parallel port will allow the onboard parallel port to select mode for SATA connectors. ▶ I /O chipset that provides Standard, ECP, and EPP features. To operate the onboard parallel port in ECP mode only. It has the...

User Manual
Page 97
... Array window to ■ Select the RAID Mode ■ Set up the Striping Block ■ Specify which disks to use for the RAID Array The SATA ports are called channels and they are considered to be Master since there is associated with adapters.
... Array window to ■ Select the RAID Mode ■ Set up the Striping Block ■ Specify which disks to use for the RAID Array The SATA ports are called channels and they are considered to be Master since there is associated with adapters.

User Manual
Page 101
... be upgraded to open the NVIDIA Windows nForce Drivers page. 2. If you do not install the NVIDIA Storage driver, NVIDIA MediaShield will upgrade the Windows SATA driver and install the RAID software. 1. After the installation is selected. B-8 Click Next and then follow the instructions. 4. This section describes how to enable NVIDIA...
... be upgraded to open the NVIDIA Windows nForce Drivers page. 2. If you do not install the NVIDIA Storage driver, NVIDIA MediaShield will upgrade the Windows SATA driver and install the RAID software. 1. After the installation is selected. B-8 Click Next and then follow the instructions. 4. This section describes how to enable NVIDIA...
