User Manual
Page 2
... Revision V1.0 Revision History First release for FAQ, technical guide, BIOS updates, driver updates, and other information: http://www.msi.com/index.php?func=service ◙ Contact our technical staff at: http://ocss.msi.com ii We take every care in this document, but no solution can be... in the preparation of this document is the intellectual property of Novell, Inc. Our products are the properties of their respective owners. ■ MSI® is registered trademark of Micro-Star Int'l Co.,Ltd. ■ NVIDIA® is registered trademark of NVIDIA Corporation. ■ ATI&#...
... Revision V1.0 Revision History First release for FAQ, technical guide, BIOS updates, driver updates, and other information: http://www.msi.com/index.php?func=service ◙ Contact our technical staff at: http://ocss.msi.com ii We take every care in this document, but no solution can be... in the preparation of this document is the intellectual property of Novell, Inc. Our products are the properties of their respective owners. ■ MSI® is registered trademark of Micro-Star Int'l Co.,Ltd. ■ NVIDIA® is registered trademark of NVIDIA Corporation. ■ ATI&#...

User Manual
Page 9
MS-7612 User Settings 3-25 M-Flash 3-26 Load Fail-Safe/ Optimized Defaults 3-29 Appendix A Realtek Audio A-1 Installing the Realtek HD Audio Driver A-2 Software Configuration A-4 Hardware Setup A-19 Appendix B NVIDIA RAID B-1 Introduction B-2 RAID Configuration B-3 Installing Driver B-7 NVIDIA RAID Utility Installation B-8 Using the NVMediaShield Software B-11 Appendix C Overclocking Center C-1 Activating Overclocking Center C-2 System Info C-3 DOT C-5 ix
MS-7612 User Settings 3-25 M-Flash 3-26 Load Fail-Safe/ Optimized Defaults 3-29 Appendix A Realtek Audio A-1 Installing the Realtek HD Audio Driver A-2 Software Configuration A-4 Hardware Setup A-19 Appendix B NVIDIA RAID B-1 Introduction B-2 RAID Configuration B-3 Installing Driver B-7 NVIDIA RAID Utility Installation B-8 Using the NVMediaShield Software B-11 Appendix C Overclocking Center C-1 Activating Overclocking Center C-2 System Info C-3 DOT C-5 ix

User Manual
Page 14
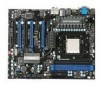
If you need to purchase accessories and request the part numbers, you purchased. Packing Checklist MS-7612 MSI mainboard MSI Driver/Utility DVD SATA Cable (Optional) Power Cable USB Bracket (Optional) Standard Cable for IDE Devices Back IO Shield User's Guide * The pictures are for reference only and may vary from the packing contents of the product you could search the product web page and find details on our web address http://www.msi.com/index.php 1-5
If you need to purchase accessories and request the part numbers, you purchased. Packing Checklist MS-7612 MSI mainboard MSI Driver/Utility DVD SATA Cable (Optional) Power Cable USB Bracket (Optional) Standard Cable for IDE Devices Back IO Shield User's Guide * The pictures are for reference only and may vary from the packing contents of the product you could search the product web page and find details on our web address http://www.msi.com/index.php 1-5
User Manual
Page 38
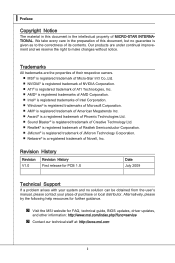
... to remove one graphics card and quit the SLI function, make sure the "MultiGPU" function is completed, restart the system and install the NV SLI driver/utility. Restart your graphics card manual). MS-7612 2.
... to remove one graphics card and quit the SLI function, make sure the "MultiGPU" function is completed, restart the system and install the NV SLI driver/utility. Restart your graphics card manual). MS-7612 2.
User Manual
Page 39
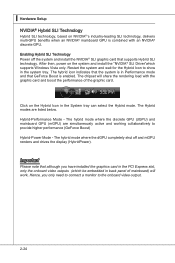
The chipset will work. After then, power on the system and install the "NVIDIA® SLI Driver"which be embedded in back panel of the graphic card. Restart the system and wait for the Hybrid Icon to provide higher performance (GeForce Boost) ...
The chipset will work. After then, power on the system and install the "NVIDIA® SLI Driver"which be embedded in back panel of the graphic card. Restart the system and wait for the Hybrid Icon to provide higher performance (GeForce Boost) ...

User Manual
Page 73
... Realtek audio codec to function properly before you must install Windows® XP Service Pack3 or later before installing the driver. Insert the application DVD into the DVD-ROM drive. Click here Important The HD Audio Configuration software utility is under continuous update to 2-, 4-,... 6-, 8- The following illustrations are based on Windows® XP environment and could look slightly different if you install the drivers in this section may be slightly different from the latest software utility and shall be held for Windows® XP For Windows® XP, ...
... Realtek audio codec to function properly before you must install Windows® XP Service Pack3 or later before installing the driver. Insert the application DVD into the DVD-ROM drive. Click here Important The HD Audio Configuration software utility is under continuous update to 2-, 4-,... 6-, 8- The following illustrations are based on Windows® XP environment and could look slightly different if you install the drivers in this section may be slightly different from the latest software utility and shall be held for Windows® XP For Windows® XP, ...

User Manual
Page 74
Click here Select this option Click here Click here A-3 MS-7612 4. Click Finish to install the Realtek High Definition Audio Driver. 3. Click Next to restart the system.
Click here Select this option Click here Click here A-3 MS-7612 4. Click Finish to install the Realtek High Definition Audio Driver. 3. Click Next to restart the system.

User Manual
Page 75
It is also available to use the 2-, 4-, 6- ▍ Realtek Audio Software Configuration After installing the audio driver, you are able to enable the audio driver by clicking the Realtek HD Audio Manager from the system tray at the lower-right corner of the screen to activate the HD Audio Configuration. channel audio feature now. Double click A-4 Click the audio icon from the Control Panel. or 8-
It is also available to use the 2-, 4-, 6- ▍ Realtek Audio Software Configuration After installing the audio driver, you are able to enable the audio driver by clicking the Realtek HD Audio Manager from the system tray at the lower-right corner of the screen to activate the HD Audio Configuration. channel audio feature now. Double click A-4 Click the audio icon from the Control Panel. or 8-

User Manual
Page 89
Right-click on and an icon will appear which provides several multimedia features for you to take advantage of this HD Audio Configuration utility, including Audio Driver Version, DirectX Version, Audio Controller & Audio Codec. You may also select the language of . A-18 Also there is a selection Show icon in the system tray. ▍ Realtek Audio Information In this tab it on the icon and the Audio Accessories dialogue box will show in system tray. Switch it provides some information about this utility by choosing from the Language list.
Right-click on and an icon will appear which provides several multimedia features for you to take advantage of this HD Audio Configuration utility, including Audio Driver Version, DirectX Version, Audio Controller & Audio Codec. You may also select the language of . A-18 Also there is a selection Show icon in the system tray. ▍ Realtek Audio Information In this tab it on the icon and the Audio Accessories dialogue box will show in system tray. Switch it provides some information about this utility by choosing from the Language list.

User Manual
Page 93
Or, the mainboard will support 5.1 channel audio-out only. ▍ Realtek Audio ■ 8-Channel Mode for Stereo-Speaker Output 1] Line In 2] Line Out (Front channels) 3] MIC 4] Line Out (Rear channels) 5] Line Out (Center and Subwoofer channel) 6] Line Out (Side channels) Important To enable 7.1 channel audio-out function on Windows Vista operating system, you have to install the Realtek Audio Driver. A-22
Or, the mainboard will support 5.1 channel audio-out only. ▍ Realtek Audio ■ 8-Channel Mode for Stereo-Speaker Output 1] Line In 2] Line Out (Front channels) 3] MIC 4] Line Out (Rear channels) 5] Line Out (Center and Subwoofer channel) 6] Line Out (Side channels) Important To enable 7.1 channel audio-out function on Windows Vista operating system, you have to install the Realtek Audio Driver. A-22

User Manual
Page 96
....) 2. The default RAID Mode is set to Mirroring and Striping Block is set up the NVRAID BIOS. Choose the hard disks that has the RAID driver to copy and install the nForce RAID software. (Check p.B-7 for details.) 4. Specify the RAID level, either Mirroring (RAID 1), Striping (RAID 0), Striping and Mirroring (RAID 0+1), RAID...
....) 2. The default RAID Mode is set to Mirroring and Striping Block is set up the NVRAID BIOS. Choose the hard disks that has the RAID driver to copy and install the nForce RAID software. (Check p.B-7 for details.) 4. Specify the RAID level, either Mirroring (RAID 1), Striping (RAID 0), Striping and Mirroring (RAID 0+1), RAID...

User Manual
Page 99
The Clear disk data prompt ap- Use the arrow keys to configure and load NVRAID drivers under Windows, as explained in "Installing the NVIDIA MediaShield Software Under Windows" on B-8. Press Enter again to go back to the previous window and then ...
The Clear disk data prompt ap- Use the arrow keys to configure and load NVRAID drivers under Windows, as explained in "Installing the NVIDIA MediaShield Software Under Windows" on B-8. Press Enter again to go back to the previous window and then ...
User Manual
Page 100
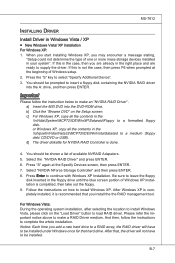
...a medium (floppy disk/ CD/DVD or USB). MS-7612 Installing Driver Install Driver in the \\nVidia\System\MCP72\IDE\WinXP\Sataraid\Floppy to a formatted floppy disk. If this is completed, then take out the floppy. 9. a] Insert the MSI DVD into the A: drive, and then press ENTER. c] For Windows... XP, copy all the contents in the right place and are already in the \\chipset\nVidia\Vista32\MCP72\IDE\WinVista\Sataraid to insert a floppy disk containing the NVIDIA RAID driver into the DVD-ROM...
...a medium (floppy disk/ CD/DVD or USB). MS-7612 Installing Driver Install Driver in the \\nVidia\System\MCP72\IDE\WinXP\Sataraid\Floppy to a formatted floppy disk. If this is completed, then take out the floppy. 9. a] Insert the MSI DVD into the A: drive, and then press ENTER. c] For Windows... XP, copy all the contents in the right place and are already in the \\chipset\nVidia\Vista32\MCP72\IDE\WinVista\Sataraid to insert a floppy disk containing the NVIDIA RAID driver into the DVD-ROM...

User Manual
Page 101
... to use the NVIDIA Serial ATA driver. Select the NVIDIA MediaShield. If you do not install the NVIDIA Storage driver, NVIDIA MediaShield will upgrade the Windows SATA driver and install the RAID software. 1. Important Make sure that the "NVIDIA Storage Driver" is completed, be enabled. 3.... RAID Array) The existing Windows Serial ATA driver must install the NVIDIA Storage driver in order to enable NVIDIA MediaShield. This section describes how to open the NVIDIA Windows nForce Drivers page. 2. Start the NVIDIA nForce Drivers installation program to run the setup application and...
... to use the NVIDIA Serial ATA driver. Select the NVIDIA MediaShield. If you do not install the NVIDIA Storage driver, NVIDIA MediaShield will upgrade the Windows SATA driver and install the RAID software. 1. Important Make sure that the "NVIDIA Storage Driver" is completed, be enabled. 3.... RAID Array) The existing Windows Serial ATA driver must install the NVIDIA Storage driver in order to enable NVIDIA MediaShield. This section describes how to open the NVIDIA Windows nForce Drivers page. 2. Start the NVIDIA nForce Drivers installation program to run the setup application and...


