User Guide
Page 22
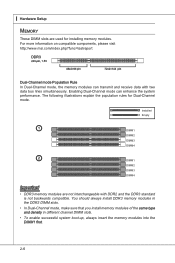
...mode, make sure that you install memory modules of the same type and density in different channel DIMM slots. • To enable successful system boot-up, always insert the memory modules into the DIMM1 first. 2-6 Enabling Dual-Channel mode can transmit and receive data with DDR2 and the ... Setup Memory These DIMM slots are not interchangeable with two data bus lines simultaneously. For more information on compatible components, please visit http://www.msi.com/index.php?func=testreport DDR3 240-pin, 1.5V 48x2=96 pin 72x2=144 pin Dual-Channel mode Population Rule In Dual-Channel mode...
...mode, make sure that you install memory modules of the same type and density in different channel DIMM slots. • To enable successful system boot-up, always insert the memory modules into the DIMM1 first. 2-6 Enabling Dual-Channel mode can transmit and receive data with DDR2 and the ... Setup Memory These DIMM slots are not interchangeable with two data bus lines simultaneously. For more information on compatible components, please visit http://www.msi.com/index.php?func=testreport DDR3 240-pin, 1.5V 48x2=96 pin 72x2=144 pin Dual-Channel mode Population Rule In Dual-Channel mode...
User Guide
Page 33
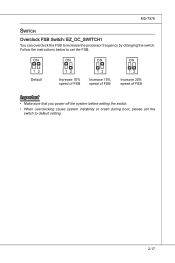
MS-7578 Switch Overclock FSB Switch: EZ_OC_SWITCH1 You can overclock the FSB to default setting. 2-17 Follow the instructions below to set the switch to increase the processor frequency by changing the switch. Default Increase 10% speed of FSB Increase 15% speed of FSB Increase 20% speed of FSB Important • Make sure that you power off the system before setting the switch. • When overclocking cause system instability or crash during boot, please set the FSB.
MS-7578 Switch Overclock FSB Switch: EZ_OC_SWITCH1 You can overclock the FSB to default setting. 2-17 Follow the instructions below to set the switch to increase the processor frequency by changing the switch. Default Increase 10% speed of FSB Increase 15% speed of FSB Increase 20% speed of FSB Important • Make sure that you power off the system before setting the switch. • When overclocking cause system instability or crash during boot, please set the FSB.
User Guide
Page 34
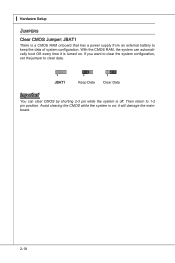
Avoid clearing the CMOS while the system is a CMOS RAM onboard that has a power supply from an external battery to keep the data of system configuration. If you want to clear the system configuration, set the jumper to 1-2 pin position. With the CMOS RAM, the system can clear CMOS by shorting 2-3 pin while the system is turned on ; ▍ Hardware Setup Jumpers Clear CMOS Jumper: JBAT1 There is on . Then return to clear data. 1 JBAT1 1 Keep Data 1 Clear Data Important You can automatically boot OS every time it will damage the mainboard. 2-18 it is off.
Avoid clearing the CMOS while the system is a CMOS RAM onboard that has a power supply from an external battery to keep the data of system configuration. If you want to clear the system configuration, set the jumper to 1-2 pin position. With the CMOS RAM, the system can clear CMOS by shorting 2-3 pin while the system is turned on ; ▍ Hardware Setup Jumpers Clear CMOS Jumper: JBAT1 There is on . Then return to clear data. 1 JBAT1 1 Keep Data 1 Clear Data Important You can automatically boot OS every time it will damage the mainboard. 2-18 it is off.
User Guide
Page 41
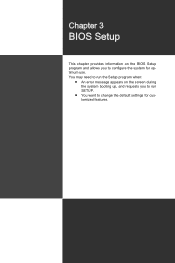
You may need to run SETUP. ■ You want to configure the system for customized features. 2-3-1 Chapter 3 BIOS Setup This chapter provides information on the BIOS Setup program and allows you to run the Setup program when: ■ An error message appears on the screen during the system booting up, and requests you to change the default settings for optimum use.
You may need to run SETUP. ■ You want to configure the system for customized features. 2-3-1 Chapter 3 BIOS Setup This chapter provides information on the BIOS Setup program and allows you to run the Setup program when: ■ An error message appears on the screen during the system booting up, and requests you to change the default settings for optimum use.
User Guide
Page 42
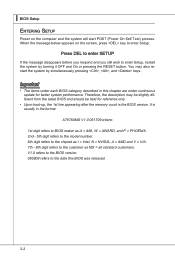
... digit refers to enter Setup, restart the system by simultaneously pressing , , and keys. Important • The items under continuous update for reference only. • Upon boot-up, the 1st line appearing after the memory count is usually in this BIOS was released. 3-2 It is the BIOS version.
... digit refers to enter Setup, restart the system by simultaneously pressing , , and keys. Important • The items under continuous update for reference only. • Upon boot-up, the 1st line appearing after the memory count is usually in this BIOS was released. 3-2 It is the BIOS version.
User Guide
Page 48
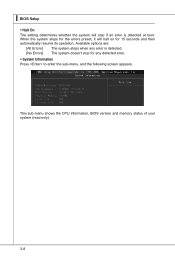
When the system stops for the errors preset, it will stop for 15 seconds and then automatically resume its operation. Available options are: [All Errors] The system stops when any detected error. ▶ System Information Press to enter the sub-menu, and the following screen appears. This sub-menu shows the CPU information, BIOS version and memory status of your system (read only). 3-8 ▍ BIOS Setup ▶ Halt On The setting determines whether the system will halt on for any error is detected. [No Errors] The system doesn't stop if an error is detected at boot.
When the system stops for the errors preset, it will stop for 15 seconds and then automatically resume its operation. Available options are: [All Errors] The system stops when any detected error. ▶ System Information Press to enter the sub-menu, and the following screen appears. This sub-menu shows the CPU information, BIOS version and memory status of your system (read only). 3-8 ▍ BIOS Setup ▶ Halt On The setting determines whether the system will halt on for any error is detected. [No Errors] The system doesn't stop if an error is detected at boot.
User Guide
Page 49
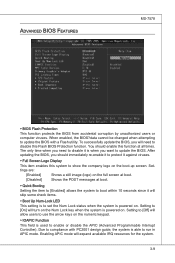
... or disable the APIC (Advanced Programmable Interrupt Controller). Settings are: [Enabled] Shows a still image (logo) on . Setting to [Off] will skip some check items. ▶ Boot Up Num-Lock LED This setting is to set the Num Lock status when the system is used to run in APIC mode. When enabled... will allow users to compliance with a Flash utility. Enabling APIC mode will turn on the Num Lock key when the system is powered on the boot-up screen. Due to use the arrow keys on the numeric keypad. ▶ IOAPIC Function This field is powered on the full screen at...
... or disable the APIC (Advanced Programmable Interrupt Controller). Settings are: [Enabled] Shows a still image (logo) on . Setting to [Off] will skip some check items. ▶ Boot Up Num-Lock LED This setting is to set the Num Lock status when the system is used to run in APIC mode. When enabled... will allow users to compliance with a Flash utility. Enabling APIC mode will turn on the Num Lock key when the system is powered on the boot-up screen. Due to use the arrow keys on the numeric keypad. ▶ IOAPIC Function This field is powered on the full screen at...
User Guide
Page 51
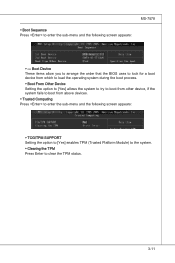
...TPM status. 3-11 Boot Device These items allow you to arrange the order that the BIOS uses to look for a boot device from which to load the operating system during the boot process. ▶ Boot From Other Device Setting the option to [Yes] allows the system to try to boot from other device, ...if the system fails to boot from above devices. ▶ Trusted Computing Press...
...TPM status. 3-11 Boot Device These items allow you to arrange the order that the BIOS uses to look for a boot device from which to load the operating system during the boot process. ▶ Boot From Other Device Setting the option to [Yes] allows the system to try to boot from other device, ...if the system fails to boot from above devices. ▶ Trusted Computing Press...
User Guide
Page 52
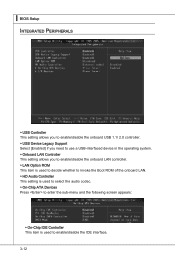
... This setting allows you to enable/disable the onboard LAN controller. ▶ LAN Option ROM This item is used to decide whether to invoke the Boot ROM of the onboard LAN. ▶ HD Audio Controller This setting is used to select the audio codec. ▶ On-Chip ATA Devices Press to...
... This setting allows you to enable/disable the onboard LAN controller. ▶ LAN Option ROM This item is used to decide whether to invoke the Boot ROM of the onboard LAN. ▶ HD Audio Controller This setting is used to select the audio codec. ▶ On-Chip ATA Devices Press to...
User Guide
Page 55
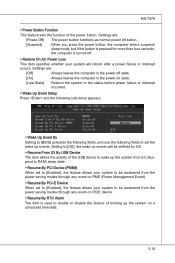
... computer is used to enable or disable the feature of the power button. MS-7578 ▶ Power Button Function This feature sets the function of booting up the system from S3 (Suspend to RAM) sleep state. ▶ Resume By PCI Device (PME#) When set to [Enabled], the feature allows your system...
... computer is used to enable or disable the feature of the power button. MS-7578 ▶ Power Button Function This feature sets the function of booting up the system from S3 (Suspend to RAM) sleep state. ▶ Resume By PCI Device (PME#) When set to [Enabled], the feature allows your system...

User Guide
Page 58
... the password will be disabled. You will be prompted to abort the selection and not enter a password. Once the password is disabled, the system will boot and you try to enter it every time you can enter Setup without entering any password. You may also press to confirm the password. Retype...
... the password will be disabled. You will be prompted to abort the selection and not enter a password. Once the password is disabled, the system will boot and you try to enter it every time you can enter Setup without entering any password. You may also press to confirm the password. Retype...
User Guide
Page 66
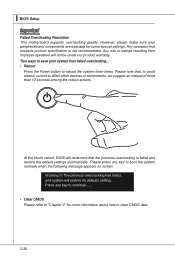
... be under our product warranty. Any risk or damge resulting from failed overclocking... • Reboot Press the Power button to boot the system normally when the following message appears on screen. Two ways to save your peripherals and components are bearable for more...among the reboot actions. Any operation that the previous overclocking is not recommended. ▍ BIOS Setup Important Failed Overclocking Resolution This motherboard supports overclocking greatly. However, please make sure your system from improper operation will restore its defaults setting, Press any key to ...
... be under our product warranty. Any risk or damge resulting from failed overclocking... • Reboot Press the Power button to boot the system normally when the following message appears on screen. Two ways to save your peripherals and components are bearable for more...among the reboot actions. Any operation that the previous overclocking is not recommended. ▍ BIOS Setup Important Failed Overclocking Resolution This motherboard supports overclocking greatly. However, please make sure your system from improper operation will restore its defaults setting, Press any key to ...
User Guide
Page 93
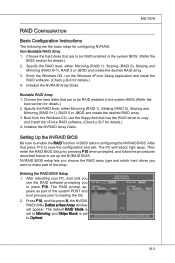
... PC, wait until you see the RAID software prompting you want to make part of the system POST and boot process prior to be RAID enabled in BIOS before configuring the NVRAID BIOS. Boot from the Windows CD, use the floppy disk that are to loading the OS. 2. Entering the RAID BIOS...
... PC, wait until you see the RAID software prompting you want to make part of the system POST and boot process prior to be RAID enabled in BIOS before configuring the NVRAID BIOS. Boot from the Windows CD, use the floppy disk that are to loading the OS. 2. Entering the RAID BIOS...

User Guide
Page 103
... drive can take over for that is automatic and requires no user interaction. If one of spare drives: Free Disk A free disk is used to boot the OS, two hard drives are met. ■ There must be at least two fault tolerant arrays already created. ■ There must be used by...
... drive can take over for that is automatic and requires no user interaction. If one of spare drives: Free Disk A free disk is used to boot the OS, two hard drives are met. ■ There must be at least two fault tolerant arrays already created. ■ There must be used by...

User Guide
Page 104
... same size as (or larger than) the RAID 1 array. ■ The number of disks in this situation, back up the data, delete the array, re-boot the PC, and then reconfigure the new array. For example, it . From RAID 5 to 1 Migrating to the new volume. B-14 If your original array is...
... same size as (or larger than) the RAID 1 array. ■ The number of disks in this situation, back up the data, delete the array, re-boot the PC, and then reconfigure the new array. For example, it . From RAID 5 to 1 Migrating to the new volume. B-14 If your original array is...


