User Guide
Page 4
...: Danger of the following help resources for further guidance. † Visit the MSI homepage & FAQ site for technical guide, BIOS updates, driver updates, and other information: http://www.msi.com.tw & http://www.msi. Alternatively, please try the following situations arises, get the equipment checked by the...well or you can not get it . com.tw/program/service/faq/faq/esc_faq_list.php † Contact our technical staff at: support@msi.com.tw Safety Instructions 1. iv Do not leave this equipment away from humidity. 4. Keep this equipment in an environment unconditioned, storage ...
...: Danger of the following help resources for further guidance. † Visit the MSI homepage & FAQ site for technical guide, BIOS updates, driver updates, and other information: http://www.msi.com.tw & http://www.msi. Alternatively, please try the following situations arises, get the equipment checked by the...well or you can not get it . com.tw/program/service/faq/faq/esc_faq_list.php † Contact our technical staff at: support@msi.com.tw Safety Instructions 1. iv Do not leave this equipment away from humidity. 4. Keep this equipment in an environment unconditioned, storage ...
User Guide
Page 9
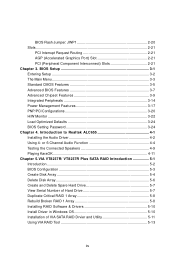
...3-17 PNP/PCI Configurations 3-20 H/W Monitor 3-22 Load Optimized Defaults 3-24 BIOS Setting Password 3-24 Chapter 4. Introduction to Realtek ALC655 4-1 Installing the Audio Driver 4-2 Using 4- BIOS Flash Jumper: JWP1 2-20 Slots ...2-21 PCI Interrupt Request Routing 2-21 AGP ... Audio Function 4-4 Testing the Connected Speakers 4-9 Playing KaraOK 4-11 Chapter 5.VIA VT8237R/ VT8237R Plus SATA RAID Introduction 5-1 Introduction ...5-2 BIOS Configuration 5-3 Create Disk Array 5-4 Delete Disk Array 5-6 Create and Delete Spare Hard Drive 5-7 View Serial Number of Hard Drive 5-7...
...3-17 PNP/PCI Configurations 3-20 H/W Monitor 3-22 Load Optimized Defaults 3-24 BIOS Setting Password 3-24 Chapter 4. Introduction to Realtek ALC655 4-1 Installing the Audio Driver 4-2 Using 4- BIOS Flash Jumper: JWP1 2-20 Slots ...2-21 PCI Interrupt Request Routing 2-21 AGP ... Audio Function 4-4 Testing the Connected Speakers 4-9 Playing KaraOK 4-11 Chapter 5.VIA VT8237R/ VT8237R Plus SATA RAID Introduction 5-1 Introduction ...5-2 BIOS Configuration 5-3 Create Disk Array 5-4 Delete Disk Array 5-6 Create and Delete Spare Hard Drive 5-7 View Serial Number of Hard Drive 5-7...

User Guide
Page 12
Dimension † Micro-ATX Form Factor: 245mm x 220mm. Supports ACPI Power Management. 1394 (optional) † Support two IEEE 1394 on board pinheaders transfer rate is up to 400Mbps. † Controlled by VIA6307 chipset. BIOS † The mainboard BIOS provides "Plug & Play" BIOS which detects the peripheral devices... 8100C / 8110SB (optional). - Mounting † 6 standard mounting holes. *For the latest information about CPU, please visit http://www.msi.com.tw/program/ products/mainboard/mbd/pro_mbd_cpu_support.php ** For the updated supporting memory modules, please visit http://www...
Dimension † Micro-ATX Form Factor: 245mm x 220mm. Supports ACPI Power Management. 1394 (optional) † Support two IEEE 1394 on board pinheaders transfer rate is up to 400Mbps. † Controlled by VIA6307 chipset. BIOS † The mainboard BIOS provides "Plug & Play" BIOS which detects the peripheral devices... 8100C / 8110SB (optional). - Mounting † 6 standard mounting holes. *For the latest information about CPU, please visit http://www.msi.com.tw/program/ products/mainboard/mbd/pro_mbd_cpu_support.php ** For the updated supporting memory modules, please visit http://www...

User Guide
Page 13
DIMM1 DIMM2 CONN1 MS-7222 Micro-ATX Mainboard Mainboard Layout Top : mouse Bottom: keyboard SYS_FAN1 Top : Parallel Port Bottom: COM Port VGA Port C P U _ FAN 1 Bottom: USB ports Top: LAN jack Bottom: USB ports JPW2 T:MIC-In M:Line- In B:SS Out Winbond W83627EHF COM2 VIA P4M800PRO AGP Slot RTL8100C AC97 JAUDIO01 CD_IN1 PCI Slot 1 PCI Slot 2 PCI Slot 3 VIA VT6307 (Optional) FDD 1 (Optional) (Optional) 1394_J2 1394_J3 JUSB1 BATT + VIA VT8237R PLUS BIOS JUSB2 JFP1 PM8PM (MS-7222 v1.X) Micro-ATX Mainboard IDE 2 IDE 1 SATA1 JBAT2 SATA2 JWP1 1-4
DIMM1 DIMM2 CONN1 MS-7222 Micro-ATX Mainboard Mainboard Layout Top : mouse Bottom: keyboard SYS_FAN1 Top : Parallel Port Bottom: COM Port VGA Port C P U _ FAN 1 Bottom: USB ports Top: LAN jack Bottom: USB ports JPW2 T:MIC-In M:Line- In B:SS Out Winbond W83627EHF COM2 VIA P4M800PRO AGP Slot RTL8100C AC97 JAUDIO01 CD_IN1 PCI Slot 1 PCI Slot 2 PCI Slot 3 VIA VT6307 (Optional) FDD 1 (Optional) (Optional) 1394_J2 1394_J3 JUSB1 BATT + VIA VT8237R PLUS BIOS JUSB2 JFP1 PM8PM (MS-7222 v1.X) Micro-ATX Mainboard IDE 2 IDE 1 SATA1 JBAT2 SATA2 JWP1 1-4
User Guide
Page 22
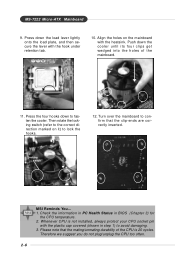
...BIOS (Chapter 3) for the CPU temperature. 2. Whenever CPU is 20 cycles. Push down the cooler until its four clips get wedged into the holes of the CPU is not installed, always protect your CPU socket pin with the heatsink. Therefore we suggest you do not plug/unplug the CPU too often. 2-6 MS-7222 Micro-ATX... Mainboard 9. locking switch MSI Reminds You... 1. Press down to avoid damaging. 3. Check the information in PC Health Status in step 1) to ...
...BIOS (Chapter 3) for the CPU temperature. 2. Whenever CPU is 20 cycles. Push down the cooler until its four clips get wedged into the holes of the CPU is not installed, always protect your CPU socket pin with the heatsink. Therefore we suggest you do not plug/unplug the CPU too often. 2-6 MS-7222 Micro-ATX... Mainboard 9. locking switch MSI Reminds You... 1. Press down to avoid damaging. 3. Check the information in PC Health Status in step 1) to ...
User Guide
Page 36
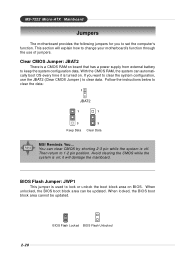
... how to change your motherboard's function through the use the JBAT2 (Clear CMOS Jumper ) to clear data. Clear CMOS Jumper: JBAT2 There is a CMOS RAM on BIOS. Then return to clear the data: 1 JBAT2 1 1 3 Keep Data 3 Clear Data MSI Reminds You... BIOS Flash Jumper: JWP1 This... supply from external battery to keep the system configuration data. When locked, the BIOS boot block area cannot be updated. If you to set the computer's function. MS-7222 Micro-ATX Mainboard Jumpers The motherboard provides the following jumpers for you want to clear the system configuration, use of...
... how to change your motherboard's function through the use the JBAT2 (Clear CMOS Jumper ) to clear data. Clear CMOS Jumper: JBAT2 There is a CMOS RAM on BIOS. Then return to clear the data: 1 JBAT2 1 1 3 Keep Data 3 Clear Data MSI Reminds You... BIOS Flash Jumper: JWP1 This... supply from external battery to keep the system configuration data. When locked, the BIOS boot block area cannot be updated. If you to set the computer's function. MS-7222 Micro-ATX Mainboard Jumpers The motherboard provides the following jumpers for you want to clear the system configuration, use of...
User Guide
Page 37
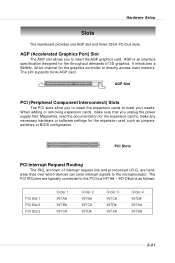
... can send interrupt signals to make sure that you to insert the expansion cards to the PCI bus INT A# ~ INT D# pins as jumpers, switches or BIOS configuration. It introduces a 66MHz, 32-bit channel for the expansion card to the microprocessor. The slot supports 8x/4x AGP card. AGP Slot PCI (Peripheral...
... can send interrupt signals to make sure that you to insert the expansion cards to the PCI bus INT A# ~ INT D# pins as jumpers, switches or BIOS configuration. It introduces a 66MHz, 32-bit channel for the expansion card to the microprocessor. The slot supports 8x/4x AGP card. AGP Slot PCI (Peripheral...
User Guide
Page 38
... SETUP. ² You want to change the default settings for optimum use. MSI Reminds You... 1. While booting up , and requests you to the date this chapter are under each BIOS category described in this BIOS is shown in the format: example: A7222IMS 12.0 102305 where: 1st digit... refers to the customer, MS=all standard customers. BIOS Setup BIOS Setup This chapter provides information on the screen during the ...
... SETUP. ² You want to change the default settings for optimum use. MSI Reminds You... 1. While booting up , and requests you to the date this chapter are under each BIOS category described in this BIOS is shown in the format: example: A7222IMS 12.0 102305 where: 1st digit... refers to the customer, MS=all standard customers. BIOS Setup BIOS Setup This chapter provides information on the screen during the ...

User Guide
Page 39
...menu or returns to the main menu from the latest BIOS and should be held for the selected setup category is the Main Menu. MSI Reminds You... The items under continuous update for all devices and the system. MS-7222 Micro-ATX Mainboard Entering Setup Power on the screen, press key ...to select the item. Main Menu The main menu displays the setup categories the BIOS supplies. Press F1 to continue...
...menu or returns to the main menu from the latest BIOS and should be held for the selected setup category is the Main Menu. MSI Reminds You... The items under continuous update for all devices and the system. MS-7222 Micro-ATX Mainboard Entering Setup Power on the screen, press key ...to select the item. Main Menu The main menu displays the setup categories the BIOS supplies. Press F1 to continue...
User Guide
Page 40
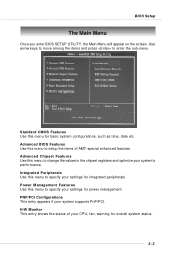
Advanced BIOS Features Use this menu to setup the items of your system's performance. Advanced Chipset Features Use this menu to change the values in the chipset ... status of AMI® special enhanced features. Power Management Features Use this menu to specify your settings for overall system status. 3-3 BIOS Setup The Main Menu Once you enter BIOS SETUP UTILITY, the Main Menu will appear on the screen. Standard CMOS Features Use this menu to enter the sub-menu. Integrated...
Advanced BIOS Features Use this menu to setup the items of your system's performance. Advanced Chipset Features Use this menu to change the values in the chipset ... status of AMI® special enhanced features. Power Management Features Use this menu to specify your settings for overall system status. 3-3 BIOS Setup The Main Menu Once you enter BIOS SETUP UTILITY, the Main Menu will appear on the screen. Standard CMOS Features Use this menu to enter the sub-menu. Integrated...

User Guide
Page 41
BIOS Setting Password Use this menu to load the default values set the password for optimal performance of the mainboard. Exit Without Saving Abandon all changes and exit setup. 3-4 Save & Exit Setup Save changes to CMOS and exit setup. MS-7222 Micro-ATX Mainboard Load Optimized Defaults Use this menu to set by the mainboard manufacturer specifically for BIOS.
BIOS Setting Password Use this menu to load the default values set the password for optimal performance of the mainboard. Exit Without Saving Abandon all changes and exit setup. 3-4 Save & Exit Setup Save changes to CMOS and exit setup. MS-7222 Micro-ATX Mainboard Load Optimized Defaults Use this menu to set by the mainboard manufacturer specifically for BIOS.
User Guide
Page 42
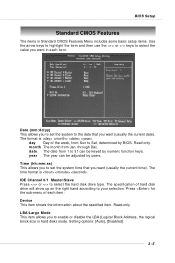
date The date from 1 to 31 can be keyed by BIOS. The time format is . Read-only. day Day of the week, from Jan. month The month from Sun to Sat, determined by numeric function keys. ...]. 3-5 Read only. through Dec. The format is . year The year can be adjusted by users. Time (hh:mm:ss) This allows you to your selection. BIOS Setup Standard CMOS Features The items in Standard CMOS Features Menu includes some basic setup items. Use the arrow keys to highlight the item and...
date The date from 1 to 31 can be keyed by BIOS. The time format is . Read-only. day Day of the week, from Jan. month The month from Sun to Sat, determined by numeric function keys. ...]. 3-5 Read only. through Dec. The format is . year The year can be adjusted by users. Time (hh:mm:ss) This allows you to your selection. BIOS Setup Standard CMOS Features The items in Standard CMOS Features Menu includes some basic setup items. Use the arrow keys to highlight the item and...
User Guide
Page 43
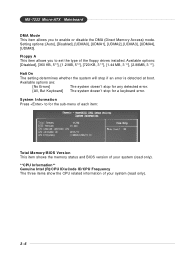
...88MB, 3 1/2]. System Information Press to for a keyboard error. Floppy A This item allows you to set the type of your system (read only). 3-6 MS-7222 Micro-ATX Mainboard DMA Mode This item allows you to enable or disable the DMA (Direct Memory Access) mode. Setting options: [Auto], [Disabled], [UDMA0], [UDMA1], ...], [UDMA3], [UDMA4], [UDMA5]. The system doesn't stop for the sub-menu of each item: Total Memory/BIOS Version This item shows the memory status and BIOS version of your system (read only). **CPU Information** Genuine Intel (R)/CPU ID/uCode ID/CPU Frequency The three...
...88MB, 3 1/2]. System Information Press to for a keyboard error. Floppy A This item allows you to set the type of your system (read only). 3-6 MS-7222 Micro-ATX Mainboard DMA Mode This item allows you to enable or disable the DMA (Direct Memory Access) mode. Setting options: [Auto], [Disabled], [UDMA0], [UDMA1], ...], [UDMA3], [UDMA4], [UDMA5]. The system doesn't stop for the sub-menu of each item: Total Memory/BIOS Version This item shows the memory status and BIOS version of your system (read only). **CPU Information** Genuine Intel (R)/CPU ID/uCode ID/CPU Frequency The three...
User Guide
Page 44
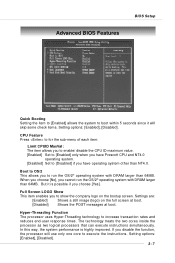
... this way, the system performance is possible if you disable the function, the processor will skip some check items. Setting options: [Enabled], [Disabled]. Advanced BIOS Features BIOS Setup Quick Booting Setting the item to [Enabled] allows the system to increase transaction rates and reduces end-user response times. The technology treats the...
... this way, the system performance is possible if you disable the function, the processor will skip some check items. Setting options: [Enabled], [Disabled]. Advanced BIOS Features BIOS Setup Quick Booting Setting the item to [Enabled] allows the system to increase transaction rates and reduces end-user response times. The technology treats the...
User Guide
Page 45
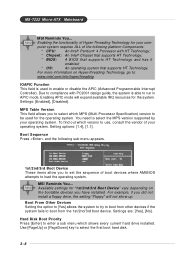
...select the first boot hard disk. 3-8 Due to compliance with HT Technology; * Chipset: An Intel® Chipset that supports HT Technology; * BIOS: A BIOS that supports HT Technology and has it enabled; * OS: An operating system that supports HT Technology. You need to run in APIC mode.... IOAPIC Function This field is able to select the MPS version supported by your operating system. Settings are: [Yes], [No]. MS-7222 Micro-ATX Mainboard MSI Reminds You... Enabling the functionality of your com- Enabling APIC mode will not show up. MPS Table Version This field allows you...
...select the first boot hard disk. 3-8 Due to compliance with HT Technology; * Chipset: An Intel® Chipset that supports HT Technology; * BIOS: A BIOS that supports HT Technology and has it enabled; * OS: An operating system that supports HT Technology. You need to run in APIC mode.... IOAPIC Function This field is able to select the MPS version supported by your operating system. Settings are: [Yes], [No]. MS-7222 Micro-ATX Mainboard MSI Reminds You... Enabling the functionality of your com- Enabling APIC mode will not show up. MPS Table Version This field allows you...
User Guide
Page 46
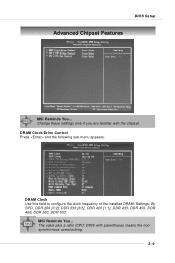
The value plus a ratio (CPU: DDR) with the chipset. MSI Reminds You... DRAM Clock/Drive Control Press and the following sub-menu appears. Settings: By SPD, DDR 266 [3:2], DDR 333 [6:5], DDR 400 [1:1], DDR 433, DDR 450, DDR 466, DDR 500, DDR 533. DRAM Clock Use this field to configure the clock frequency of the installed DRAM. BIOS Setup Advanced Chipset Features MSI Reminds You... Change these settings only if you are familiar with parentheses means the nonsynchronous overclocking. 3-9
The value plus a ratio (CPU: DDR) with the chipset. MSI Reminds You... DRAM Clock/Drive Control Press and the following sub-menu appears. Settings: By SPD, DDR 266 [3:2], DDR 333 [6:5], DDR 400 [1:1], DDR 433, DDR 450, DDR 466, DDR 500, DDR 533. DRAM Clock Use this field to configure the clock frequency of the installed DRAM. BIOS Setup Advanced Chipset Features MSI Reminds You... Change these settings only if you are familiar with parentheses means the nonsynchronous overclocking. 3-9

User Guide
Page 47
... the RAS to precharge. This item applies only when synchronous DRAM is controlled by BIOS based on the configurations on the DRAM module. This setup item allows you to CAS (column address strobe). Setting options: [08T]~ [71T]. MS-7222 Micro-ATX Mainboard DRAM Timing Selects whether DRAM timing is installed in the system. SDRAM CAS...
... the RAS to precharge. This item applies only when synchronous DRAM is controlled by BIOS based on the configurations on the DRAM module. This setup item allows you to CAS (column address strobe). Setting options: [08T]~ [71T]. MS-7222 Micro-ATX Mainboard DRAM Timing Selects whether DRAM timing is installed in the system. SDRAM CAS...
User Guide
Page 48
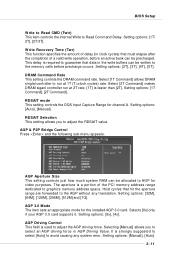
.... Select [2T Command] makes DRAM siganl controller run at 2T rate. [1T] is strongly suggested to select [Auto] to run at 1T (T=clock cycles) rate. BIOS Setup Write to Read CMD (Twtr) This item controls the internal Write to the AGP without any system error. RDSAIT Selection This setting allows you...
.... Select [2T Command] makes DRAM siganl controller run at 2T rate. [1T] is strongly suggested to select [Auto] to run at 1T (T=clock cycles) rate. BIOS Setup Write to Read CMD (Twtr) This item controls the internal Write to the AGP without any system error. RDSAIT Selection This setting allows you...
User Guide
Page 50
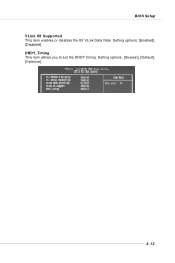
DRDY_Timing This item allows you to set the DRDY timing. Setting options: [Slowest], [Default], [Optimize]. 3-13 Setting options: [Enabled], [Disabled]. BIOS Setup VLink 8X Supported This item enables or disables the 8X VLink Data Rate.
DRDY_Timing This item allows you to set the DRDY timing. Setting options: [Slowest], [Default], [Optimize]. 3-13 Setting options: [Enabled], [Disabled]. BIOS Setup VLink 8X Supported This item enables or disables the 8X VLink Data Rate.
User Guide
Page 52
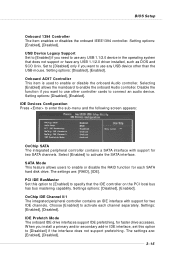
... to connect an audio device. When you want to enable or disable the RAID function for two IDE channels. The settings are : [Enabled], [Disabled]. 3-15 BIOS Setup Onboard 1394 Controller The item enables or disables the onboard IEEE1394 controller. Select [Enabled] to [Disabled] if the interface does not support prefetching. Disable...
... to connect an audio device. When you want to enable or disable the RAID function for two IDE channels. The settings are : [Enabled], [Disabled]. 3-15 BIOS Setup Onboard 1394 Controller The item enables or disables the onboard IEEE1394 controller. Select [Enabled] to [Disabled] if the interface does not support prefetching. Disable...


