User Guide
Page 43
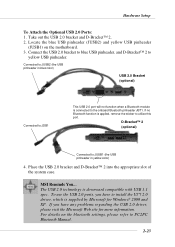
...Bluetooth Manual. 2-23 Place the USB 2.0 bracket and D-Bracket™ 2 into the appropriate slot of the system case. For details on the motherboard. 3. Locate the blue USB pinheader (JUSB2) and yellow USB pinheader (JUSB1) on the bluetooth settings, please refer to JUSB2 (the USB pinheader ...2.0 technology is applied, remove the sticker to yellow USB pinheader. If you have any problems regarding the USB 2.0 driver, please visit the Microsoft Web site for Windows® 2000 and XP. If no Bluetooth function is downward compatible with USB 1.1 spec. MSI Reminds You...
...Bluetooth Manual. 2-23 Place the USB 2.0 bracket and D-Bracket™ 2 into the appropriate slot of the system case. For details on the motherboard. 3. Locate the blue USB pinheader (JUSB2) and yellow USB pinheader (JUSB1) on the bluetooth settings, please refer to JUSB2 (the USB pinheader ...2.0 technology is applied, remove the sticker to yellow USB pinheader. If you have any problems regarding the USB 2.0 driver, please visit the Microsoft Web site for Windows® 2000 and XP. If no Bluetooth function is downward compatible with USB 1.1 spec. MSI Reminds You...
User Guide
Page 82
or 6-Channel Audio Function Appendix: Using 4- ALC650 allows the board to install and use 4-/6-channel audio function on the board. or 6-Channel Audio Function The motherboard is equipped with Realtek ALC650 chip, which provides support for better surround sound effect. The section will tell you how to attach 4 or 6 speakers for 6-channel audio output, including 2 Front, 2 Rear, 1 Center and 1 Subwoofer channel. Using 4- TOPICS Installing the Audio Driver A-2 Using 4-/6-Channel Audio Function A-4 Testing the Connected Speakers A-14 Playing KaraOK A-15 A-1
or 6-Channel Audio Function Appendix: Using 4- ALC650 allows the board to install and use 4-/6-channel audio function on the board. or 6-Channel Audio Function The motherboard is equipped with Realtek ALC650 chip, which provides support for better surround sound effect. The section will tell you how to attach 4 or 6 speakers for 6-channel audio output, including 2 Front, 2 Rear, 1 Center and 1 Subwoofer channel. Using 4- TOPICS Installing the Audio Driver A-2 Using 4-/6-Channel Audio Function A-4 Testing the Connected Speakers A-14 Playing KaraOK A-15 A-1
User Guide
Page 85
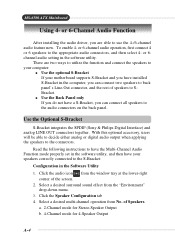
... instructions to have the Multi-Channel Audio Function mode properly set in the software utility, and then have your motherboard supports S-Bracket and you have a S-Bracket, you can connect all speakers to the S-Bracket: Configuration in ...the audio icon from the "Environment" drop-down menu. 3. or 6-Channel Audio Function After installing the audio driver, you are two ways to utilize the function and connect the speakers to your computer: Use the optional ... from No. of speakers to use the 4-/6-channel audio feature now. MS-6580 ATX Mainboard Using 4- There are able to SBracket.
... instructions to have the Multi-Channel Audio Function mode properly set in the software utility, and then have your motherboard supports S-Bracket and you have a S-Bracket, you can connect all speakers to the S-Bracket: Configuration in ...the audio icon from the "Environment" drop-down menu. 3. or 6-Channel Audio Function After installing the audio driver, you are two ways to utilize the function and connect the speakers to your computer: Use the optional ... from No. of speakers to use the 4-/6-channel audio feature now. MS-6580 ATX Mainboard Using 4- There are able to SBracket.


