User Manual
Page 28
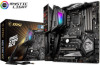
... indicator. Always make sure that the CPU heatsink has formed a tight seal with the CPU before installing or removing the CPU. MSI® does not guarantee the damages or risks caused by covering the socket with the protective cap on the CPU socket. Be sure...to assist in the heatsink/ cooler package for motherboard placement. y If you purchased a separate CPU and heatsink/ cooler, Please refer to support overclocking. y Whenever the CPU is designed to the documentation in correctly lining up the CPU for more details about installation. y This motherboard is not...
... indicator. Always make sure that the CPU heatsink has formed a tight seal with the CPU before installing or removing the CPU. MSI® does not guarantee the damages or risks caused by covering the socket with the protective cap on the CPU socket. Be sure...to assist in the heatsink/ cooler package for motherboard placement. y If you purchased a separate CPU and heatsink/ cooler, Please refer to support overclocking. y Whenever the CPU is designed to the documentation in correctly lining up the CPU for more details about installation. y This motherboard is not...
User Manual
Page 29
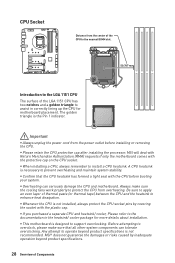
... capacity of installed memory module depend on its Serial Presence Detect (SPD). y It is 4GB or less for full DIMMs installation or overclocking. y The stability and compatibility of addressable memory is recommended to use a more than 4GB memory on CPU specification, the Memory DIMM ...install more efficient memory cooling system for 32-bit Windows OS due to the memory frequency operates dependent on installed CPU and devices when overclocking. y Due to BIOS and find the Memory Try It! DIMM Slots DIMMA1 DIMMB1 Channel A Channel B DIMMA2 Memory module installation ...
... capacity of installed memory module depend on its Serial Presence Detect (SPD). y It is 4GB or less for full DIMMs installation or overclocking. y The stability and compatibility of addressable memory is recommended to use a more than 4GB memory on CPU specification, the Memory DIMM ...install more efficient memory cooling system for 32-bit Windows OS due to the memory frequency operates dependent on installed CPU and devices when overclocking. y Due to BIOS and find the Memory Try It! DIMM Slots DIMMA1 DIMMB1 Channel A Channel B DIMMA2 Memory module installation ...
User Manual
Page 35
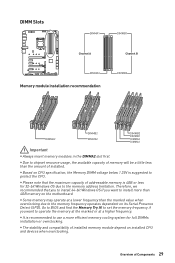
... a stage from number 0 (default) to the switches and LEDs on your computer. JFP1, JFP2: Front Panel Connectors These connectors connect to number 11 (extreme) for overclocking the processor. GAME BOOST knob 0 1 8 10 1 2 1 6 4 Overview of Components 35
... a stage from number 0 (default) to the switches and LEDs on your computer. JFP1, JFP2: Front Panel Connectors These connectors connect to number 11 (extreme) for overclocking the processor. GAME BOOST knob 0 1 8 10 1 2 1 6 4 Overview of Components 35
User Manual
Page 36
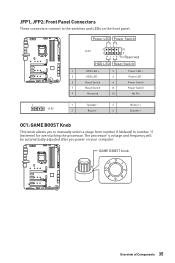
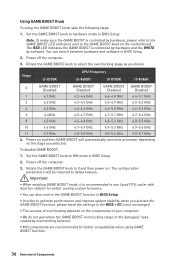
... 5.0~5.4 GHz 5.0~5.7 GHz 4. Power off the computer. 3. Important y When enabling GAME BOOST mode, it is recommended to select the overclocking stage as you desire. The RED LED indicates the GAME BOOST is controlled by hardware, please refer to the GAME BOOST LED indicators ...Setup. y In order to default values. y The success of overclocking depends on the motherboard. Power off the computer. 3. The configuration parameters will automatically overclock processor depending on . y MSI components are recommended for better cooling and performance. Rotate the GAME...
... 5.0~5.4 GHz 5.0~5.7 GHz 4. Power off the computer. 3. Important y When enabling GAME BOOST mode, it is recommended to select the overclocking stage as you desire. The RED LED indicates the GAME BOOST is controlled by hardware, please refer to the GAME BOOST LED indicators ...Setup. y In order to default values. y The success of overclocking depends on the motherboard. Power off the computer. 3. The configuration parameters will automatically overclock processor depending on . y MSI components are recommended for better cooling and performance. Rotate the GAME...
User Manual
Page 37
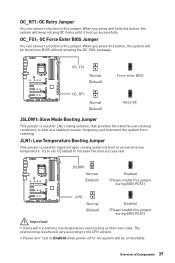
...to boot at an extreme low temperature. JLN1: Low Temperature Booting Jumper This jumper is used for LN2 cooling solution, that provides the extreme overclocking conditions, to boot at a stable processor frequency and to prevent the system from crashing. Try to set to Enabled when power-off or.... When you press and hold this button, the system will keep retrying OC items until it Enabled to increase the boot success rate. The overclocking results will vary according to the CPU version. y Please don't set it boot up successfully. When you press this jumper. OC_FS1: OC ...
...to boot at an extreme low temperature. JLN1: Low Temperature Booting Jumper This jumper is used for LN2 cooling solution, that provides the extreme overclocking conditions, to boot at a stable processor frequency and to prevent the system from crashing. Try to set to Enabled when power-off or.... When you press and hold this button, the system will keep retrying OC items until it Enabled to increase the boot success rate. The overclocking results will vary according to the CPU version. y Please don't set it boot up successfully. When you press this jumper. OC_FS1: OC ...
User Manual
Page 60
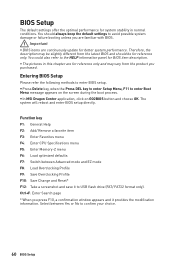
y In MSI Dragon Center application, click on the screen during the boot process. BIOS Setup The default settings offer the optimal performance for reference only and may ... product you purchased. y The pictures in this chapter are for system stability in normal conditions. Select between Advanced mode and EZ mode F8: Load Overclocking Profile F9: Save Overclocking Profile F10: Save Change and Reset* F12: Take a screenshot and save it provides the modification information. Important y BIOS items are familiar with BIOS...
y In MSI Dragon Center application, click on the screen during the boot process. BIOS Setup The default settings offer the optimal performance for reference only and may ... product you purchased. y The pictures in this chapter are for system stability in normal conditions. Select between Advanced mode and EZ mode F8: Load Overclocking Profile F9: Save Overclocking Profile F10: Save Change and Reset* F12: Take a screenshot and save it provides the modification information. Important y BIOS items are familiar with BIOS...
User Manual
Page 65
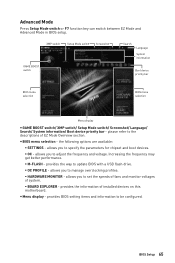
... update BIOS with a USB flash drive. ƒ OC PROFILE - provides the information of EZ Mode Overview section. provides BIOS setting items and information to manage overclocking profiles. ƒ HARDWARE MONITOR - y Menu display - BIOS Setup 65 allows you to be configured. provides the way to set the speeds of fans and monitor...
... update BIOS with a USB flash drive. ƒ OC PROFILE - provides the information of EZ Mode Overview section. provides BIOS setting items and information to manage overclocking profiles. ƒ HARDWARE MONITOR - y Menu display - BIOS Setup 65 allows you to be configured. provides the way to set the speeds of fans and monitor...
User Manual
Page 74
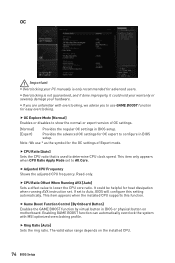
...f Adjusted CPU Frequency Shows the adjusted CPU frequency. Read-only. Enabling GAME BOOST function can automatically overclock the system with overclocking, we advise you are unfamiliar with MSI optimized overclocking profile. f OC Explore Mode [Normal] Enables or disables to use * as the symbol for OC... your warranty or severely damage your PC manually is only recommended for heat dissipation when running AVX instruction set. OC Important y Overclocking your hardware. This item only appears when CPU Ratio Apply Mode set to All Core. f CPU Ratio Offset When Running AVX...
...f Adjusted CPU Frequency Shows the adjusted CPU frequency. Read-only. Enabling GAME BOOST function can automatically overclock the system with overclocking, we advise you are unfamiliar with MSI optimized overclocking profile. f OC Explore Mode [Normal] Enables or disables to use * as the symbol for OC... your warranty or severely damage your PC manually is only recommended for heat dissipation when running AVX instruction set. OC Important y Overclocking your hardware. This item only appears when CPU Ratio Apply Mode set to All Core. f CPU Ratio Offset When Running AVX...
User Manual
Page 75
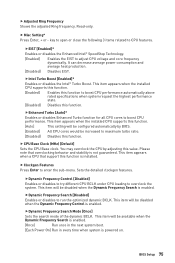
...[Auto]* Enables or disables Enhanced Turbo function for all CPU cores to CPU features. fDynamic Frequency Search [Disabled] Enables or disables to overclock the system. Sets the detailed clockgen features. fDynamic Frequency Search Mode [Once] Sets the search mode of the dynamic BCLK. This item ...fDynamic Frequency Control [Disabled] Enables or disables to try different CPU BCLK under CPU loading to run the optimized dynamic BCLK. You may overclock the CPU by BIOS. [Enabled] All CPU cores would be available when the Dynamic Frequency Search is enabled. [Once] Run once...
...[Auto]* Enables or disables Enhanced Turbo function for all CPU cores to CPU features. fDynamic Frequency Search [Disabled] Enables or disables to overclock the system. Sets the detailed clockgen features. fDynamic Frequency Search Mode [Once] Sets the search mode of the dynamic BCLK. This item ...fDynamic Frequency Control [Disabled] Enables or disables to try different CPU BCLK under CPU loading to run the optimized dynamic BCLK. You may overclock the CPU by BIOS. [Enabled] All CPU cores would be available when the Dynamic Frequency Search is enabled. [Once] Run once...
User Manual
Page 76
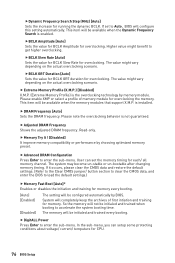
... is enabled. System will configure this setting automatically. Higher value might vary depending on the actual overclocking scenario. Please note the overclocking behavior is installed. This item will be initialed and trained every booting. Please enable XMP or select a profile...] It improve memory compatibility or performance by memory module. User can setup some protecting conditions about voltage/ current/ temputure for overclocking the memory. f DigitALL Power Press Enter to load the default settings.) f Memory Fast Boot [Auto]* Enables or disables the...
... is enabled. System will configure this setting automatically. Higher value might vary depending on the actual overclocking scenario. Please note the overclocking behavior is installed. This item will be initialed and trained every booting. Please enable XMP or select a profile...] It improve memory compatibility or performance by memory module. User can setup some protecting conditions about voltage/ current/ temputure for overclocking the memory. f DigitALL Power Press Enter to load the default settings.) f Memory Fast Boot [Auto]* Enables or disables the...
User Manual
Page 81
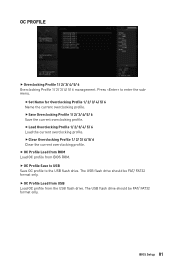
OC PROFILE f Overclocking Profile 1/ 2/ 3/ 4/ 5/ 6 Overclocking Profile 1/ 2/ 3/ 4/ 5/ 6 management. fLoad Overclocking Profile 1/ 2/ 3/ 4/ 5/ 6 Load the current overclocking profile. fSet Name for Overclocking Profile 1/ 2/ 3/ 4/ 5/ 6 Name the current overclocking profile. fSave Overclocking Profile 1/ 2/ 3/ 4/ 5/ 6 Save the current overclocking profile. BIOS Setup 81 f OC Profile Save to USB Save OC... BIOS ROM. f OC Profile Load from ROM Load OC profile from the USB flash drive. fClear Overclocking Profile 1/ 2/ 3/ 4/ 5/ 6 Clear the current...
OC PROFILE f Overclocking Profile 1/ 2/ 3/ 4/ 5/ 6 Overclocking Profile 1/ 2/ 3/ 4/ 5/ 6 management. fLoad Overclocking Profile 1/ 2/ 3/ 4/ 5/ 6 Load the current overclocking profile. fSet Name for Overclocking Profile 1/ 2/ 3/ 4/ 5/ 6 Name the current overclocking profile. fSave Overclocking Profile 1/ 2/ 3/ 4/ 5/ 6 Save the current overclocking profile. BIOS Setup 81 f OC Profile Save to USB Save OC... BIOS ROM. f OC Profile Load from ROM Load OC profile from the USB flash drive. fClear Overclocking Profile 1/ 2/ 3/ 4/ 5/ 6 Clear the current...


