
User Manual
Page 6
... has been adjusted properly to the value of the following situations arises, get the equipment checked by a service personnel: VI Lay this copyright protection technology must be noted. 10. Do not cover the openings. 6. Safety Instructions 1. Keep this User Guide for air convection and to the power inlet. 7. Read the safety instructions carefully and thoroughly. 2. Place the power cord in...
... has been adjusted properly to the value of the following situations arises, get the equipment checked by a service personnel: VI Lay this copyright protection technology must be noted. 10. Do not cover the openings. 6. Safety Instructions 1. Keep this User Guide for air convection and to the power inlet. 7. Read the safety instructions carefully and thoroughly. 2. Place the power cord in...

User Manual
Page 13
... View 2-14 Rear View 2-15 Bottom View 2-16 Power Management 2-18 AC Adapter 2-18 Battery Pack 2-19 Using the Battery Pack 2-22 Basic Operations 2-24 Safety and Comfort Tips 2-24 Have a Good Work Habit 2-25 Knowing the Keyboard 2-26 Knowing the Touchpad 2-31 About Hard Disk Drive 2-35 Using the Optical Storage 2-36 Customizing this Notebook Connecting the External Devices 3-2 Connecting the Peripheral Devices 3-3 Connecting the Communication Devices 3-6 PC Card Installation 3-7 Installing the PC card 3-7 XIII
... View 2-14 Rear View 2-15 Bottom View 2-16 Power Management 2-18 AC Adapter 2-18 Battery Pack 2-19 Using the Battery Pack 2-22 Basic Operations 2-24 Safety and Comfort Tips 2-24 Have a Good Work Habit 2-25 Knowing the Keyboard 2-26 Knowing the Touchpad 2-31 About Hard Disk Drive 2-35 Using the Optical Storage 2-36 Customizing this Notebook Connecting the External Devices 3-2 Connecting the Peripheral Devices 3-3 Connecting the Communication Devices 3-6 PC Card Installation 3-7 Installing the PC card 3-7 XIII

User Manual
Page 16
... customer satisfaction. Chapter 2, Getting Started, provides the specification of this notebook, and introduces the function buttons, quick launch buttons, connectors, LEDs and externals of this notebook, the finely designed notebook. Also, this chapter instructs the correct procedure of installing or uninstalling the battery pack, and the brief ideas on how to use this notebook. 1-2 General Introductions Congratulations on becoming a new user of this notebook. It is recommended to check...
... customer satisfaction. Chapter 2, Getting Started, provides the specification of this notebook, and introduces the function buttons, quick launch buttons, connectors, LEDs and externals of this notebook, the finely designed notebook. Also, this chapter instructs the correct procedure of installing or uninstalling the battery pack, and the brief ideas on how to use this notebook. 1-2 General Introductions Congratulations on becoming a new user of this notebook. It is recommended to check...
User Manual
Page 17
Chapter 4, BIOS setup, provides information on BIOS Setup program and allows you to configure the system for optimum use. 1-3 General Introductions Chapter 3, Customizing this Notebook, gives instructions not only in connecting the mouse, keyboard, webcam, printer, external monitor, IEEE 1394 devices, and communication devices, but also in installing and removing the PC card.
Chapter 4, BIOS setup, provides information on BIOS Setup program and allows you to configure the system for optimum use. 1-3 General Introductions Chapter 3, Customizing this Notebook, gives instructions not only in connecting the mouse, keyboard, webcam, printer, external monitor, IEEE 1394 devices, and communication devices, but also in installing and removing the PC card.
User Manual
Page 18
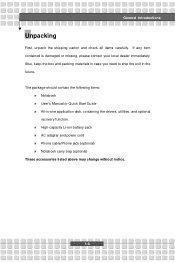
... should contain the following items: w Notebook w User's Manual or Quick Start Guide w All-in the future. Also, keep the box and packing materials in case you need to ship the unit in -one application disk, containing the drivers, utilities, and optional recovery function. w High-capacity Li-ion battery pack w AC adapter and power cord w Phone cable/Phone jack (optional) w Notebook carry bag (optional) These accessories listed above may change without notice. 1-4 General Introductions...
... should contain the following items: w Notebook w User's Manual or Quick Start Guide w All-in the future. Also, keep the box and packing materials in case you need to ship the unit in -one application disk, containing the drivers, utilities, and optional recovery function. w High-capacity Li-ion battery pack w AC adapter and power cord w Phone cable/Phone jack (optional) w Notebook carry bag (optional) These accessories listed above may change without notice. 1-4 General Introductions...
User Manual
Page 23
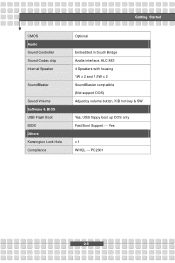
PC2001 2-5 Yes x 1 WHQL --- Getting Started CMOS Audio Sound Controller Sound Codec chip Internal Speaker SoundBlaster Sound Volume Software & BIOS USB Flash Boot BIOS Others Kensington Lock Hole Compliance Optional Embedded in South Bridge Azalia interface, ALC 883 4 Speakers with housing 1W x 2 and 1.5W x 2 SoundBlaster compatible (Not support DOS) Adjust by volume button, K/B hot-key & SW Yes, USB floppy boot up DOS only Fast Boot Support ---
PC2001 2-5 Yes x 1 WHQL --- Getting Started CMOS Audio Sound Controller Sound Codec chip Internal Speaker SoundBlaster Sound Volume Software & BIOS USB Flash Boot BIOS Others Kensington Lock Hole Compliance Optional Embedded in South Bridge Azalia interface, ALC 883 4 Speakers with housing 1W x 2 and 1.5W x 2 SoundBlaster compatible (Not support DOS) Adjust by volume button, K/B hot-key & SW Yes, USB floppy boot up DOS only Fast Boot Support ---
User Manual
Page 28
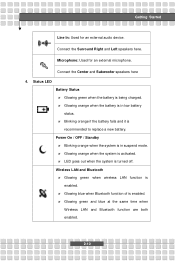
... Bluetooth function are both enabled. 2-10 w Glowing orange when the system is turned off. w Glowing blue when Bluetooth function of is enabled. Microphone: Used for an external audio device. Wireless LAN and Bluetooth w Glowing green when wireless LAN function is enabled. w Blinking orange if the battery fails and it is in low battery status. Connect the Surround Right and Left speakers here. Getting Started Line In: Used for an external microphone. Connect the Center and Subwoofer speakers here 4. Power...
... Bluetooth function are both enabled. 2-10 w Glowing orange when the system is turned off. w Glowing blue when Bluetooth function of is enabled. Microphone: Used for an external audio device. Wireless LAN and Bluetooth w Glowing green when wireless LAN function is enabled. w Blinking orange if the battery fails and it is in low battery status. Connect the Surround Right and Left speakers here. Getting Started Line In: Used for an external microphone. Connect the Center and Subwoofer speakers here 4. Power...

User Manual
Page 30
... notebook provides a DVI (Digital Visual Interface) connector which allows you to connect USB-interface peripheral devices, such as the mouse, keyboard, modem, portable hard disk module, printer and more. 3. Express Card Slot The computer provides an Express Card slot. The DVI connector provides a high-speed digital interconnection between the notebook and the display device connected to connect a LCD monitor. USB Port The USB 2.0 port allows you to the notebook. 2-12 Right-side View uv w Getting Started...
... notebook provides a DVI (Digital Visual Interface) connector which allows you to connect USB-interface peripheral devices, such as the mouse, keyboard, modem, portable hard disk module, printer and more. 3. Express Card Slot The computer provides an Express Card slot. The DVI connector provides a high-speed digital interconnection between the notebook and the display device connected to connect a LCD monitor. USB Port The USB 2.0 port allows you to the notebook. 2-12 Right-side View uv w Getting Started...

User Manual
Page 31
Ventilator The ventilator is designed to support one Type-II PC card for air circulation. 2-13 PC Card Slot This notebook provides a PC card slot to cool the system. DO NOT block the ventilator for expansion functions, such as a computer display. 6. Getting Started 4. S-Video Connector By using a Super VHS (S-Video) cable, this connector allows you to connect a television (NTSC/PAL system) to use as LAN/WLAN card, modem card, memory card, etc. 5.
Ventilator The ventilator is designed to support one Type-II PC card for air circulation. 2-13 PC Card Slot This notebook provides a PC card slot to cool the system. DO NOT block the ventilator for expansion functions, such as a computer display. 6. Getting Started 4. S-Video Connector By using a Super VHS (S-Video) cable, this connector allows you to connect a television (NTSC/PAL system) to use as LAN/WLAN card, modem card, memory card, etc. 5.

User Manual
Page 32
... on the model you with a high quality TV viewing experience via the TV-Tuner Connector. or Hybrid TV-tuner connector, depending on the disks. 3. This connector may be a Digital TV-tuner connector; Lightscribe function allows users to connect USB-interface peripheral devices, such as the mouse, keyboard, modem, portable hard disk module, printer and more. 2-14 TV-Tuner Connector (Optional) This notebook provides you...
... on the model you with a high quality TV viewing experience via the TV-Tuner Connector. or Hybrid TV-tuner connector, depending on the disks. 3. This connector may be a Digital TV-tuner connector; Lightscribe function allows users to connect USB-interface peripheral devices, such as the mouse, keyboard, modem, portable hard disk module, printer and more. 2-14 TV-Tuner Connector (Optional) This notebook provides you...

User Manual
Page 40
.... w Only replace the main battery pack with the same or equivalent type of fire or explosion, which could cause serious injury. w Do not use rusty or damaged batteries. Check with batteries. Conserving Battery Power Efficient battery power is not managed well, the saved data and customized settings may present a risk of battery. w Suspend system operation if the system will be lost. w Disable unneeded settings or remove idle...
.... w Only replace the main battery pack with the same or equivalent type of fire or explosion, which could cause serious injury. w Do not use rusty or damaged batteries. Check with batteries. Conserving Battery Power Efficient battery power is not managed well, the saved data and customized settings may present a risk of battery. w Suspend system operation if the system will be lost. w Disable unneeded settings or remove idle...

User Manual
Page 48
... into suspend mode + (depending on the keyboard, which are used to your Windows manual or online help. Getting Started Function Keys n Windows Keys You can find the Windows Logo key ( ) and one Application Logo key ( ) on the system configuration). 2-30 For more information of the two keys, please refer to perform Windows-specific functions, such as opening the Start menu and launching the shortcut menu. n [Fn] Key Switch the display output mode between the + LCD, external monitor and Both...
... into suspend mode + (depending on the keyboard, which are used to your Windows manual or online help. Getting Started Function Keys n Windows Keys You can find the Windows Logo key ( ) and one Application Logo key ( ) on the system configuration). 2-30 For more information of the two keys, please refer to perform Windows-specific functions, such as opening the Start menu and launching the shortcut menu. n [Fn] Key Switch the display output mode between the + LCD, external monitor and Both...

User Manual
Page 52
Getting Started n Configuring the Touchpad You can customize the pointing device to meet your Windows operating system. To configure the touchpad, you can use the standard Microsoft or IBM PS/2 driver in Control Panel allows you may want to change the size, shape, moving speed and other advanced features of the two buttons. In addition, you can change the configuration. The Mouse Properties in your personal needs. Mouse Properties Window 2-34 For example, if you are a left-hand user, you to swap the functions of the cursor on the screen.
Getting Started n Configuring the Touchpad You can customize the pointing device to meet your Windows operating system. To configure the touchpad, you can use the standard Microsoft or IBM PS/2 driver in Control Panel allows you may want to change the size, shape, moving speed and other advanced features of the two buttons. In addition, you can change the configuration. The Mouse Properties in your personal needs. Mouse Properties Window 2-34 For example, if you are a left-hand user, you to swap the functions of the cursor on the screen.

User Manual
Page 58
Modem LAN Monitor Web Cam IEEE 1394 Device Mouse/ Keyboard Microphone Printer Television Speakers/ Earphones 3-2 Customizing this Notebook Connecting the External Devices The I/O (input/output) ports on the Notebook allow you to connect peripheral devices.
Modem LAN Monitor Web Cam IEEE 1394 Device Mouse/ Keyboard Microphone Printer Television Speakers/ Earphones 3-2 Customizing this Notebook Connecting the External Devices The I/O (input/output) ports on the Notebook allow you to connect peripheral devices.
User Manual
Page 59
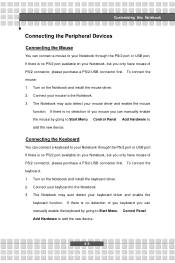
.../2-USB connector first. Connect your mouse driver and enable the mouse function. Connecting the Keyboard You can connect a keyboard to your Notebook through the PS/2 port or USB port. If there is no PS/2 port available on your Notebook, but you can manually enable the mouse by going to Start Menu à Control Panel à Add Hardware to add the new device. Connect your keyboard driver and enable the keyboard function. If there is no PS/2 port available on your Notebook, but you can manually enable the keyboard...
.../2-USB connector first. Connect your mouse driver and enable the mouse function. Connecting the Keyboard You can connect a keyboard to your Notebook through the PS/2 port or USB port. If there is no PS/2 port available on your Notebook, but you can manually enable the mouse by going to Start Menu à Control Panel à Add Hardware to add the new device. Connect your keyboard driver and enable the keyboard function. If there is no PS/2 port available on your Notebook, but you can manually enable the keyboard...
User Manual
Page 60
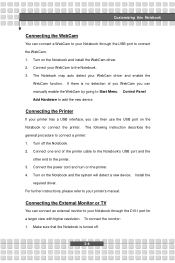
Connect your printer's manual. Connecting the Printer If your WebCam driver and enable the WebCam function. Connect the power cord and turn on the Notebook to connect the printer. To connect the monitor: 1. The following instruction describes the general procedure to the printer. 3. Connect one end of you WebCam you can then use the USB port on the printer. 4. Turn on the Notebook and install the WebCam driver. 2. For further instructions, please refer to your WebCam to the Notebook. 3. If...
Connect your printer's manual. Connecting the Printer If your WebCam driver and enable the WebCam function. Connect the power cord and turn on the Notebook to connect the printer. To connect the monitor: 1. The following instruction describes the general procedure to the printer. 3. Connect one end of you WebCam you can then use the USB port on the printer. 4. Turn on the Notebook and install the WebCam driver. 2. For further instructions, please refer to your WebCam to the Notebook. 3. If...

User Manual
Page 61
... (digital video camera). Plug the monitor's D-type connector into the Notebook's VGA port. 3. Turn on the monitor. 4. The IEEE 1394 standard interface supports "plug-and-play" technology, so that features a high-speed transfer rate and the connection of up to 63 devices, allowing you can switch the display mode by configuring the settings in Display Properties of Windows operating system. Customizing this Notebook 2. If not, you can change the display mode by pressing...
... (digital video camera). Plug the monitor's D-type connector into the Notebook's VGA port. 3. Turn on the monitor. 4. The IEEE 1394 standard interface supports "plug-and-play" technology, so that features a high-speed transfer rate and the connection of up to 63 devices, allowing you can switch the display mode by configuring the settings in Display Properties of Windows operating system. Customizing this Notebook 2. If not, you can change the display mode by pressing...
User Manual
Page 62
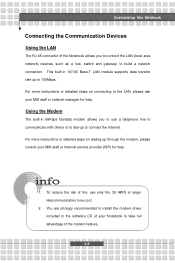
... to build a network connection. For more instructions or detailed steps on dialing-up to use only No. 26 AWG or larger telecommunication lone cord. 2. Using the Modem The built-in 56Kbps fax/data modem allows you to connect the LAN (local area network) devices, such as a hub, switch and gateway, to install the modem driver included in 10/100 Base-T LAN module supports data transfer...
... to build a network connection. For more instructions or detailed steps on dialing-up to use only No. 26 AWG or larger telecommunication lone cord. 2. Using the Modem The built-in 56Kbps fax/data modem allows you to connect the LAN (local area network) devices, such as a hub, switch and gateway, to install the modem driver included in 10/100 Base-T LAN module supports data transfer...
User Manual
Page 74
If you want optimize the processor, set this item to Enabled, so that the processor's speed will be controlled by the use of your operating system and applications. Setting options: Enabled, and Disabled. 4-8 BIOS Setup mode (the processor works at FSB400-600MHz or FSB533-800MHz).
If you want optimize the processor, set this item to Enabled, so that the processor's speed will be controlled by the use of your operating system and applications. Setting options: Enabled, and Disabled. 4-8 BIOS Setup mode (the processor works at FSB400-600MHz or FSB533-800MHz).
User Manual
Page 77
... used to run Setup. Settings are prompted to run Setup. BIOS Setup When the Supervisor Password is set password, just press [Enter] when you can make changes. 4-11 Setting options: No Access, View Only, Limited and Full Access. User Password only allows the user to enter the setup menu, but do not have the right to enter and change the settings of the setup menu; To clear a set , the new item User Access Level and Password Check will be disabled. You can enter Setup without entering any password...
... used to run Setup. Settings are prompted to run Setup. BIOS Setup When the Supervisor Password is set password, just press [Enter] when you can make changes. 4-11 Setting options: No Access, View Only, Limited and Full Access. User Password only allows the user to enter the setup menu, but do not have the right to enter and change the settings of the setup menu; To clear a set , the new item User Access Level and Password Check will be disabled. You can enter Setup without entering any password...


