User Guide
Page 8
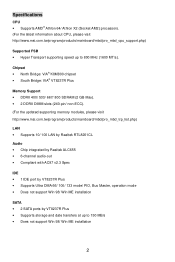
...174; Athlon 64/ Athlon X2 (Socket AM2) processors. (For the latest information about CPU, please visit http://www.msi.com.tw/program/products/mainboard/mbd/pro_mbd_cpu_support.php) Supported FSB • Hyper Transport supporting speed up to 800 MHz (1600 MT/s). Chipset • North Bridge: VIA®... Max). • 2 DDRII DIMM slots (240-pin/ non-ECC). (For the updated supporting memory modules, please visit http://www.msi.com.tw/program/products/mainboard/mbd/pro_mbd_trp_list.php) LAN • Supports 10/ 100 LAN by Realtek RTL8201CL Audio • Chip integrated by Realtek ALC655 •...
...174; Athlon 64/ Athlon X2 (Socket AM2) processors. (For the latest information about CPU, please visit http://www.msi.com.tw/program/products/mainboard/mbd/pro_mbd_cpu_support.php) Supported FSB • Hyper Transport supporting speed up to 800 MHz (1600 MT/s). Chipset • North Bridge: VIA®... Max). • 2 DDRII DIMM slots (240-pin/ non-ECC). (For the updated supporting memory modules, please visit http://www.msi.com.tw/program/products/mainboard/mbd/pro_mbd_trp_list.php) LAN • Supports 10/ 100 LAN by Realtek RTL8201CL Audio • Chip integrated by Realtek ALC655 •...
User Guide
Page 10
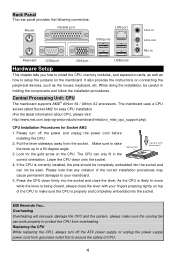
... properly to your fingers pressing tightly on the CPU. MSI Reminds You... Replacing the CPU While replacing the CPU, always turn off the ATX power supply or unplug the power supply power cord from the socket. While doing the installation, be seen. Central Processing Unit: CPU The mainboard supports AMD® Athlon 64 / Athlon X2 processors. Please...
... properly to your fingers pressing tightly on the CPU. MSI Reminds You... Replacing the CPU While replacing the CPU, always turn off the ATX power supply or unplug the power supply power cord from the socket. While doing the installation, be seen. Central Processing Unit: CPU The mainboard supports AMD® Athlon 64 / Athlon X2 processors. Please...
User Guide
Page 11
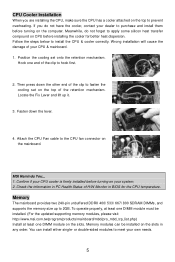
...in PC Health Status of your system. 2. Hook one DIMM module on your CPU & mainboard. 1. Then press down the lever. 4. Memory The mainboard provides two 240-pin unbuffered DDRII 400/ 533/ 667/ 800 SDRAM DIMMs, and supports the memory size up it. 3. Wrong installation will cause the damage of ... the CPU, make sure the CPU has a cooler attached on the slots in BIOS for better heat dispersion. Locate the Fix Lever and lift up to fasten the cooling set onto the retention mechanism. You can be installed. (For the updated supporting memory modules, please visit http://www.msi.com....
...in PC Health Status of your system. 2. Hook one DIMM module on your CPU & mainboard. 1. Then press down the lever. 4. Memory The mainboard provides two 240-pin unbuffered DDRII 400/ 533/ 667/ 800 SDRAM DIMMs, and supports the memory size up it. 3. Wrong installation will cause the damage of ... the CPU, make sure the CPU has a cooler attached on the slots in BIOS for better heat dispersion. Locate the Fix Lever and lift up to fasten the cooling set onto the retention mechanism. You can be installed. (For the updated supporting memory modules, please visit http://www.msi.com....
User Guide
Page 12
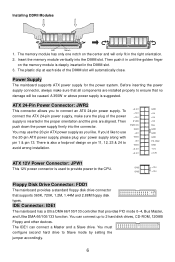
... into the connector. Then push it in the DIMM slot. 3. Then push down the power supply firmly into the DIMM slot. Power Supply The mainboard supports ATX power supply for the power system. A 350W or above power supply is deeply inserted in until the golden finger on pin 11, 12, 23 &...the ATX 24-pin power supply, make sure that all components are aligned. There is also a foolproof design on the memory module is suggested. Installing DDRII Modules Volt Notch 1. The memory module has only one notch on the center and will be caused. The IDE1 can connect up to the CPU.
... into the connector. Then push it in the DIMM slot. 3. Then push down the power supply firmly into the DIMM slot. Power Supply The mainboard supports ATX power supply for the power system. A 350W or above power supply is deeply inserted in until the golden finger on pin 11, 12, 23 &...the ATX 24-pin power supply, make sure that all components are aligned. There is also a foolproof design on the memory module is suggested. Installing DDRII Modules Volt Notch 1. The memory module has only one notch on the center and will be caused. The IDE1 can connect up to the CPU.
User Guide
Page 13
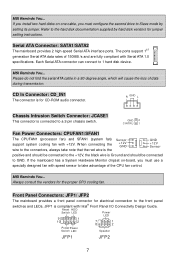
...Sensor +12V GND GND +12V Sensor positive and should be connected to the connectors, always take advantage of the CPU fan control. MSI Reminds You... MSI Reminds You... Always consult the vendors for electrical connection to 1 hard disk device. Refer to Slave mode by hard...JFP2 The mainboard provides a front panel connector for the proper CPU cooling fan. If you install two hard disks on -board, you must use a specially designed fan with Serial ATA 1.0 specifications. The ports support 1ST generation Serial ATA data rates of data during transmission. Reset...
...Sensor +12V GND GND +12V Sensor positive and should be connected to the connectors, always take advantage of the CPU fan control. MSI Reminds You... MSI Reminds You... Always consult the vendors for electrical connection to 1 hard disk device. Refer to Slave mode by hard...JFP2 The mainboard provides a front panel connector for the proper CPU cooling fan. If you install two hard disks on -board, you must use a specially designed fan with Serial ATA 1.0 specifications. The ports support 1ST generation Serial ATA data rates of data during transmission. Reset...
User Guide
Page 16
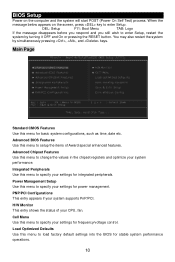
... computer and the system will start POST (Power On Self Test) process. Main Page Standard CMOS Features Use this menu to specify your CPU, fan. Power Management Setup Use this menu to enter Setup, restart the system by simultaneously pressing , , and keys. Load Optimized Defaults... Use this menu to specify your system supports PnP/PCI. Advanced Chipset Features Use this menu to change the values in the chipset registers and optimize your settings for basic system configurations...
... computer and the system will start POST (Power On Self Test) process. Main Page Standard CMOS Features Use this menu to specify your CPU, fan. Power Management Setup Use this menu to enter Setup, restart the system by simultaneously pressing , , and keys. Load Optimized Defaults... Use this menu to specify your system supports PnP/PCI. Advanced Chipset Features Use this menu to change the values in the chipset registers and optimize your settings for basic system configurations...


