User Manual
Page 4
Preface 1-4 Connecting the External Devices 3-43 Connecting the Peripheral Devices 3-43 Connecting the Communication Devices 3-47 Components Replacement and Upgrade 3-50 BIOS Setup About BIOS Setup...4-2 When to Use BIOS Setup...4-2 How to Run BIOS Setup...4-2 Control Keys ...4-3 BIOS Setup Menu...4-4 Main menu...4-5 Advanced menu...4-7 Boot menu ...4-9 Security menu...4-10 Save & Exit menu...4-12
Preface 1-4 Connecting the External Devices 3-43 Connecting the Peripheral Devices 3-43 Connecting the Communication Devices 3-47 Components Replacement and Upgrade 3-50 BIOS Setup About BIOS Setup...4-2 When to Use BIOS Setup...4-2 How to Run BIOS Setup...4-2 Control Keys ...4-3 BIOS Setup Menu...4-4 Main menu...4-5 Advanced menu...4-7 Boot menu ...4-9 Security menu...4-10 Save & Exit menu...4-12

User Manual
Page 25
... of user's manual, drivers, utilities, and optional recovery function, etc.. Unpacking First, unpack the shipping carton and check all items carefully. Introductions Chapter 4, BIOS Setup, provides information on BIOS Setup program and allows you need to configure the system for optimum use. The package should contain the following items: Notebook Quick Start...
... of user's manual, drivers, utilities, and optional recovery function, etc.. Unpacking First, unpack the shipping carton and check all items carefully. Introductions Chapter 4, BIOS Setup, provides information on BIOS Setup program and allows you need to configure the system for optimum use. The package should contain the following items: Notebook Quick Start...

User Manual
Page 30
Supported Realtek® ALC892-GR x 2 x 1 x 1 Adjust by K/B hot-key & SW Yes, USB floppy boot up DOS only Fast Boot Support --- Yes WHQL x 1 Introductions 2-8 Special Notification WebCam HD CMOS Camera Audio Sound Controller Internal Speaker Internal Subwoofer Internal Microphone Sound Volume Software & BIOS USB Flash Boot BIOS Others Compliance Kensington Lock Hole The actual graphics chipset preinstalled in the notebook depends on the model you purchased, and may vary without notice.
Supported Realtek® ALC892-GR x 2 x 1 x 1 Adjust by K/B hot-key & SW Yes, USB floppy boot up DOS only Fast Boot Support --- Yes WHQL x 1 Introductions 2-8 Special Notification WebCam HD CMOS Camera Audio Sound Controller Internal Speaker Internal Subwoofer Internal Microphone Sound Volume Software & BIOS USB Flash Boot BIOS Others Compliance Kensington Lock Hole The actual graphics chipset preinstalled in the notebook depends on the model you purchased, and may vary without notice.

User Manual
Page 100
...wish to enter Setup, either restart the system by turning it OFF and ON, or simultaneously pressing [Ctrl]+[Alt]+[Delete] keys to Use BIOS Setup? BIOS Setup 4-2 About BIOS Setup When to restart. To run SETUP. Š You want to change the default settings for customized features. Š You want... to Run BIOS Setup? The actual setting screens and options on your references only. How to reload the default BIOS settings. Be noted that the screen snaps and setting options in this chapter are for your ...
...wish to enter Setup, either restart the system by turning it OFF and ON, or simultaneously pressing [Ctrl]+[Alt]+[Delete] keys to Use BIOS Setup? BIOS Setup 4-2 About BIOS Setup When to restart. To run SETUP. Š You want to change the default settings for customized features. Š You want... to Run BIOS Setup? The actual setting screens and options on your references only. How to reload the default BIOS settings. Be noted that the screen snaps and setting options in this chapter are for your ...

User Manual
Page 101
... Utility. In some items, press this key to change setting options. 2) Bring up help screen providing the information of control keys. 1) Exit the BIOS Setup Utility. 2) Return to select one menu title. Bring up a sub-menu when available. Press up arrow to select one item under the menu title. ... setting value or make changes. + Decrease the setting value or make changes. 1) Open the selected item to control the cursor in a sub-menu. 4-3 Control Keys BIOS Setup You can use only the keyboard to change setting field.
... Utility. In some items, press this key to change setting options. 2) Bring up help screen providing the information of control keys. 1) Exit the BIOS Setup Utility. 2) Return to select one menu title. Bring up a sub-menu when available. Press up arrow to select one item under the menu title. ... setting value or make changes. + Decrease the setting value or make changes. 1) Open the selected item to control the cursor in a sub-menu. 4-3 Control Keys BIOS Setup You can use only the keyboard to change setting field.

User Manual
Page 102
...Security Menu Install or clear the password settings for reference only. Save & Exit Menu Save or discard the changes before leaving the BIOS Setup Menu. 4-4 The BIOS items and figures shown here are for administrator and user. Boot Menu Set up boot type and boot sequence. Main Menu Show system... overview information about BIOS version, CPU features, memory size and setting of the notebook in order to enter the other menus. BIOS Setup BIOS Setup Menu Once you enter the BIOS Setup Utility, the Main Menu will appear on the screen.
...Security Menu Install or clear the password settings for reference only. Save & Exit Menu Save or discard the changes before leaving the BIOS Setup Menu. 4-4 The BIOS items and figures shown here are for administrator and user. Boot Menu Set up boot type and boot sequence. Main Menu Show system... overview information about BIOS version, CPU features, memory size and setting of the notebook in order to enter the other menus. BIOS Setup BIOS Setup Menu Once you enter the BIOS Setup Utility, the Main Menu will appear on the screen.

User Manual
Page 103
... Year Day of the week, from Sun to set the system date. The month from 01 to 12 (December). The year can be adjusted by BIOS (read-only). Press [Enter] to set the system time. The system clock will go on no matter you to bring up a window showing the detailed... information of the SATA devices installed in the notebook. The date from 01 (January) to 31. BIOS Setup 4-5 Main Menu Š System Date This item allows you shut down the PC or get into sleep mode. The date format is [day:month...
... Year Day of the week, from Sun to set the system date. The month from 01 to 12 (December). The year can be adjusted by BIOS (read-only). Press [Enter] to set the system time. The system clock will go on no matter you to bring up a window showing the detailed... information of the SATA devices installed in the notebook. The date from 01 (January) to 31. BIOS Setup 4-5 Main Menu Š System Date This item allows you shut down the PC or get into sleep mode. The date format is [day:month...
User Manual
Page 104
BIOS Setup 4-6 Š System Information This item provides the information about the firmware, processor, and system memory.
BIOS Setup 4-6 Š System Information This item provides the information about the firmware, processor, and system memory.

User Manual
Page 105
... Mode Selection This item allows you to Enabled, so that the processor's speed will be controlled by the use of your operating system and applications. BIOS Setup 4-7 Advanced Menu Š PCI Latency Timer This item controls how long each PCI device can conduct transactions for a longer time and thus improve the...
... Mode Selection This item allows you to Enabled, so that the processor's speed will be controlled by the use of your operating system and applications. BIOS Setup 4-7 Advanced Menu Š PCI Latency Timer This item controls how long each PCI device can conduct transactions for a longer time and thus improve the...

User Manual
Page 106
When "iCharger" is set to Enabled, it will automatically detect if there is an iPad or iPhone connected to the notebook. Š USB Configuration Select this item to use USB devices, such as mouse, keyboard, or portable disk, in DOS system; Legacy USB Support Selecting Enabled allows users to enter the sub-menu: -- Setting options: Enabled, Disabled and Auto. BIOS Setup 4-8 Š iCharger Function This notebook supports the iCharger function. or allows users to boot the system by USB device.
When "iCharger" is set to Enabled, it will automatically detect if there is an iPad or iPhone connected to the notebook. Š USB Configuration Select this item to use USB devices, such as mouse, keyboard, or portable disk, in DOS system; Legacy USB Support Selecting Enabled allows users to enter the sub-menu: -- Setting options: Enabled, Disabled and Auto. BIOS Setup 4-8 Š iCharger Function This notebook supports the iCharger function. or allows users to boot the system by USB device.

User Manual
Page 107
... State when the system is to show OEM logo. Š Boot Option Priorities These items showing the sequence of boot devices where BIOS attempts to load the disk operating system. BIOS Setup 4-9 Boot Menu Š Boot Configuration Configure settings during POST process, if not, then it will allow the users to use...
... State when the system is to show OEM logo. Š Boot Option Priorities These items showing the sequence of boot devices where BIOS attempts to load the disk operating system. BIOS Setup 4-9 Boot Menu Š Boot Configuration Configure settings during POST process, if not, then it will allow the users to use...
User Manual
Page 108
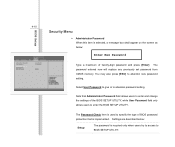
... also press [ESC] to abandon password setting. Settings are described below : Enter New Password Type a maximum of the BIOS SETUP UTILITY, while User Password field only allows users to enter the BIOS SETUP UTILITY. Note that is implemented. The Password Check item is used to specify the type of... protection that Administrator Password field allows users to enter and change the settings of twenty-digit password and press [Enter]. BIOS Setup 4-10 Security Menu Š Administrator Password When this item is selected, a message box shall appear on the screen as below : Setup ...
... also press [ESC] to abandon password setting. Settings are described below : Enter New Password Type a maximum of the BIOS SETUP UTILITY, while User Password field only allows users to enter the BIOS SETUP UTILITY. Note that is implemented. The Password Check item is used to specify the type of... protection that Administrator Password field allows users to enter and change the settings of twenty-digit password and press [Enter]. BIOS Setup 4-10 Security Menu Š Administrator Password When this item is selected, a message box shall appear on the screen as below : Setup ...

User Manual
Page 109
A confirmation dialogue will be cleared at the same time. Once the password is disabled, users can enter BIOS Setup menu without entering password when the system is rebooted. To clear the setting of Administrator Password or User Password, please press [Enter] under Administrator ...Password or User Password field when the password setting pop-up asking for re-confirmation to BIOS SETUP UTILITY. Please note that when the Administrator Password is cleared, the User Password will pop up dialogue appears...
A confirmation dialogue will be cleared at the same time. Once the password is disabled, users can enter BIOS Setup menu without entering password when the system is rebooted. To clear the setting of Administrator Password or User Password, please press [Enter] under Administrator ...Password or User Password field when the password setting pop-up asking for re-confirmation to BIOS SETUP UTILITY. Please note that when the Administrator Password is cleared, the User Password will pop up dialogue appears...

User Manual
Page 110
BIOS Setup 4-12 Save & Exit Menu Š Save Changes and Reset Save the changes you have made and reset the utility. Š Discard Changes and Exit Exit the utility without saving the changes you have made.. Š Load Setup Defaults Select this item to load the default settings.
BIOS Setup 4-12 Save & Exit Menu Š Save Changes and Reset Save the changes you have made and reset the utility. Š Discard Changes and Exit Exit the utility without saving the changes you have made.. Š Load Setup Defaults Select this item to load the default settings.


