
User Manual
Page 2
Preface 1-2 Table of Content Preface Table of Content ...1-2 Regulations Information...1-5 FCC-B Radio Frequency Interference Statement 1-5 FCC Conditions ...1-6 Safety Instructions...1-7 Safety Guideline for Using Lithium Battery 1-9 WEEE Statement ...1-13 Optical Device Drive Notice ...1-20 Caution on Using Modem...1-20 Trademarks ...1-21 Release History...1-21 Introductions Manual Map ...2-2 Unpacking...2-3 Specification...2-4 Product Overview ...2-9 Top-Open View ...2-9 Front View ...2-14
Preface 1-2 Table of Content Preface Table of Content ...1-2 Regulations Information...1-5 FCC-B Radio Frequency Interference Statement 1-5 FCC Conditions ...1-6 Safety Instructions...1-7 Safety Guideline for Using Lithium Battery 1-9 WEEE Statement ...1-13 Optical Device Drive Notice ...1-20 Caution on Using Modem...1-20 Trademarks ...1-21 Release History...1-21 Introductions Manual Map ...2-2 Unpacking...2-3 Specification...2-4 Product Overview ...2-9 Top-Open View ...2-9 Front View ...2-14
User Manual
Page 3
Power Saving Function (optional 3-2 AC Adapter ...3-4 Battery Pack ...3-6 Using the Battery Pack...3-9 Basic Operations ...3-11 Safety and Comfort Tips...3-11 Having a Good Work Habit...3-12 Knowing the Keyboard ...3-13 Knowing the Touchpad ...3-17 About Hard Disk ...
Power Saving Function (optional 3-2 AC Adapter ...3-4 Battery Pack ...3-6 Using the Battery Pack...3-9 Basic Operations ...3-11 Safety and Comfort Tips...3-11 Having a Good Work Habit...3-12 Knowing the Keyboard ...3-13 Knowing the Touchpad ...3-17 About Hard Disk ...
User Manual
Page 8
... signs of the building. When installing the coaxial cable to the TV Tuner, it . Do not place anything on card or module. Always keep the battery in a way that the metal shield is damaged. Š Liquid has penetrated into the equipment. Š The equipment has been exposed to moisture....not worked well or you can not get the equipment checked by the manufacturer only. To prevent explosion caused by improper battery replacement, use the same or equivalent type of battery recommended by a service personnel: Š The power cord or plug is reliable connected to step on it is ...
... signs of the building. When installing the coaxial cable to the TV Tuner, it . Do not place anything on card or module. Always keep the battery in a way that the metal shield is damaged. Š Liquid has penetrated into the equipment. Š The equipment has been exposed to moisture....not worked well or you can not get the equipment checked by the manufacturer only. To prevent explosion caused by improper battery replacement, use the same or equivalent type of battery recommended by a service personnel: Š The power cord or plug is reliable connected to step on it is ...
User Manual
Page 23
... optical storage drive. Chapter 1, Preface, gives users the basic safety information and caution that if you have all the accessories of installing and uninstalling the battery; It is recommended to check out that is thoroughly tested and certified by our reputation for the first time.
... optical storage drive. Chapter 1, Preface, gives users the basic safety information and caution that if you have all the accessories of installing and uninstalling the battery; It is recommended to check out that is thoroughly tested and certified by our reputation for the first time.
User Manual
Page 24
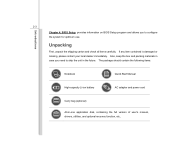
... First, unpack the shipping carton and check all items carefully. The package should contain the following items: Notebook Quick Start Manual High-capacity Li-ion battery AC adapter and power cord Carry bag (optional) All-in-one application disk, containing the full version of user's manual, drivers, utilities, and optional recovery...
... First, unpack the shipping carton and check all items carefully. The package should contain the following items: Notebook Quick Start Manual High-capacity Li-ion battery AC adapter and power cord Carry bag (optional) All-in-one application disk, containing the full version of user's manual, drivers, utilities, and optional recovery...

User Manual
Page 25
2-4 Introductions Specification Physical Characteristic Dimension Weight 395 (W) x 278 (D) x 33.5~39.5 (H) mm 3.2 kg (with 6-cell battery) CPU Processor Type Support Processor L2 Cache FSB Speed mPGA 989 socket Intel® Calpella 3MB/ 6MB Support 800/1066/1333 MHz Core Chips Chipset Combine with Intel®/ Ibex Peak-M Memory Technology Memory DDR3 800/ 1066/ 1333 MT/s - Clarksfield (Qual Code) Maximum up to 8GB Power AC Adapter Battery Type 120W, 19V 9 cells (optional) 6 cells (optional)
2-4 Introductions Specification Physical Characteristic Dimension Weight 395 (W) x 278 (D) x 33.5~39.5 (H) mm 3.2 kg (with 6-cell battery) CPU Processor Type Support Processor L2 Cache FSB Speed mPGA 989 socket Intel® Calpella 3MB/ 6MB Support 800/1066/1333 MHz Core Chips Chipset Combine with Intel®/ Ibex Peak-M Memory Technology Memory DDR3 800/ 1066/ 1333 MT/s - Clarksfield (Qual Code) Maximum up to 8GB Power AC Adapter Battery Type 120W, 19V 9 cells (optional) 6 cells (optional)
User Manual
Page 26
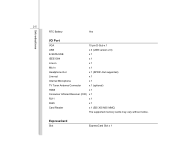
ExpressCard Slot ExpressCard Slot x 1 2-5 RTC Battery Yes Introductions I/O Port VGA 15 pin D-Sub x 1 USB x 3 (USB version 2.0) E-SATA/USB x 1 IEEE1394 x 1 Line-in x 1 Mic-in x 1 Headphone Out x 1 (SPDIF-Out supported) Line-out x 1 Internal Microphone x 1 TV Tuner Antenna Connector x 1 (optional) HDMI x 1 Consumer Infrared Receiver (CIR) x 1 RJ11 x 1 RJ45 x 1 Card Reader x 1 (SD/ XD/ MS/ MMC) The supported memory cards may vary without notice.
ExpressCard Slot ExpressCard Slot x 1 2-5 RTC Battery Yes Introductions I/O Port VGA 15 pin D-Sub x 1 USB x 3 (USB version 2.0) E-SATA/USB x 1 IEEE1394 x 1 Line-in x 1 Mic-in x 1 Headphone Out x 1 (SPDIF-Out supported) Line-out x 1 Internal Microphone x 1 TV Tuner Antenna Connector x 1 (optional) HDMI x 1 Consumer Infrared Receiver (CIR) x 1 RJ11 x 1 RJ45 x 1 Card Reader x 1 (SD/ XD/ MS/ MMC) The supported memory cards may vary without notice.
User Manual
Page 29
..., if you are not an authorized dealer or service center, since it may be noticed that the memory, hard disk drive, optical storage drive, and battery pack preinstalled in the User's Manual.
..., if you are not an authorized dealer or service center, since it may be noticed that the memory, hard disk drive, optical storage drive, and battery pack preinstalled in the User's Manual.
User Manual
Page 32
Use these convenient sensors to use various media playing functions. Battery Status Š Glowing yellow green when the battery is being charged. Š Glowing amber when the battery is in suspend mode. Š Glowing blue when the system is activated. Š LED goes off when the ... Lock function is activated. Power On/ Off/ Suspend: Š Blinking blue when the system is in low battery status. Š Blinking amber if the battery fails and it is activated. 2-11 Wireless LAN Introductions Multimedia Play Function Sensors This notebook provides multimedia play function allowing...
Use these convenient sensors to use various media playing functions. Battery Status Š Glowing yellow green when the battery is being charged. Š Glowing amber when the battery is in suspend mode. Š Glowing blue when the system is activated. Š LED goes off when the ... Lock function is activated. Power On/ Off/ Suspend: Š Blinking blue when the system is in low battery status. Š Blinking amber if the battery fails and it is activated. 2-11 Wireless LAN Introductions Multimedia Play Function Sensors This notebook provides multimedia play function allowing...

User Manual
Page 33
...: Blinking blue when the system is the pointing device of a standard keyboard. 6. Consult the local dealer for purchasing an equivalent type of battery recommended by the manufacturer. Š Battery LED goes off when both functions are disabled. Š Note: For flight safety consideration, make sure these two LED indicators go off when...
...: Blinking blue when the system is the pointing device of a standard keyboard. 6. Consult the local dealer for purchasing an equivalent type of battery recommended by the manufacturer. Š Battery LED goes off when both functions are disabled. Š Note: For flight safety consideration, make sure these two LED indicators go off when...
User Manual
Page 42
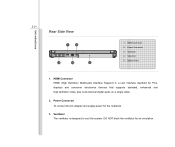
... devices that supports standard, enhanced and high-definition video, plus multi-channel digital audio on a single cable. 2. Introductions 2-21 Rear Side View 1 2 3 4 5 1. HDMI Connector 2. Ventilator 4. Battery Pack 1. Power Connector 3.
... devices that supports standard, enhanced and high-definition video, plus multi-channel digital audio on a single cable. 2. Introductions 2-21 Rear Side View 1 2 3 4 5 1. HDMI Connector 2. Ventilator 4. Battery Pack 1. Power Connector 3.
User Manual
Page 43
Introductions 2-22 4. Battery Pack This notebook will be powered by the battery pack when the AC adapter is disconnected. VGA Port The 15-pin-D-sub VGA port allows you to connect an external monitor or other standard VGA-compatible device (such as a projector) for a great view of the computer display. 5.
Introductions 2-22 4. Battery Pack This notebook will be powered by the battery pack when the AC adapter is disconnected. VGA Port The 15-pin-D-sub VGA port allows you to connect an external monitor or other standard VGA-compatible device (such as a projector) for a great view of the computer display. 5.
User Manual
Page 44
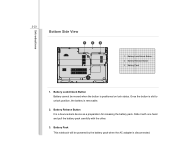
Battery Pack 1. Battery Lock/Unlock Button Battery cannot be powered by the battery pack when the AC adapter is positioned on lock status. Battery Pack This notebook will be moved when the button is disconnected. Once the button is slid to unlock position, the battery is a bounce-back device as a preparation for releasing the battery pack. Battery Release Button 3. Introductions 2-23 Bottom Side View 1 3 2 1. Battery Lock/Unlock Button 2. Battery Release Button It is removable. 2. Slide it with one hand and pull the battery pack carefully with the other. 3.
Battery Pack 1. Battery Lock/Unlock Button Battery cannot be powered by the battery pack when the AC adapter is positioned on lock status. Battery Pack This notebook will be moved when the button is disconnected. Once the button is slid to unlock position, the battery is a bounce-back device as a preparation for releasing the battery pack. Battery Release Button 3. Introductions 2-23 Bottom Side View 1 3 2 1. Battery Lock/Unlock Button 2. Battery Release Button It is removable. 2. Slide it with one hand and pull the battery pack carefully with the other. 3.

User Manual
Page 46
..., to turn this notebook. Press the ECO quick launch button repeatedly to switch among these 5 different modes or to extend the battery running time while performing different tasks with this ECO Engine off recurrently. Power Saving Function (optional) ECO Engine, the outstanding and unique power saving function, ...
..., to turn this notebook. Press the ECO quick launch button repeatedly to switch among these 5 different modes or to extend the battery running time while performing different tasks with this ECO Engine off recurrently. Power Saving Function (optional) ECO Engine, the outstanding and unique power saving function, ...
User Manual
Page 47
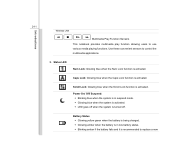
ECO Off Selected to maximize the battery running time. Getting Started 3-3 Presentation Mode Select this mode while dealing with office documentation tasks. Office Mode Select this mode while performing presentation applications. Turbo Battery Mode Select this mode to disable ECO Engine.
ECO Off Selected to maximize the battery running time. Getting Started 3-3 Presentation Mode Select this mode while dealing with office documentation tasks. Office Mode Select this mode while performing presentation applications. Turbo Battery Mode Select this mode to disable ECO Engine.

User Manual
Page 48
When the AC adapter is connected, the battery is strongly recommended to connect the AC adapter and use the AC power while using other adapter model may damage either the notebook or other devices attached to it is being charged immediately. using this notebook for your notebook; Getting Started 3-4 AC Adapter Please be noted that the AC adapter included in the package is approved for the first time. Note that it .
When the AC adapter is connected, the battery is strongly recommended to connect the AC adapter and use the AC power while using other adapter model may damage either the notebook or other devices attached to it is being charged immediately. using this notebook for your notebook; Getting Started 3-4 AC Adapter Please be noted that the AC adapter included in the package is approved for the first time. Note that it .
User Manual
Page 50
... is equipped with a high-capacity Li-ion battery pack. Be noted that the limited warranty to the battery pack may be damaged if users try to recycle the unused battery pack. Please follow your local laws and regulations to disassemble the battery pack on their own. Be aware of the notebook.... Also, note that the figures show here are for reference only. Getting Started 3-6 Battery Pack This notebook is an internal ...
... is equipped with a high-capacity Li-ion battery pack. Be noted that the limited warranty to the battery pack may be damaged if users try to recycle the unused battery pack. Please follow your local laws and regulations to disassemble the battery pack on their own. Be aware of the notebook.... Also, note that the figures show here are for reference only. Getting Started 3-6 Battery Pack This notebook is an internal ...
User Manual
Page 51
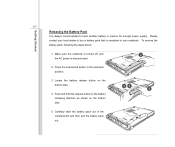
... the lock/unlock button in reserve for enough power supply. Carefully slide the battery pack out of the compartment and then pull the battery pack out. Push and hold the release button to your notebook. Locate the battery release button on the bottom side. 5. Make sure the notebook is turned ...off, and 2 the AC power is compliant to the battery releasing direction as shown on the bottom side. 34 5 4. Please contact your...
... the lock/unlock button in reserve for enough power supply. Carefully slide the battery pack out of the compartment and then pull the battery pack out. Push and hold the release button to your notebook. Locate the battery release button on the bottom side. 5. Make sure the notebook is turned ...off, and 2 the AC power is compliant to the battery releasing direction as shown on the bottom side. 34 5 4. Please contact your...

User Manual
Page 52
Getting Started 3-8 Replacing the Battery Pack To insert the battery pack, following the steps below: 1. Slightly slide and press the battery pack into the compartment with correct orientation. 2. Press the lock/unlock button to align and insert the battery pack into the right position until the battery back is fastened in the compartment. 3. Use both hands to the Lock position. 1 2 3
Getting Started 3-8 Replacing the Battery Pack To insert the battery pack, following the steps below: 1. Slightly slide and press the battery pack into the compartment with correct orientation. 2. Press the lock/unlock button to align and insert the battery pack into the right position until the battery back is fastened in the compartment. 3. Use both hands to the Lock position. 1 2 3

User Manual
Page 53
...F). Š Do not temper with your local solid waste officials for details about recycling options or for proper disposal in your area. To optimize battery life and avoid a sudden power loss, read the tips below: Š Suspend system operation if the system will be idle for a while... the suspend timer's time period. Š Turn off the system if you won't be lost. Getting Started 3-9 Using the Battery Pack Battery Safety Tips Replacing or handling the battery incorrectly may be using it for a period of time. Š Disable unnecessary settings or remove idle peripherals. Š Connect...
...F). Š Do not temper with your local solid waste officials for details about recycling options or for proper disposal in your area. To optimize battery life and avoid a sudden power loss, read the tips below: Š Suspend system operation if the system will be idle for a while... the suspend timer's time period. Š Turn off the system if you won't be lost. Getting Started 3-9 Using the Battery Pack Battery Safety Tips Replacing or handling the battery incorrectly may be using it for a period of time. Š Disable unnecessary settings or remove idle peripherals. Š Connect...


