
User Manual
Page 3
Power Saving Function 3-10 GPU Boost Function...3-12 Power Management in Windows OS 3-14 Energy Saving Tips...3-16 Basic Operations ...3-17 Safety and Comfort Tips...3-17 Having a Good Work Habit...3-18 Knowing the Keyboard ...3-19 Knowing the ...
Power Saving Function 3-10 GPU Boost Function...3-12 Power Management in Windows OS 3-14 Energy Saving Tips...3-16 Basic Operations ...3-17 Safety and Comfort Tips...3-17 Having a Good Work Habit...3-18 Knowing the Keyboard ...3-19 Knowing the ...
User Manual
Page 58
... power saving mode in response to a command from any of user inactivity. Then click on the Control Panel. Power Options in Windows OS allow you to control the power management features of electricity as well as deliver environmental benefits. The Shut Down Computer menu will... present the options to adjust the power management settings in Windows OS: 1. Getting Started 3-14 Power Management in Windows OS Power management of personal computers (PCs) and monitors has the potential to save significant amounts of your display...
... power saving mode in response to a command from any of user inactivity. Then click on the Control Panel. Power Options in Windows OS allow you to control the power management features of electricity as well as deliver environmental benefits. The Shut Down Computer menu will... present the options to adjust the power management settings in Windows OS: 1. Getting Started 3-14 Power Management in Windows OS Power management of personal computers (PCs) and monitors has the potential to save significant amounts of your display...
User Manual
Page 60
Getting Started 3-16 Energy Saving Tips Š Activate the ECO power saving function to manage the computer's energy consumption. Š Turn off the monitor after a period of user inactivity. Š Utilize the Fn and F12 sleep mode keys to turn into power saving mode. Š Tune the settings in Power Options under Windows OS to optimize the computer's power management. Š Always disconnect the AC power cord or uninstall the battery pack or switch off the wall socket if the computer would be left unused for a certain time to achieve zero energy consumption.
Getting Started 3-16 Energy Saving Tips Š Activate the ECO power saving function to manage the computer's energy consumption. Š Turn off the monitor after a period of user inactivity. Š Utilize the Fn and F12 sleep mode keys to turn into power saving mode. Š Tune the settings in Power Options under Windows OS to optimize the computer's power management. Š Always disconnect the AC power cord or uninstall the battery pack or switch off the wall socket if the computer would be left unused for a certain time to achieve zero energy consumption.

User Manual
Page 66
... The Backspace key, [Ins] and [Del] keys at upper right corner are used to perform Windows-specific functions, such as opening the Start menu and launching the shortcut menu. Function Keys „ Windows Keys You can find the Windows Logo key ( ) and one space. Press this key to delete one character to the... refer to the right of the cursor and move the following text left for editing purpose. Press this key to delete one character to your Windows manual or online help. „ [Fn] Key Switch the display output mode between "insert" and "overtype" modes.
... The Backspace key, [Ins] and [Del] keys at upper right corner are used to perform Windows-specific functions, such as opening the Start menu and launching the shortcut menu. Function Keys „ Windows Keys You can find the Windows Logo key ( ) and one space. Press this key to delete one character to the... refer to the right of the cursor and move the following text left for editing purpose. Press this key to delete one character to your Windows manual or online help. „ [Fn] Key Switch the display output mode between "insert" and "overtype" modes.

User Manual
Page 71
... the screen will act as a left -handed user, you want to swap the functions of the cursor on a proper location of the pad, lift your Windows operating system. Getting Started 3-27 Using the Touchpad Read the following description to learn how to use the standard Microsoft or IBM PS/2 driver in...
... the screen will act as a left -handed user, you want to swap the functions of the cursor on a proper location of the pad, lift your Windows operating system. Getting Started 3-27 Using the Touchpad Read the following description to learn how to use the standard Microsoft or IBM PS/2 driver in...
User Manual
Page 81
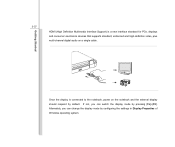
Once the display is a new interface standard for PCs, displays and consumer electronics devices that supports standard, enhanced and high-definition video, plus multi-channel digital audio on the notebook and the external display should respond by default. If not, you can switch the display mode by configuring the settings in Display Properties of Windows operating system. Getting Started 3-37 HDMI (High Definition Multimedia Interface Support) is connected to the notebook, power on a single cable. Alternately, you can change the display mode by pressing [Fn]+[F2].
Once the display is a new interface standard for PCs, displays and consumer electronics devices that supports standard, enhanced and high-definition video, plus multi-channel digital audio on the notebook and the external display should respond by default. If not, you can switch the display mode by configuring the settings in Display Properties of Windows operating system. Getting Started 3-37 HDMI (High Definition Multimedia Interface Support) is connected to the notebook, power on a single cable. Alternately, you can change the display mode by pressing [Fn]+[F2].
User Manual
Page 94
... name, vendor, LBA mode, PIO mode and more. The time format is determined by users. Š System Time This item allows you to bring up a window showing the detailed information of the SATA devices installed in the notebook. Press [Enter] to set the system date. The month from 01 to 12...
... name, vendor, LBA mode, PIO mode and more. The time format is determined by users. Š System Time This item allows you to bring up a window showing the detailed information of the SATA devices installed in the notebook. Press [Enter] to set the system date. The month from 01 to 12...

