
User Manual
Page 4
Preface 1-4 Connecting the Communication Devices 3-38 ExpressCard Installation...3-41 Removing the ExpressCard 3-41 Installing the ExpressCard ...3-41 Components Replacement and Upgrade 3-43 BIOS Setup About BIOS Setup...4-2 When to Use BIOS Setup...4-2 How to Run BIOS Setup...4-2 Control Keys ...4-3 BIOS Setup Menu...4-4 Main menu...4-5 Advanced menu...4-7 Boot menu ...4-9 Security menu...4-10 Save & Exit menu...4-12
Preface 1-4 Connecting the Communication Devices 3-38 ExpressCard Installation...3-41 Removing the ExpressCard 3-41 Installing the ExpressCard ...3-41 Components Replacement and Upgrade 3-43 BIOS Setup About BIOS Setup...4-2 When to Use BIOS Setup...4-2 How to Run BIOS Setup...4-2 Control Keys ...4-3 BIOS Setup Menu...4-4 Main menu...4-5 Advanced menu...4-7 Boot menu ...4-9 Security menu...4-10 Save & Exit menu...4-12
User Manual
Page 29
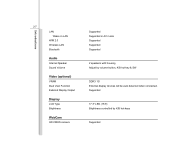
Supported 17.3" LED (16:9) Brightness controlled by volume button, K/B hot-key & SW DDR3 1G External display devices will be auto detected when connected. Introductions 2-7 LAN Wake on LAN WfM 2.0 Wireless LAN Bluetooth Audio Internal Speaker Sound Volume Video (optional) VRAM Dual View Function External Display Output Display LCD Type Brightness WebCam HD CMOS camera Supported Supported in AC mode Supported Supported Supported 2 speakers with housing Adjust by K/B hot-keys Supported
Supported 17.3" LED (16:9) Brightness controlled by volume button, K/B hot-key & SW DDR3 1G External display devices will be auto detected when connected. Introductions 2-7 LAN Wake on LAN WfM 2.0 Wireless LAN Bluetooth Audio Internal Speaker Sound Volume Video (optional) VRAM Dual View Function External Display Output Display LCD Type Brightness WebCam HD CMOS camera Supported Supported in AC mode Supported Supported Supported 2 speakers with housing Adjust by K/B hot-keys Supported
User Manual
Page 34
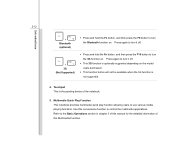
... function to turn the 3G function on. Introductions 2-12 + Bluetooth (optional) Š Press and hold the Fn button, and then press the F10 button to control the multimedia applications. Use this manual for the detailed information of the notebook. 5. Press again to turn it off . + 3G (Not Supported) Š Press and...
... function to turn the 3G function on. Introductions 2-12 + Bluetooth (optional) Š Press and hold the Fn button, and then press the F10 button to control the multimedia applications. Use this manual for the detailed information of the notebook. 5. Press again to turn it off . + 3G (Not Supported) Š Press and...
User Manual
Page 58
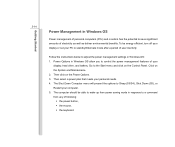
... power management features of electricity as well as deliver environmental benefits. Follow the instructions below to the Start menu and click on the Control Panel. Click on the Power Options. 3. The Shut Down Computer menu will present the options to Sleep (S3/S4), Shut Down (S5), or Restart your ...
... power management features of electricity as well as deliver environmental benefits. Follow the instructions below to the Start menu and click on the Control Panel. Click on the Power Options. 3. The Shut Down Computer menu will present the options to Sleep (S3/S4), Shut Down (S5), or Restart your ...

User Manual
Page 65
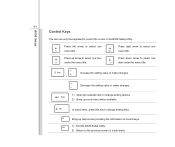
Move the cursor right for one space. Move the cursor up for one line. Move the cursor down for one line. Move to the previous page. Move to the next page. Move to the beginning of the line (or document). + Getting Started 3-21 Cursor Keys The four cursor (arrow) keys and [Home], [PgUp], [PgDn], [End] keys are used to the end of the line (or document). + Move to control the cursor movement. Move the cursor left for one space.
Move the cursor right for one space. Move the cursor up for one line. Move the cursor down for one line. Move to the previous page. Move to the next page. Move to the beginning of the line (or document). + Getting Started 3-21 Cursor Keys The four cursor (arrow) keys and [Home], [PgUp], [PgDn], [End] keys are used to the end of the line (or document). + Move to control the cursor movement. Move the cursor left for one space.
User Manual
Page 70
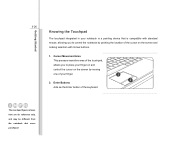
Cursor Movement Area This pressure-sensitive area of the touchpad, allows you to place your finger on and control the cursor on the screen by pointing the location of the cursor on the screen and making selection with its two buttons. 1. Getting Started 3-26... Knowing the Touchpad The touchpad integrated in your notebook is compatible with standard mouse, allowing you to control the notebook by moving one of your finger. 2. Enter Buttons Acts as the Enter button of the keyboard. 1 2 The touchpad figures shown here are ...
Cursor Movement Area This pressure-sensitive area of the touchpad, allows you to place your finger on and control the cursor on the screen by pointing the location of the cursor on the screen and making selection with its two buttons. 1. Getting Started 3-26... Knowing the Touchpad The touchpad integrated in your notebook is compatible with standard mouse, allowing you to control the notebook by moving one of your finger. 2. Enter Buttons Acts as the Enter button of the keyboard. 1 2 The touchpad figures shown here are ...

User Manual
Page 71
... your display. Getting Started 3-27 Using the Touchpad Read the following description to learn how to use the standard Microsoft or IBM PS/2 driver in Control Panel allows you move your fingertip across the pad, the cursor on the touchpad (usually using the forefinger), and the rectangular pad will move simultaneously...
... your display. Getting Started 3-27 Using the Touchpad Read the following description to learn how to use the standard Microsoft or IBM PS/2 driver in Control Panel allows you move your fingertip across the pad, the cursor on the touchpad (usually using the forefinger), and the rectangular pad will move simultaneously...

User Manual
Page 73
... appearing on the display to use various media playing functions. Touch the sensor again to pause the playback. Stop Š Touch the Stop sensor to control the multimedia applications. Use this convenient function to stop the playback during the playback function is ongoing. Getting Started 3-29 Multimedia Quick Play Function This...
... appearing on the display to use various media playing functions. Touch the sensor again to pause the playback. Stop Š Touch the Stop sensor to control the multimedia applications. Use this convenient function to stop the playback during the playback function is ongoing. Getting Started 3-29 Multimedia Quick Play Function This...

User Manual
Page 79
... detect the USB devices installed, and if there is no detection of the devices, please manually enable the USB devices by going to Start Menu / Control Panel / Add Hardware to the notebook. The devices shown in the reference figures here may be different from the devices users have. Connecting the Peripheral...
... detect the USB devices installed, and if there is no detection of the devices, please manually enable the USB devices by going to Start Menu / Control Panel / Add Hardware to the notebook. The devices shown in the reference figures here may be different from the devices users have. Connecting the Peripheral...
User Manual
Page 92
.... 1) Exit the BIOS Setup Utility. 2) Return to the previous screen in the BIOS Setup Utility. 4-3 Control Keys BIOS Setup You can use only the keyboard to control the cursor in a sub-menu. Press up a sub-menu when available. Increase the setting value or make changes. + Decrease the setting value or make changes...
.... 1) Exit the BIOS Setup Utility. 2) Return to the previous screen in the BIOS Setup Utility. 4-3 Control Keys BIOS Setup You can use only the keyboard to control the cursor in a sub-menu. Press up a sub-menu when available. Increase the setting value or make changes. + Decrease the setting value or make changes...
User Manual
Page 96
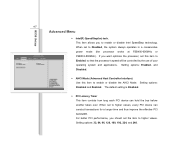
...to higher values. For better PCI performance, you want optimize the processor, set the item to Enabled, so that the processor's speed will be controlled by the use of your operating system and applications. Setting options: Disabled and Enabled. Setting options: 32, 64, 96, 128, 160, ... power mode (the processor works at FSB400-600MHz or FSB533-800MHz). The default setting is Disabled. Š PCI Latency Timer This item controls how long each PCI device can conduct transactions for a longer time and thus improve the effective PCI bandwidth. When set to higher values,...
...to higher values. For better PCI performance, you want optimize the processor, set the item to Enabled, so that the processor's speed will be controlled by the use of your operating system and applications. Setting options: Disabled and Enabled. Setting options: 32, 64, 96, 128, 160, ... power mode (the processor works at FSB400-600MHz or FSB533-800MHz). The default setting is Disabled. Š PCI Latency Timer This item controls how long each PCI device can conduct transactions for a longer time and thus improve the effective PCI bandwidth. When set to higher values,...

