

User Manual
Page 2
Preface 1-2 Table of Content Preface Table of Content ...1-2 Regulations Information...1-5 FCC-B Radio Frequency Interference Statement 1-5 FCC Conditions ...1-6 Safety Instructions...1-7 Safety Guideline for Using Lithium Battery 1-9 WEEE Statement ...1-13 Optical Device Drive Notice ...1-19 Trademarks ...1-20 Release History...1-20 Introductions Manual Map ...2-2 Unpacking...2-3 Specification...2-4 Product Overview ...2-8 Top-Open View ...2-8 Front View ...2-13 Right Side View ...2-14
Preface 1-2 Table of Content Preface Table of Content ...1-2 Regulations Information...1-5 FCC-B Radio Frequency Interference Statement 1-5 FCC Conditions ...1-6 Safety Instructions...1-7 Safety Guideline for Using Lithium Battery 1-9 WEEE Statement ...1-13 Optical Device Drive Notice ...1-19 Trademarks ...1-20 Release History...1-20 Introductions Manual Map ...2-2 Unpacking...2-3 Specification...2-4 Product Overview ...2-8 Top-Open View ...2-8 Front View ...2-13 Right Side View ...2-14
User Manual
Page 3
Preface 1-3 Left Side View...2-16 Rear Side View...2-18 Bottom Side View ...2-19 Getting Started Power Management ...3-2 ECO Engine -- Power Saving Function 3-2 AC Adapter ...3-4 Battery Pack ...3-6 Using the Battery Pack...3-9 Basic Operations ...3-11 Safety and Comfort Tips...3-11 Having a Good Work Habit...3-12 Knowing the Keyboard ...3-13 Knowing the Touchpad ...3-17 About Hard Disk Drive...3-20 Using the Optical Storage Device 3-21 Connecting the External Devices 3-24 Connecting the Peripheral Devices 3-24 Connecting the Communication Devices 3-27 Express Card Installation...3-28 ...
Preface 1-3 Left Side View...2-16 Rear Side View...2-18 Bottom Side View ...2-19 Getting Started Power Management ...3-2 ECO Engine -- Power Saving Function 3-2 AC Adapter ...3-4 Battery Pack ...3-6 Using the Battery Pack...3-9 Basic Operations ...3-11 Safety and Comfort Tips...3-11 Having a Good Work Habit...3-12 Knowing the Keyboard ...3-13 Knowing the Touchpad ...3-17 About Hard Disk Drive...3-20 Using the Optical Storage Device 3-21 Connecting the External Devices 3-24 Connecting the Peripheral Devices 3-24 Connecting the Communication Devices 3-27 Express Card Installation...3-28 ...

User Manual
Page 4
Preface 1-4 Safely Remove Hardware ...3-30 BIOS Setup About BIOS Setup...4-2 When to Use BIOS Setup...4-2 How to Run BIOS Setup...4-2 Control Keys ...4-3 BIOS Setup Menu...4-4 Main menu...4-5 Advanced menu...4-7 Security menu...4-9 Boot menu ...4-11 Exit menu...4-12
Preface 1-4 Safely Remove Hardware ...3-30 BIOS Setup About BIOS Setup...4-2 When to Use BIOS Setup...4-2 How to Run BIOS Setup...4-2 Control Keys ...4-3 BIOS Setup Menu...4-4 Main menu...4-5 Advanced menu...4-7 Security menu...4-9 Boot menu ...4-11 Exit menu...4-12

User Manual
Page 5
NOTE Š The changes or modifications not expressly approved by one or more of the following measures: „ Reorient or relocate the receiving antenna. „ Increase the separation between the equipment and receiver. „ Connect the equipment into an outlet on , the user is encouraged to try to correct the interference by the party responsible for a Class B digital device, pursuant to part 15 of the FCC rules. If this equipment does cause harmful interference to radio or television reception, which can be determined by turning the equipment off and on a circuit different from...
NOTE Š The changes or modifications not expressly approved by one or more of the following measures: „ Reorient or relocate the receiving antenna. „ Increase the separation between the equipment and receiver. „ Connect the equipment into an outlet on , the user is encouraged to try to correct the interference by the party responsible for a Class B digital device, pursuant to part 15 of the FCC rules. If this equipment does cause harmful interference to radio or television reception, which can be determined by turning the equipment off and on a circuit different from...

User Manual
Page 6
Preface 1-6 Š Shield interface cables and AC power cord, if any interference received, including interference that may not cause harmful interference. „ This device must accept any , must be used in order to the following two conditions: „ This device may cause undesired operation. FCC Conditions This device complies with the emission limits. Operation is subject to comply with part 15 of the FCC Rules.
Preface 1-6 Š Shield interface cables and AC power cord, if any interference received, including interference that may not cause harmful interference. „ This device must accept any , must be used in order to the following two conditions: „ This device may cause undesired operation. FCC Conditions This device complies with the emission limits. Operation is subject to comply with part 15 of the FCC Rules.

User Manual
Page 7
Do not cover the openings. Make sure the power voltage is within safety range and has been adjusted properly to the value of 100~240V before setting it up. The openings on the enclosure are used for future reference. Keep the User's Guide that could damage the equipment or cause an electrical shock. Do not leave the equipment in an unconditioned environment with the package for air convection and to the power outlet. Lay this equipment away from overheating. Keep this equipment on the equipment or user's manual should be noted. Preface 1-7 Safety Instructions Read the ...
Do not cover the openings. Make sure the power voltage is within safety range and has been adjusted properly to the value of 100~240V before setting it up. The openings on the enclosure are used for future reference. Keep the User's Guide that could damage the equipment or cause an electrical shock. Do not leave the equipment in an unconditioned environment with the package for air convection and to the power outlet. Lay this equipment away from overheating. Keep this equipment on the equipment or user's manual should be noted. Preface 1-7 Safety Instructions Read the ...
User Manual
Page 8
1-8 Preface Place the power cord in a safe place. When installing the coaxial cable to the TV Tuner, it is necessary to ensure that people are unlikely to step on top of battery recommended by improper battery replacement, use the same or equivalent type of the power cord. Always keep the strong magnetic or electrical objects away from the equipment. If any add-on card or module. Do not place anything on it work according to protective earthing system of breakage. Always keep the battery in a way that the metal shield is damaged. Š Liquid has penetrated into the...
1-8 Preface Place the power cord in a safe place. When installing the coaxial cable to the TV Tuner, it is necessary to ensure that people are unlikely to step on top of battery recommended by improper battery replacement, use the same or equivalent type of the power cord. Always keep the strong magnetic or electrical objects away from the equipment. If any add-on card or module. Do not place anything on it work according to protective earthing system of breakage. Always keep the battery in a way that the metal shield is damaged. Š Liquid has penetrated into the...

User Manual
Page 13
Hävitage kasutatud aku vastavalt tootja juhistele. Persian) Arabic WEEE Statement (English) Under the European Union ("EU") Directive on Waste Electrical and Electronic Equipment, Directive 2002/96/EC, which takes effect on valesti paigaldatud. Plahvatusoht, kui aku on August 13, 2005, products of "electrical and electronic equipment" cannot be discarded as municipal waste anymore and manufacturers of covered electronic equipment will be obligated to take back such products at the end of their useful life. (French) (Français) Au sujet de la directive europ&#...
Hävitage kasutatud aku vastavalt tootja juhistele. Persian) Arabic WEEE Statement (English) Under the European Union ("EU") Directive on Waste Electrical and Electronic Equipment, Directive 2002/96/EC, which takes effect on valesti paigaldatud. Plahvatusoht, kui aku on August 13, 2005, products of "electrical and electronic equipment" cannot be discarded as municipal waste anymore and manufacturers of covered electronic equipment will be obligated to take back such products at the end of their useful life. (French) (Français) Au sujet de la directive europ&#...
User Manual
Page 19
To prevent direct exposure to the laser beam, do not try to disassemble the enclosure. augustil 2005, on kohustatud sellised tooted pärast nende kasutuselt kõrvaldamist tagasi võtma. Persian 2002/96/EC 2005 13 Arabic) 2002/96/EC 2005 13 Optical Device Drive Notice CAUTION: This appliance contains a laser system and is classified as a "CLASS 1 LASER PRODUCT." kolovoza 2005., "električni i elektronički uređaji" se ne smiju više bacati zajedno s kućnim otpadom i proizvođači su obvezni zbrinuti takve proizvode na kraju ...
To prevent direct exposure to the laser beam, do not try to disassemble the enclosure. augustil 2005, on kohustatud sellised tooted pärast nende kasutuselt kõrvaldamist tagasi võtma. Persian 2002/96/EC 2005 13 Arabic) 2002/96/EC 2005 13 Optical Device Drive Notice CAUTION: This appliance contains a laser system and is classified as a "CLASS 1 LASER PRODUCT." kolovoza 2005., "električni i elektronički uređaji" se ne smiju više bacati zajedno s kućnim otpadom i proizvođači su obvezni zbrinuti takve proizvode na kraju ...

User Manual
Page 20
Preface 1-20 Trademarks „ All trademarks are the properties of their respective owners. „ AMD®, Athlon™, Athlon™XP, Thoroughbred™ and Duron™ are registered trademarks of AMD® Corporation. „ Intel® and Pentium® are registered trademarks of Intel Corporation. „ PS/2 and OS/2® are registered trademarks of International Business Machines Corporation. „ Microsoft® is a registered trademark of American Megatrends Inc. „ Kensington and MicroSaver are registered trademarks of the Kensington Technology Group. „ ...
Preface 1-20 Trademarks „ All trademarks are the properties of their respective owners. „ AMD®, Athlon™, Athlon™XP, Thoroughbred™ and Duron™ are registered trademarks of AMD® Corporation. „ Intel® and Pentium® are registered trademarks of Intel Corporation. „ PS/2 and OS/2® are registered trademarks of International Business Machines Corporation. „ Microsoft® is a registered trademark of American Megatrends Inc. „ Kensington and MicroSaver are registered trademarks of the Kensington Technology Group. „ ...

User Manual
Page 21
CHAPTER 2 Introductions
CHAPTER 2 Introductions
User Manual
Page 22
Manual Map This User's Manual provides instructions and illustrations on becoming an user of this notebook, the finely designed notebook. It is recommended to read this manual carefully before using this notebook. It is recommended to check out that is damaged or missing, please contact the vendor where you purchased this notebook. Beside, the steps of this notebook is recommended to read these accessories is interrelated to using keyboard, touchpad, hard disk drive, and optical storage drive. Chapter 1, Preface, gives users the basic safety information and caution that if you...
Manual Map This User's Manual provides instructions and illustrations on becoming an user of this notebook, the finely designed notebook. It is recommended to read this manual carefully before using this notebook. It is recommended to check out that is damaged or missing, please contact the vendor where you purchased this notebook. Beside, the steps of this notebook is recommended to read these accessories is interrelated to using keyboard, touchpad, hard disk drive, and optical storage drive. Chapter 1, Preface, gives users the basic safety information and caution that if you...

User Manual
Page 23
Also, keep the box and packing materials in case you to ship the unit in -one application disk, containing the full version of user's manual, drivers, utilities, and optional recovery function, etc.. Introductions 2-3 Chapter 4, BIOS Setup, provides information on BIOS Setup program and allows you need to configure the system for optimum use. If any item contained is damaged or missing, please contact your local dealer immediately. The package should contain the following items: Notebook Quick Start Manual High-capacity Li-ion battery AC adapter and power cord Carry bag (optional...
Also, keep the box and packing materials in case you to ship the unit in -one application disk, containing the full version of user's manual, drivers, utilities, and optional recovery function, etc.. Introductions 2-3 Chapter 4, BIOS Setup, provides information on BIOS Setup program and allows you need to configure the system for optimum use. If any item contained is damaged or missing, please contact your local dealer immediately. The package should contain the following items: Notebook Quick Start Manual High-capacity Li-ion battery AC adapter and power cord Carry bag (optional...

User Manual
Page 25
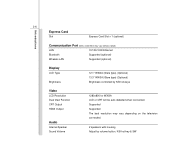
Yes (optional) 2.5", 9.5mm High, 5400rpm 160/ 200/ 250/ 320 GB DVD Combo / Super Multi / Blu-ray (Devices listed here may vary without notice) Introductions 2-5 Power AC Adapter Battery Type RTC Battery I/O Port Monitor (VGA) USB E-SATA HDMI Mic-in Headphone Out RJ45 Card Reader Finger Print Reader Storage HDD form factor Optical Device 90W, 19V 4 cells (optional) 8 cells (optional) Yes 15 pin D-Sub x 1 x 2 (USB version 2.0) x 1 x 1 x 1 x 1 (S/PDIF supported) x 1 x 1 (SD*/ MMC/ MS) (SDHC supported) The supported memory cards may vary without notice.
Yes (optional) 2.5", 9.5mm High, 5400rpm 160/ 200/ 250/ 320 GB DVD Combo / Super Multi / Blu-ray (Devices listed here may vary without notice) Introductions 2-5 Power AC Adapter Battery Type RTC Battery I/O Port Monitor (VGA) USB E-SATA HDMI Mic-in Headphone Out RJ45 Card Reader Finger Print Reader Storage HDD form factor Optical Device 90W, 19V 4 cells (optional) 8 cells (optional) Yes 15 pin D-Sub x 1 x 2 (USB version 2.0) x 1 x 1 x 1 x 1 (S/PDIF supported) x 1 x 1 (SD*/ MMC/ MS) (SDHC supported) The supported memory cards may vary without notice.
User Manual
Page 26
Supported Supported The best resolution may vary without notice) LAN 10/100/1000 Ethernet Bluetooth Supported (optional) Wireless LAN Supported (optional) Display LCD Type Brightness 12.1" WXGA (Glare type) (Optional) 13.3" WXGA (Glare type) (Optional) Brightness controlled by volume button, K/B hot-key & SW Introductions 2-6 Express Card Slot Express Card Slot x 1 (optional) Communication Port (Items listed here may vary depending on the television connected. 2 speakers with housing Adjust by K/B hot-keys Video LCD Resolution Dual View Function CRT Output HDMI Output Audio ...
Supported Supported The best resolution may vary without notice) LAN 10/100/1000 Ethernet Bluetooth Supported (optional) Wireless LAN Supported (optional) Display LCD Type Brightness 12.1" WXGA (Glare type) (Optional) 13.3" WXGA (Glare type) (Optional) Brightness controlled by volume button, K/B hot-key & SW Introductions 2-6 Express Card Slot Express Card Slot x 1 (optional) Communication Port (Items listed here may vary depending on the television connected. 2 speakers with housing Adjust by K/B hot-keys Video LCD Resolution Dual View Function CRT Output HDMI Output Audio ...

User Manual
Page 27
Yes x 1 WHQL Introductions 2-7 WebCam CMOS (optional) Software & BIOS USB Flash Boot BIOS Others Kensington Lock Hole Compliance 2.0 Mega Pixel Yes, USB floppy boot up DOS only Fast Boot Support ---
Yes x 1 WHQL Introductions 2-7 WebCam CMOS (optional) Software & BIOS USB Flash Boot BIOS Others Kensington Lock Hole Compliance 2.0 Mega Pixel Yes, USB floppy boot up DOS only Fast Boot Support ---
User Manual
Page 28
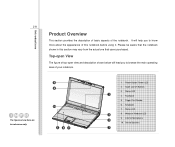
Top-open View The figure of top-open view and description shown below will help you to know more about the appearance of the notebook. The figures show here are for reference only. 8 9 10 2 65 1. Please be aware that the notebook shown in this notebook before using it. Keyboard 7. Status LED 3 8. Introductions 2-8 Product Overview This section provides the description of basic aspects of this section may vary from the actual one that users purchased. Power Button/ Power LED 2. Quick Launch Buttons 3. Finger Print Reader 6. Webcam/ Webcam LED 9. Internal ...
Top-open View The figure of top-open view and description shown below will help you to know more about the appearance of the notebook. The figures show here are for reference only. 8 9 10 2 65 1. Please be aware that the notebook shown in this notebook before using it. Keyboard 7. Status LED 3 8. Introductions 2-8 Product Overview This section provides the description of basic aspects of this section may vary from the actual one that users purchased. Power Button/ Power LED 2. Quick Launch Buttons 3. Finger Print Reader 6. Webcam/ Webcam LED 9. Internal ...
User Manual
Page 29
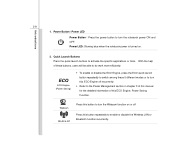
Power LED: Glowing blue when the notebook power is turned on or off recurrently. Š Refer to do work more efficiently. Quick Launch Buttons Press the quick launch buttons to turn the notebook power ON and OFF. ECO ECO Engine (Power Saving) Š To enable or disable the ECO Engine, press the ECO quick launch button repeatedly to switch among these buttons, users will be able to the Power Management section in chapter 3 of this manual for the detailed information of these 5 different modes or to turn the Webcam function on . 2. With the help of this ECO Engine, Power Saving ...
Power LED: Glowing blue when the notebook power is turned on or off recurrently. Š Refer to do work more efficiently. Quick Launch Buttons Press the quick launch buttons to turn the notebook power ON and OFF. ECO ECO Engine (Power Saving) Š To enable or disable the ECO Engine, press the ECO quick launch button repeatedly to switch among these buttons, users will be able to the Power Management section in chapter 3 of this manual for the detailed information of these 5 different modes or to turn the Webcam function on . 2. With the help of this ECO Engine, Power Saving ...
User Manual
Page 30
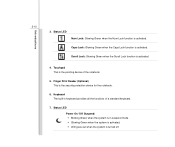
Finger Print Reader (Optional) This is turned off. Status LED Power On/ Off/ Suspend: Š Blinking Green when the system is in keyboard provides all the functions of the notebook. 5. Scroll Lock: Glowing Green when the Scroll Lock function is activated. Keyboard The built-in suspend mode. Š Glowing Green when the system is activated. Š LED goes out when the system is the security protection device for the notebook. 6. Status LED Num Lock: Glowing Green when the Num Lock function is activated. 4. Caps Lock: Glowing Green when the Caps Lock function is the ...
Finger Print Reader (Optional) This is turned off. Status LED Power On/ Off/ Suspend: Š Blinking Green when the system is in keyboard provides all the functions of the notebook. 5. Scroll Lock: Glowing Green when the Scroll Lock function is activated. Keyboard The built-in suspend mode. Š Glowing Green when the system is activated. Š LED goes out when the system is the security protection device for the notebook. 6. Status LED Num Lock: Glowing Green when the Num Lock function is activated. 4. Caps Lock: Glowing Green when the Caps Lock function is the ...
User Manual
Page 31
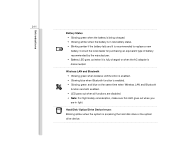
Hard Disk/ Optical Drive Device In-use: Blinking amber when the system is disconnected. Consult the local dealer for purchasing an equivalent type of battery recommended by the manufacturer. Š Battery LED goes out when it is enabled. Š Glowing green and blue at the same time when Wireless LAN and Bluetooth function are both enabled. Š LED goes out when all functions are disabled. Š Note: For flight safety consideration, make sure this LED goes out when you are in low battery status. Š Blinking amber if the battery fails and it is fully charged or when the AC ...
Hard Disk/ Optical Drive Device In-use: Blinking amber when the system is disconnected. Consult the local dealer for purchasing an equivalent type of battery recommended by the manufacturer. Š Battery LED goes out when it is enabled. Š Glowing green and blue at the same time when Wireless LAN and Bluetooth function are both enabled. Š LED goes out when all functions are disabled. Š Note: For flight safety consideration, make sure this LED goes out when you are in low battery status. Š Blinking amber if the battery fails and it is fully charged or when the AC ...
