User Guide
Page 12
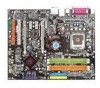
Designed to fit the advanced Intel® Pentium 4, Pentium D, Pentium 4 Extreme Edition and Pentium Extreme Edition LGA775 processor, the 975X Platinum Series mainboard delivers a high performance and professional desktop platform solution. Chapter 1 Getting Started Thank you for optimal system efficiency. The 975X Platinum Series mainboard is based on Intel® 975X and Intel® ICH7DH chipset for choosing the 975X Platinum Series (MS-7246) v2.x ATX mainboard.
Designed to fit the advanced Intel® Pentium 4, Pentium D, Pentium 4 Extreme Edition and Pentium Extreme Edition LGA775 processor, the 975X Platinum Series mainboard delivers a high performance and professional desktop platform solution. Chapter 1 Getting Started Thank you for optimal system efficiency. The 975X Platinum Series mainboard is based on Intel® 975X and Intel® ICH7DH chipset for choosing the 975X Platinum Series (MS-7246) v2.x ATX mainboard.

User Guide
Page 13
...Specifications Processor Support* - Com pliant with Fan Speed Control. - Supports five SATA II device - Intel® Core 2 Duo, Pemtium 4 Extreme Edition, Pentium 4, Pentium D, and Celeron D processors in the LGA775 package. - Supports EIST Technology - Supports PIO, Bus Master operation mode SATA -... Realtek® ALC882M - Supports Intel® ViivTM Technology Memory Support** - Chip integrated by JMicron SATARAID - North Bridge: Intel® 975X chipset - Chip integrated by ICH7DH, JMB361 - Supports Ultra DMA 66/100/133 m ode - Supports Intel® 05B/05A and 04B...
...Specifications Processor Support* - Com pliant with Fan Speed Control. - Supports five SATA II device - Intel® Core 2 Duo, Pemtium 4 Extreme Edition, Pentium 4, Pentium D, and Celeron D processors in the LGA775 package. - Supports EIST Technology - Supports PIO, Bus Master operation mode SATA -... Realtek® ALC882M - Supports Intel® ViivTM Technology Memory Support** - Chip integrated by JMicron SATARAID - North Bridge: Intel® 975X chipset - Chip integrated by ICH7DH, JMB361 - Supports Ultra DMA 66/100/133 m ode - Supports Intel® 05B/05A and 04B...

User Guide
Page 19
...can work properly to enhance heat dissipation. 3. For the latest information about CPU, please visit http://www.msi.com.tw/program/ produc ts /mainboar d/mbd/pr o_mbd_c pu _s upport .php. W hen you ...apply some silicone heat transfer compound on the computer. While replacing the CPU, always turn off the ATX power supply or unplug the power supply's power cord from overheating. 2. Alignment Key Alignment Key Yellow... supports Intel® Pentium 4, Pentium D, Pentium 4 Extreme Edition and Pentium Extreme Edition. The mainboard uses a CPU socket called LGA775. Important 1.
...can work properly to enhance heat dissipation. 3. For the latest information about CPU, please visit http://www.msi.com.tw/program/ produc ts /mainboar d/mbd/pr o_mbd_c pu _s upport .php. W hen you ...apply some silicone heat transfer compound on the computer. While replacing the CPU, always turn off the ATX power supply or unplug the power supply's power cord from overheating. 2. Alignment Key Alignment Key Yellow... supports Intel® Pentium 4, Pentium D, Pentium 4 Extreme Edition and Pentium Extreme Edition. The mainboard uses a CPU socket called LGA775. Important 1.

User Guide
Page 40
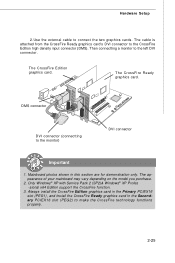
...be designed to meet your needs. You can auto detect the CrossFire mode by yourself. To utilize this technology, always install the CrossFire Edition graphics card in the Primary PCIE x16 (PEG1) slot and install the CrossFire Ready graphics card in the Primary PCI Express x 16...The mainboard can insert the expansion cards to deliver highest performance in the Secondary PCI Express x 16 (PEG2) slot. 2-24 Install the CrossFire Edition graphics card in the Secondary PCIE x 16 (PEG2) slot. Install the CrossFire Ready graphics card in video, graphics, multimedia and other sophisticated ...
...be designed to meet your needs. You can auto detect the CrossFire mode by yourself. To utilize this technology, always install the CrossFire Edition graphics card in the Primary PCIE x16 (PEG1) slot and install the CrossFire Ready graphics card in the Primary PCI Express x 16...The mainboard can insert the expansion cards to deliver highest performance in the Secondary PCI Express x 16 (PEG2) slot. 2-24 Install the CrossFire Edition graphics card in the Secondary PCIE x 16 (PEG2) slot. Install the CrossFire Ready graphics card in video, graphics, multimedia and other sophisticated ...
User Guide
Page 41
... in the Primary PCIEX16 slot (PEG1), and install the CrossFire Ready graphics card in this section are for demonstration only. The CrossFire Edition graphics card. Then connectting a monitor to the monitor) DVI connector Important 1. Mainboard photos shown in the Secondary PCIEX16 slot (PEG2...technology functions pr op er ly . 2-25 Only Windows® XP with Service Pack 2 (SP2)& Windows® XP Profes -sional x64 Edition support the CrossFire function. 3. The cable is attached from the CrossFire Ready graphics card's DVI connector to connect the two graphics cards. Hardware Setup...
... in the Primary PCIEX16 slot (PEG1), and install the CrossFire Ready graphics card in this section are for demonstration only. The CrossFire Edition graphics card. Then connectting a monitor to the monitor) DVI connector Important 1. Mainboard photos shown in the Secondary PCIEX16 slot (PEG2...technology functions pr op er ly . 2-25 Only Windows® XP with Service Pack 2 (SP2)& Windows® XP Profes -sional x64 Edition support the CrossFire function. 3. The cable is attached from the CrossFire Ready graphics card's DVI connector to connect the two graphics cards. Hardware Setup...
User Guide
Page 75
... In this blue icon to turn DigiCell into a MP3 player, and then you can load media files from your MEGA STICK or the system, and edit the preferred playlis t. Power on back button in every sub-menu and it will be lit up. Important Click on Agent In this icon will...
... In this blue icon to turn DigiCell into a MP3 player, and then you can load media files from your MEGA STICK or the system, and edit the preferred playlis t. Power on back button in every sub-menu and it will be lit up. Important Click on Agent In this icon will...

User Guide
Page 82
...media files or the playlist of mp3 files (*.m3u) on your system or on your MEGA STICK. Song length --- Basic Function Here you can edit your own play the media file in the Play List: in the Play List: field and use "Delete" button to select multi files. You... file from the play list through your printer with the following information: Song title --- Song length --- To repeat the selected files in the \\Program files\MSI\DigiCell\MyMusic.txt for your reference. To save the details of current play list and save ", "delete", "shuttle", "repeat" & "print". Introduction to...
...media files or the playlist of mp3 files (*.m3u) on your system or on your MEGA STICK. Song length --- Basic Function Here you can edit your own play the media file in the Play List: in the Play List: field and use "Delete" button to select multi files. You... file from the play list through your printer with the following information: Song title --- Song length --- To repeat the selected files in the \\Program files\MSI\DigiCell\MyMusic.txt for your reference. To save the details of current play list and save ", "delete", "shuttle", "repeat" & "print". Introduction to...
User Guide
Page 96
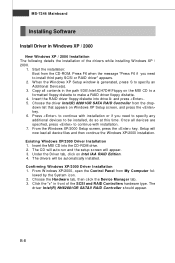
...installation or if you need to specify any additional devices to install third party SCSI or RAID driver" appears. 2. down list that appears on the MSI CD to a formatted floppy diskette to make a RAID driver floppy diskette. 4. Choose the Hardware tab, then click the Device M anager tab. ...Driver in front of the drivers while installing W indows XP / 2000. 1. Under the Driver tab, click on Intel IAA RAID Edition. 4. Start the installation: Boot from the CD-ROM. B-8 Insert the MSI CD into drive A: and press . 5. Insert the RAID driver floppy diskette into the CD-ROM drive. 2.
...installation or if you need to specify any additional devices to install third party SCSI or RAID driver" appears. 2. down list that appears on the MSI CD to a formatted floppy diskette to make a RAID driver floppy diskette. 4. Choose the Hardware tab, then click the Device M anager tab. ...Driver in front of the drivers while installing W indows XP / 2000. 1. Under the Driver tab, click on Intel IAA RAID Edition. 4. Start the installation: Boot from the CD-ROM. B-8 Insert the MSI CD into drive A: and press . 5. Insert the RAID driver floppy diskette into the CD-ROM drive. 2.
User Guide
Page 97
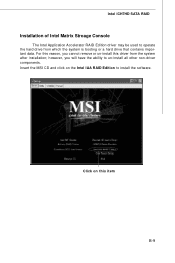
For this reason, you will have the ability to operate the hard drive from the system after installation; Intel ICH7HD SATA RAID Installation of Intel Matrix Stroage Console The Intel Application Accelerator RAID Edition driver may be used to un-install all other non-driver components. however, you cannot remove or un-install this item B-9 Click on the Intel IAA RAID Edition to install the software. Insert the MSI CD and click on this driver from which the system is booting or a hard drive that contains important data.
For this reason, you will have the ability to operate the hard drive from the system after installation; Intel ICH7HD SATA RAID Installation of Intel Matrix Stroage Console The Intel Application Accelerator RAID Edition driver may be used to un-install all other non-driver components. however, you cannot remove or un-install this item B-9 Click on the Intel IAA RAID Edition to install the software. Insert the MSI CD and click on this driver from which the system is booting or a hard drive that contains important data.

User Guide
Page 101
Once the installation is complete, the following window appears to show the Intel Application Accelerator RAID Edition Setup installation status. B-13 Intel ICH7HD SATA RAID The following window appears.
Once the installation is complete, the following window appears to show the Intel Application Accelerator RAID Edition Setup installation status. B-13 Intel ICH7HD SATA RAID The following window appears.

User Guide
Page 105
On a RAID Ready system, this can also use the Intel Application Accelerator RAID Edition utility before the second disk is attached to continue. B-17 It is very important to note which port (e.g. Port 0 or Port 1) the single disk is ...
On a RAID Ready system, this can also use the Intel Application Accelerator RAID Edition utility before the second disk is attached to continue. B-17 It is very important to note which port (e.g. Port 0 or Port 1) the single disk is ...

