User Guide
Page 10
The 785GM-E51/ 760GM-E51 Series mainboards are based on AMD® 785G/ 760G & SB710 chipsets for choosing the 785GM-E51/ 760GM-E51 Series (MS-7596 v1.X) Micro ATX mainboard. Chapter 1 Getting Started Thank you for optimal system efficiency. Designed to fit the advanced AMD® 64 bits PhenomTM II processor, the 785GM-E51/ 760GME51 Series deliver a high performance and professional desktop platform solution. 1-1-1
The 785GM-E51/ 760GM-E51 Series mainboards are based on AMD® 785G/ 760G & SB710 chipsets for choosing the 785GM-E51/ 760GM-E51 Series (MS-7596 v1.X) Micro ATX mainboard. Chapter 1 Getting Started Thank you for optimal system efficiency. Designed to fit the advanced AMD® 64 bits PhenomTM II processor, the 785GM-E51/ 760GME51 Series deliver a high performance and professional desktop platform solution. 1-1-1
User Guide
Page 11
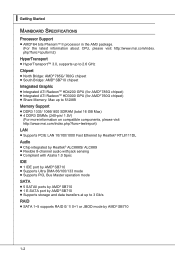
... 3.0, supports up to 2.6 GHz Chipset ■ North Bridge: AMD® 785G/ 760G chipset ■ South Bridge: AMD® SB710 chipset Integrated Graphic ■ Integrated ATI RadeonTM HD4200 GPU (for AMD® 785G chipset) ■ Integrated ATI RadeonTM HD3000 GPU (for AMD® 760G chipset) ■ Share Memory: Max ...up to 512MB Memory Support ■ DDR3 1333/ 1066/ 800 SDRAM (total 16 GB Max) ■ 4 DDR3 DIMMs (240-pin/ 1.5V) (For more information on compatible components, please visit http://www.msi.com/index.php?func=testreport...
... 3.0, supports up to 2.6 GHz Chipset ■ North Bridge: AMD® 785G/ 760G chipset ■ South Bridge: AMD® SB710 chipset Integrated Graphic ■ Integrated ATI RadeonTM HD4200 GPU (for AMD® 785G chipset) ■ Integrated ATI RadeonTM HD3000 GPU (for AMD® 760G chipset) ■ Share Memory: Max ...up to 512MB Memory Support ■ DDR3 1333/ 1066/ 800 SDRAM (total 16 GB Max) ■ 4 DDR3 DIMMs (240-pin/ 1.5V) (For more information on compatible components, please visit http://www.msi.com/index.php?func=testreport...

User Guide
Page 21
... Installed Empty Important • DDR3 memory modules are used for installing memory modules. For more information on compatible components, please visit http://www.msi.com/index.php?func=testreport DDR3 240-pin, 1.5V 72x2=144 pin 48x2=96 pin Dual-Channel mode Population Rule In Dual-Channel mode... DIMM slots. • To enable successful system boot-up, always insert the memory modules into the DIMM1 first. • Due to the chipset resource deployment, the system density will only be detected up to 15+GB (not full 16GB) when each DIMM is not backwards compatible. Enabling...
... Installed Empty Important • DDR3 memory modules are used for installing memory modules. For more information on compatible components, please visit http://www.msi.com/index.php?func=testreport DDR3 240-pin, 1.5V 72x2=144 pin 48x2=96 pin Dual-Channel mode Population Rule In Dual-Channel mode... DIMM slots. • To enable successful system boot-up, always insert the memory modules into the DIMM1 first. • Due to the chipset resource deployment, the system density will only be detected up to 15+GB (not full 16GB) when each DIMM is not backwards compatible. Enabling...
User Guide
Page 28
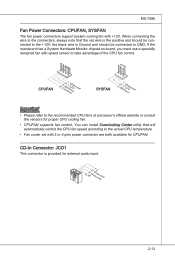
If the mainboard has a System Hardware Monitor chipset on-board, you must use a specially designed fan with +12V. the black wire is Ground and should be connected to GND. CPUFAN 4.3C.oS2n.e+1tnr....
If the mainboard has a System Hardware Monitor chipset on-board, you must use a specially designed fan with +12V. the black wire is Ground and should be connected to GND. CPUFAN 4.3C.oS2n.e+1tnr....
User Guide
Page 35
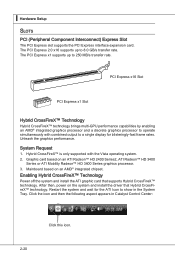
...) Express Slot The PCI Express slot supports the PCI Express interface expansion card. Unleash the graphics performance. Graphic card based on an AMD® integrated chipset. The PCI Express x1 supports up to show in Catalyst Control Center: 2-20 Click this icon. Restart the system and wait for blisteringly-fast frame...
...) Express Slot The PCI Express slot supports the PCI Express interface expansion card. Unleash the graphics performance. Graphic card based on an AMD® integrated chipset. The PCI Express x1 supports up to show in Catalyst Control Center: 2-20 Click this icon. Restart the system and wait for blisteringly-fast frame...

User Guide
Page 36
... setup the system: • Disable the Hybrid CrossFireX™ in Catalyst Control Center. • Reboot into BIOS. • Select the option in Advanced BIOS Features -> Chipset Feature -> On-Chip VGA. • Save BIOS settings and reboot. • Enable the Hybrid CrossFireX™ in Catalyst Control Center. 2-21 When Hybrid CrossFireX™...
... setup the system: • Disable the Hybrid CrossFireX™ in Catalyst Control Center. • Reboot into BIOS. • Select the option in Advanced BIOS Features -> Chipset Feature -> On-Chip VGA. • Save BIOS settings and reboot. • Enable the Hybrid CrossFireX™ in Catalyst Control Center. 2-21 When Hybrid CrossFireX™...

User Guide
Page 41
... where: 1st digit refers to BIOS maker as A = AMI, W = AWARD, and P = PHOENIX. 2nd - 5th digit refers to the model number. 6th digit refers to the chipset as I = Intel, N = NVIDIA, A = AMD and V = VIA. 7th - 8th digit refers to the customer as MS = all standard customers. When the message below appears on the...
... where: 1st digit refers to BIOS maker as A = AMI, W = AWARD, and P = PHOENIX. 2nd - 5th digit refers to the model number. 6th digit refers to the chipset as I = Intel, N = NVIDIA, A = AMD and V = VIA. 7th - 8th digit refers to the customer as MS = all standard customers. When the message below appears on the...
User Guide
Page 49
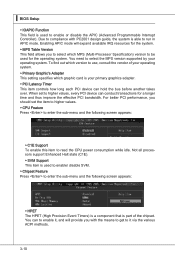
...PC2001 design guide, the system is able to run in APIC mode. To find out which version to use, consult the vendor of the chipset. Enabling APIC mode will provide you to select which graphic card is your operating system. Due to compliance with the means to get to ...Controller). You can conduct transactions for the operating system. ▍ BIOS Setup ▶ IOAPIC Function This field is used to enable/ disable SVM. ▶ Chipset Feature Press to enter the sub-menu and the following screen appears: ▶ C1E Support To enable this item to read the CPU power consumption...
...PC2001 design guide, the system is able to run in APIC mode. To find out which version to use, consult the vendor of the chipset. Enabling APIC mode will provide you to select which graphic card is your operating system. Due to compliance with the means to get to ...Controller). You can conduct transactions for the operating system. ▍ BIOS Setup ▶ IOAPIC Function This field is used to enable/ disable SVM. ▶ Chipset Feature Press to enter the sub-menu and the following screen appears: ▶ C1E Support To enable this item to read the CPU power consumption...

User Guide
Page 52
It has the following screen appears: ▶ COM Port 1 Select an address and corresponding interrupt for SATA connectors. ▶ I /O chipset that provides Standard, ECP, and EPP features. Choosing [ECP + EPP] will operate in parallel port on the on-board Super I /O Devices Press to enter the ...
It has the following screen appears: ▶ COM Port 1 Select an address and corresponding interrupt for SATA connectors. ▶ I /O chipset that provides Standard, ECP, and EPP features. Choosing [ECP + EPP] will operate in parallel port on the on-board Super I /O Devices Press to enter the ...
User Guide
Page 53
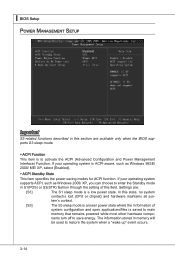
... open applications/files is a lower power state where the in memory will be used to save energy. If your operating system is lost (CPU or chipset) and hardware maintains all sys- Settings are available only when the BIOS supports S3 sleep mode. ▶ ACPI Function This item is a low power state...
... open applications/files is a lower power state where the in memory will be used to save energy. If your operating system is lost (CPU or chipset) and hardware maintains all sys- Settings are available only when the BIOS supports S3 sleep mode. ▶ ACPI Function This item is a low power state...
User Guide
Page 58
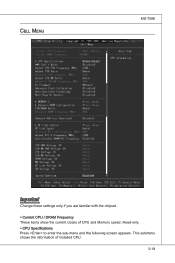
Cell Menu MS-7596 Important Change these settings only if you are familiar with the chipset. ▶ Current CPU / DRAM Frequency These items show the current clocks of installed CPU. 3-19 This submenu shows the information of CPU and Memory speed. Read-only. ▶ CPU Specifications Press to enter the sub-menu and the following screen appears.
Cell Menu MS-7596 Important Change these settings only if you are familiar with the chipset. ▶ Current CPU / DRAM Frequency These items show the current clocks of installed CPU. 3-19 This submenu shows the information of CPU and Memory speed. Read-only. ▶ CPU Specifications Press to enter the sub-menu and the following screen appears.

User Guide
Page 62
... speed which may just cause your local EMI regulation. • Remember to disable Spread Spectrum if you to adjust the voltage of CPU, Memory and chipset. ▶ Spread Spectrum When the mainboard's clock generator pulses, the extreme values (spikes) of the pulses create EMI (Electromagnetic Interference). For the most suitable Spread...
... speed which may just cause your local EMI regulation. • Remember to disable Spread Spectrum if you to adjust the voltage of CPU, Memory and chipset. ▶ Spread Spectrum When the mainboard's clock generator pulses, the extreme values (spikes) of the pulses create EMI (Electromagnetic Interference). For the most suitable Spread...

User Guide
Page 97
... the RAID volume is done. 4. Leave the disk in the : - ▍ SB710 RAID Installing the RAID Driver (for yourself. • Insert the MSI DVD into the DVD-ROM drive. • Click the "Browse DVD" on "Load Driver" button to select "Specify Additional Device". After you can copy ... and the Windows Setup program starts. 2. Select the compatible RAID controller for Windows XP: \\ChipSet\AMD\XP\SBDrv\RAID7xx - for 32-bit/ 64-bit version system and then press ENTER. 7. for Windows Vista: \\ChipSet\AMD\VISTA\Packages\Drivers\SBDrv\SB7xx\RAID\ x86 (for 32bit) or x64(for 64bit) &#...
... the RAID volume is done. 4. Leave the disk in the : - ▍ SB710 RAID Installing the RAID Driver (for yourself. • Insert the MSI DVD into the DVD-ROM drive. • Click the "Browse DVD" on "Load Driver" button to select "Specify Additional Device". After you can copy ... and the Windows Setup program starts. 2. Select the compatible RAID controller for Windows XP: \\ChipSet\AMD\XP\SBDrv\RAID7xx - for 32-bit/ 64-bit version system and then press ENTER. 7. for Windows Vista: \\ChipSet\AMD\VISTA\Packages\Drivers\SBDrv\SB7xx\RAID\ x86 (for 32bit) or x64(for 64bit) &#...
User Guide
Page 98
B-9 Insert the MSI DVD into the DVD-ROM drive. 2. The driver will appear. 3. The AMD chipset drivers include RAID Driver. 4. Under the Driver tab, click on AMD chipset drivers by your need. MS-7596 Installing the RAID Driver Under Windows (for Non-bootable RAID Array) 1. The DVD will auto-run and the setup screen will be automatically installed.
B-9 Insert the MSI DVD into the DVD-ROM drive. 2. The driver will appear. 3. The AMD chipset drivers include RAID Driver. 4. Under the Driver tab, click on AMD chipset drivers by your need. MS-7596 Installing the RAID Driver Under Windows (for Non-bootable RAID Array) 1. The DVD will auto-run and the setup screen will be automatically installed.