Installation and Operation Manual
Page 1
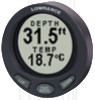
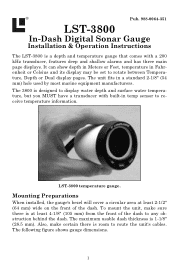
... have a transducer with a 200 kHz transducer, features deep and shallow alarms and has three main page displays. Pub. 988-0064-351 LST-3800 In-Dash Digital Sonar Gauge Installation & Operation Instructions The LST-3800 is a depth and temperature gauge that comes with built-in temp sensor to receive temperature information. The following figure shows gauge...
... have a transducer with a 200 kHz transducer, features deep and shallow alarms and has three main page displays. Pub. 988-0064-351 LST-3800 In-Dash Digital Sonar Gauge Installation & Operation Instructions The LST-3800 is a depth and temperature gauge that comes with built-in temp sensor to receive temperature information. The following figure shows gauge...
Installation and Operation Manual
Page 2
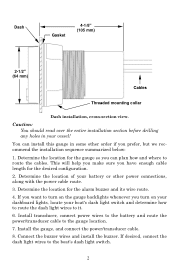
... dash light wires to the gauge location. 7. You can plan how and where to it. 6. Determine the location for the desired configuration. 2. Install transducer, connect power wires to the battery and route the power/transducer cable to the boat's dash light switch. 2 Dash Gasket 4-1/8" (105 mm...) 2-1/2" (64 mm) Cables Threaded mounting collar Dash installation, cross-section view. If you want to turn on your dashboard lights, locate your boat's dash light switch and determine how to route ...
... dash light wires to the gauge location. 7. You can plan how and where to it. 6. Determine the location for the desired configuration. 2. Install transducer, connect power wires to the battery and route the power/transducer cable to the boat's dash light switch. 2 Dash Gasket 4-1/8" (105 mm...) 2-1/2" (64 mm) Cables Threaded mounting collar Dash installation, cross-section view. If you want to turn on your dashboard lights, locate your boat's dash light switch and determine how to route ...
Installation and Operation Manual
Page 3
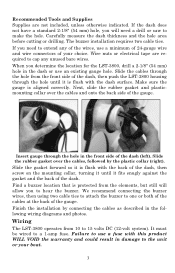
...and onto the back side of the gauge. Finish the installation by the plastic collar (right). Failure to use a fuse with the dash surface. Make sure the gauge is protected from the front side of the dash, then push the LST-3800 housing through the hole in damage to the unit or ...When you to hear the buzzer. If the dash does not have a standard 2-1/8" (54 mm) hole, you will allow you determine the location for the LST-3800, drill a 2-1/8" (54 mm) hole in the following wiring diagrams and photos. Recommended Tools and Supplies Supplies are required to cap any of the wires, use...
...and onto the back side of the gauge. Finish the installation by the plastic collar (right). Failure to use a fuse with the dash surface. Make sure the gauge is protected from the front side of the dash, then push the LST-3800 housing through the hole in damage to the unit or ...When you to hear the buzzer. If the dash does not have a standard 2-1/8" (54 mm) hole, you will allow you determine the location for the LST-3800, drill a 2-1/8" (54 mm) hole in the following wiring diagrams and photos. Recommended Tools and Supplies Supplies are required to cap any of the wires, use...

Installation and Operation Manual
Page 4
...of about 50 milliamps. A battery's normal discharge plus the gauge current (lights off the gauge when your boat's accessory switch, or install an optional switch between the unit and the power source. Typically, the maximum recommended current load on full brightness. Power/transducer cable ... , connect the red wire from the power/transducer cable to the switch controlling the dash lights. See the following figure. LST 3800 housing LST black wire to buzzer black wire Buzzer red wire to boat power Buzzer Power/transducer cable Transducer Red to approximately 20 milliamps,...
...of about 50 milliamps. A battery's normal discharge plus the gauge current (lights off the gauge when your boat's accessory switch, or install an optional switch between the unit and the power source. Typically, the maximum recommended current load on full brightness. Power/transducer cable ... , connect the red wire from the power/transducer cable to the switch controlling the dash lights. See the following figure. LST 3800 housing LST black wire to buzzer black wire Buzzer red wire to boat power Buzzer Power/transducer cable Transducer Red to approximately 20 milliamps,...
Installation and Operation Manual
Page 5
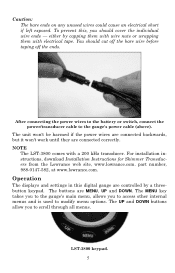
.... LST-3800 keypad. 5 Operation The displays and settings in this , you should cut off the bare wire before taping off the ends. To prevent this digital gauge are controlled by capping them with wire nuts or wrapping them with a 200 kHz transducer. For installation instructions, download Installation Instructions for Skimmer Transducers from the Lowrance web...
.... LST-3800 keypad. 5 Operation The displays and settings in this , you should cut off the bare wire before taping off the ends. To prevent this digital gauge are controlled by capping them with wire nuts or wrapping them with a 200 kHz transducer. For installation instructions, download Installation Instructions for Skimmer Transducers from the Lowrance web...

Installation and Operation Manual
Page 6
Timeout There is 5 seconds. That means they automatically close after a preset amount of time. When TIMEOUT appears in the LST 3800. Temperature Page. To modify what pages will time out, taking you back to the main screen. 6 Press MENU and use the UP and DOWN keys ... Depth page by pressing MENU and using the gauge it will open the Timeout Menu, which has four settings: 3, 5, 7 and 10 seconds. Pages When you install the gauge, the default timeout duration is no exit key in the center square -
Timeout There is 5 seconds. That means they automatically close after a preset amount of time. When TIMEOUT appears in the LST 3800. Temperature Page. To modify what pages will time out, taking you back to the main screen. 6 Press MENU and use the UP and DOWN keys ... Depth page by pressing MENU and using the gauge it will open the Timeout Menu, which has four settings: 3, 5, 7 and 10 seconds. Pages When you install the gauge, the default timeout duration is no exit key in the center square -
Installation and Operation Manual
Page 7
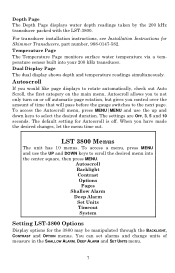
For transducer installation instructions, see Installation Instructions for the 3800 may be manipulated through the BACKLIGHT, CONTRAST and OPTION menus. Autoscroll If you to the next page. Temperature Page The Temperature Page monitors surface water ..., let the menu time out. Autoscroll Backlight Contrast Options Pages Shallow Alarm Deep Alarm Set Units Timeout System Setting LST-3800 Options Display options for Skimmer Transducers, part number, 988-0147-582. LST 3800 Menus The unit has 10 menus. You can set alarms and change units of time that will pass before the...
For transducer installation instructions, see Installation Instructions for the 3800 may be manipulated through the BACKLIGHT, CONTRAST and OPTION menus. Autoscroll If you to the next page. Temperature Page The Temperature Page monitors surface water ..., let the menu time out. Autoscroll Backlight Contrast Options Pages Shallow Alarm Deep Alarm Set Units Timeout System Setting LST-3800 Options Display options for Skimmer Transducers, part number, 988-0147-582. LST 3800 Menus The unit has 10 menus. You can set alarms and change units of time that will pass before the...

Installation and Operation Manual
Page 11
... has resulted from any accident, misuse, negligence, or carelessness, or from any serial number has been effaced, altered, or removed; LOWRANCE ELECTRONICS 12000 E. WE MAKE NO OTHER EXPRESS WARRANTY OR REPRESENTATION OF ANY KIND WHATSOEVER CONCERNING THIS PRODUCT. THIS REPAIR, OR REPLACEMENT OR...in our products from state to obtain without charge a replacement of attempts to repair by us ; (2) when the product has been connected, installed, combined, altered, adjusted, or handled in accordance with a new product identical or reasonably equivalent to this product, at our option, within...
... has resulted from any accident, misuse, negligence, or carelessness, or from any serial number has been effaced, altered, or removed; LOWRANCE ELECTRONICS 12000 E. WE MAKE NO OTHER EXPRESS WARRANTY OR REPRESENTATION OF ANY KIND WHATSOEVER CONCERNING THIS PRODUCT. THIS REPAIR, OR REPLACEMENT OR...in our products from state to obtain without charge a replacement of attempts to repair by us ; (2) when the product has been connected, installed, combined, altered, adjusted, or handled in accordance with a new product identical or reasonably equivalent to this product, at our option, within...


