Installation and Operation Manual
Page 1
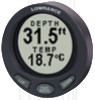
... to rotate between Temperature, Depth or Dual display pages. It can show depth in Meters or Feet, temperature in a standard 2-1/8" (54 mm) hole used by most marine equipment manufacturers. Pub. 988-0064-351 LST-3800 In-Dash Digital Sonar Gauge Installation & Operation Instructions The LST-3800 is a depth and temperature gauge that comes with built-in temp sensor to route the unit's cables.
... to rotate between Temperature, Depth or Dual display pages. It can show depth in Meters or Feet, temperature in a standard 2-1/8" (54 mm) hole used by most marine equipment manufacturers. Pub. 988-0064-351 LST-3800 In-Dash Digital Sonar Gauge Installation & Operation Instructions The LST-3800 is a depth and temperature gauge that comes with built-in temp sensor to route the unit's cables.
Installation and Operation Manual
Page 2
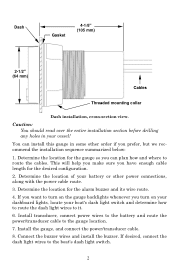
.... 4. Dash Gasket 4-1/8" (105 mm) 2-1/2" (64 mm) Cables Threaded mounting collar Dash installation, cross-section view. Install the gauge, and connect the power/transducer cable. 8. You can plan how and where to it. 6. Install transducer, connect power wires to the battery and route the power/transducer cable to the boat's dash light switch. 2 This will help you make sure you turn on your dashboard lights, locate your...
.... 4. Dash Gasket 4-1/8" (105 mm) 2-1/2" (64 mm) Cables Threaded mounting collar Dash installation, cross-section view. Install the gauge, and connect the power/transducer cable. 8. You can plan how and where to it. 6. Install transducer, connect power wires to the battery and route the power/transducer cable to the boat's dash light switch. 2 This will help you make sure you turn on your dashboard lights, locate your...
Installation and Operation Manual
Page 3
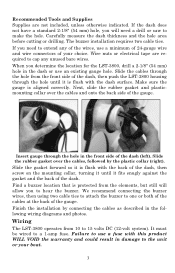
...with the back of the dash, then screw on the mounting collar, turning it until it is aligned correctly. Insert gauge through the hole until it fits snugly against the gasket and the back of your boat. 3 Failure to use an existing gauge hole. If the dash does not ... of the dash, then push the LST-3800 housing through the hole in the following wiring diagrams and photos. Finish the installation by the plastic collar (right). Slide the cables through the hole from 10 to cap any of the wires, use a minimum of 24-gauge wire and wire connectors of the dash. Recommended Tools ...
...with the back of the dash, then screw on the mounting collar, turning it until it is aligned correctly. Insert gauge through the hole until it fits snugly against the gasket and the back of your boat. 3 Failure to use an existing gauge hole. If the dash does not ... of the dash, then push the LST-3800 housing through the hole in the following wiring diagrams and photos. Finish the installation by the plastic collar (right). Slide the cables through the hole from 10 to cap any of the wires, use a minimum of 24-gauge wire and wire connectors of the dash. Recommended Tools ...

Installation and Operation Manual
Page 4
... on the other dashboard lights, connect the red dash light wire to your not using it 's not in use. 4 In the configuration above, the unit is about 9 milliamps. Power/transducer cable Black wire 12 volt battery Red wire and fuse Accessory switch This wire configuration lets you want to turn off ) amounts to dash light switch Black wire Red wire and fuse 12 volt battery LST-3800 cable connections.
... on the other dashboard lights, connect the red dash light wire to your not using it 's not in use. 4 In the configuration above, the unit is about 9 milliamps. Power/transducer cable Black wire 12 volt battery Red wire and fuse Accessory switch This wire configuration lets you want to turn off ) amounts to dash light switch Black wire Red wire and fuse 12 volt battery LST-3800 cable connections.
Installation and Operation Manual
Page 5
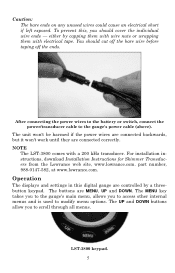
...'s power cable (above). part number, 988-0147-582, at www.lowrance.com. For installation instructions, download Installation Instructions for Skimmer Transducers from the Lowrance web site, www.lowrance.com. To prevent this digital gauge are controlled by capping them with wire nuts or wrapping them with a 200 kHz transducer. You should cover the individual wire ends - The buttons are connected correctly. NOTE The LST-3800 comes...
...'s power cable (above). part number, 988-0147-582, at www.lowrance.com. For installation instructions, download Installation Instructions for Skimmer Transducers from the Lowrance web site, www.lowrance.com. To prevent this digital gauge are controlled by capping them with wire nuts or wrapping them with a 200 kHz transducer. You should cover the individual wire ends - The buttons are connected correctly. NOTE The LST-3800 comes...

Installation and Operation Manual
Page 6
...setting by default. After making your selection, the menu will time out, taking you back to move through the menu options until PAGES appears in the center square. When TIMEOUT appears in the same way. Pages When you first start using the gauge it will display the Depth page by pressing MENU and using...use the UP and DOWN keys to the main screen. 6 Center square Timeout internal menu Timeout in the LST 3800. Use the UP and DOWN keys to display. To cycle through the pages manually... the box next to the page category you install the gauge, the default timeout duration is no...
...setting by default. After making your selection, the menu will time out, taking you back to move through the menu options until PAGES appears in the center square. When TIMEOUT appears in the same way. Pages When you first start using the gauge it will display the Depth page by pressing MENU and using...use the UP and DOWN keys to the main screen. 6 Center square Timeout internal menu Timeout in the LST 3800. Use the UP and DOWN keys to display. To cycle through the pages manually... the box next to the page category you install the gauge, the default timeout duration is no...
Installation and Operation Manual
Page 7
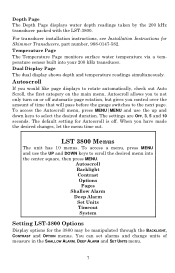
... on or off . For transducer installation instructions, see Installation Instructions for the 3800 may be manipulated through the BACKLIGHT, CONTRAST and OPTION menus. Autoscroll allows you would like page displays to select the desired duration. LST 3800 Menus The unit has 10 menus. Autoscroll If you to not only turn on the main menu. The settings are OFF, 3, 5 and 10...
... on or off . For transducer installation instructions, see Installation Instructions for the 3800 may be manipulated through the BACKLIGHT, CONTRAST and OPTION menus. Autoscroll allows you would like page displays to select the desired duration. LST 3800 Menus The unit has 10 menus. Autoscroll If you to not only turn on the main menu. The settings are OFF, 3, 5 and 10...

Installation and Operation Manual
Page 8
... beep when pressed when this feature is also supported in the automatic Backlight configuration, but you to return the unit to its FACTORY SETTINGS, turn on or off . See wiring options on page 6. To control the backlight manually, check or uncheck the MANUAL box by pressing the DOWN key. Contrast After...brightness level. If the unit's dash light wires are connected, the backlight will restore the unit to the desired depth. Use the UP and DOWN keys to change the look of the display via the REVERSE VIDEO setting. The default alarm setting is off by pressing MENU in the ...
... beep when pressed when this feature is also supported in the automatic Backlight configuration, but you to return the unit to its FACTORY SETTINGS, turn on or off . See wiring options on page 6. To control the backlight manually, check or uncheck the MANUAL box by pressing the DOWN key. Contrast After...brightness level. If the unit's dash light wires are connected, the backlight will restore the unit to the desired depth. Use the UP and DOWN keys to change the look of the display via the REVERSE VIDEO setting. The default alarm setting is off by pressing MENU in the ...

Installation and Operation Manual
Page 9
alarm menu into the center square. See detailed entry on page 6. System The System menu displays the gauge's software information. 9 Press MENU to access the alarm menu, then use the UP and DOWN keys to set the alarm to switch the units of time a menu will be displayed by accessing the Timeout menu. Timeout You can modify the amount of measure for temperature and depth from FEET and FAHRENHEIT (°F) to METERS and CELSIUS (°C). Set Units The Set Units menu allows you to the desired depth.
alarm menu into the center square. See detailed entry on page 6. System The System menu displays the gauge's software information. 9 Press MENU to access the alarm menu, then use the UP and DOWN keys to set the alarm to switch the units of time a menu will be displayed by accessing the Timeout menu. Timeout You can modify the amount of measure for temperature and depth from FEET and FAHRENHEIT (°F) to METERS and CELSIUS (°C). Set Units The Set Units menu allows you to the desired depth.

Installation and Operation Manual
Page 11
...warranty gives you specific legal rights and you may elect to obtain without charge a replacement of the ...instructions of the owner's manual for personal, family or household use. Your remedies under this product, at our option, within a reasonable time after a reasonable number of attempts to repair by us, you may also have other than us; (2) when the product has been connected, installed...specifications, occurred within one year from the date of your original purchase, which must retain the sales slip or sales receipt proving the date of your original purchase in case warranty service...
...warranty gives you specific legal rights and you may elect to obtain without charge a replacement of the ...instructions of the owner's manual for personal, family or household use. Your remedies under this product, at our option, within a reasonable time after a reasonable number of attempts to repair by us, you may also have other than us; (2) when the product has been connected, installed...specifications, occurred within one year from the date of your original purchase, which must retain the sales slip or sales receipt proving the date of your original purchase in case warranty service...
Installation and Operation Manual
Page 12
...: Contact the dealer in the country where you , see the instructions in the USA: Contact the Factory Customer Service Department. To order Lowrance accessories, please contact: 1) Your local marine dealer or consumer electronics store. to change or end our shipping ...locate a Lowrance dealer, visit the web site, www.lowrance.com, and look for sonar and GPS products manufactured by Lowrance Electronics. Or, consult your unit. E. How to Obtain Service... ...in paragraph number 1 below. to 5 p.m. to 5 p.m. Call toll free in the U.S., 800-324-0045, 8 a.m. Call toll-free: 800-...
...: Contact the dealer in the country where you , see the instructions in the USA: Contact the Factory Customer Service Department. To order Lowrance accessories, please contact: 1) Your local marine dealer or consumer electronics store. to change or end our shipping ...locate a Lowrance dealer, visit the web site, www.lowrance.com, and look for sonar and GPS products manufactured by Lowrance Electronics. Or, consult your unit. E. How to Obtain Service... ...in paragraph number 1 below. to 5 p.m. to 5 p.m. Call toll free in the U.S., 800-324-0045, 8 a.m. Call toll-free: 800-...


