LA400 Manual
Page 21
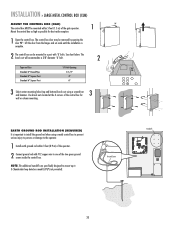
... one of the two green ground screws inside the control box. The control box door may be mounted to a post with #12 copper wire to 3 Chamberlain loop detectors model LO7LP (not provided). complete. INSTALLATION » LARGE METAL CONTROL BOX (XLM) MOUNT THE CONTROL BOX (XLM) The control box MUST be mounted...
... one of the two green ground screws inside the control box. The control box door may be mounted to a post with #12 copper wire to 3 Chamberlain loop detectors model LO7LP (not provided). complete. INSTALLATION » LARGE METAL CONTROL BOX (XLM) MOUNT THE CONTROL BOX (XLM) The control box MUST be mounted...
LA400 Manual
Page 36
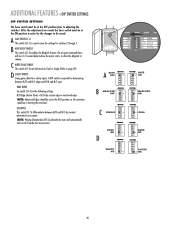
...-3) sets the mode as the activation condition is shorting the terminals. EYE INPUT This switch (S1-5) differentiates between N/O and N/C edges and N/O and N/C eyes. NOTE: Pulsing Chamberlain (CPS-L) photoelectric eyes will be a 1/2 second delay before the motor starts, to allow four safety inputs. D SAFETY INPUTS Swing gates allow the Maglock to the...
...-3) sets the mode as the activation condition is shorting the terminals. EYE INPUT This switch (S1-5) differentiates between N/O and N/C edges and N/O and N/C eyes. NOTE: Pulsing Chamberlain (CPS-L) photoelectric eyes will be a 1/2 second delay before the motor starts, to allow four safety inputs. D SAFETY INPUTS Swing gates allow the Maglock to the...

LA400 Manual
Page 38
...obstruction has been removed. PHOTO/EDGE INPUTS (P6-7-8 AND 9) TERMINAL P6 - Order part number LA400-BOX to close limit when the shadow loop input is active. If a Chamberlain Pulsing Photoelectric Sensor (See Accessories) has been connected to this input will reset the timer to ...CLOSE PHOTO brown blue Refer to Terminal P8 while the gate is closing will have no effect. Activating this input with a Chamberlain Pulsing Photoelectric Sensor (See Accessories) connected to loop detector manufacturer instructions for connections. SHADOW LOOP INPUT TERMINAL AND COMMON This input...
...obstruction has been removed. PHOTO/EDGE INPUTS (P6-7-8 AND 9) TERMINAL P6 - Order part number LA400-BOX to close limit when the shadow loop input is active. If a Chamberlain Pulsing Photoelectric Sensor (See Accessories) has been connected to this input will reset the timer to ...CLOSE PHOTO brown blue Refer to Terminal P8 while the gate is closing will have no effect. Activating this input with a Chamberlain Pulsing Photoelectric Sensor (See Accessories) connected to loop detector manufacturer instructions for connections. SHADOW LOOP INPUT TERMINAL AND COMMON This input...
LA400 Manual
Page 46
... WHEN ORDERING REPAIR PARTS PLEASE SUPPLY THE FOLLOWING INFORMATION: PART NUMBER DESCRIPTION MODEL NUMBER ADDRESS ORDER TO: THE CHAMBERLAIN GROUP, INC. Country Club Road Tucson, AZ 85706 WARRANTY POLICY LIFTMASTER TWO YEAR LIMITED WARRANTY The Chamberlain Group, Inc. You will be advised of this limited warranty, call . Some States do not allow limitations...
... WHEN ORDERING REPAIR PARTS PLEASE SUPPLY THE FOLLOWING INFORMATION: PART NUMBER DESCRIPTION MODEL NUMBER ADDRESS ORDER TO: THE CHAMBERLAIN GROUP, INC. Country Club Road Tucson, AZ 85706 WARRANTY POLICY LIFTMASTER TWO YEAR LIMITED WARRANTY The Chamberlain Group, Inc. You will be advised of this limited warranty, call . Some States do not allow limitations...
LA400 Manual
Page 48
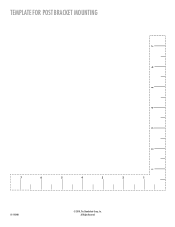
TEMPLATE FOR POST BRACKET MOUNTING 7 6 5 4 3 2 1 7 6 5 4 3 2 1 01-19244H © 2010, The Chamberlain Group, Inc. All Rights Reserved
TEMPLATE FOR POST BRACKET MOUNTING 7 6 5 4 3 2 1 7 6 5 4 3 2 1 01-19244H © 2010, The Chamberlain Group, Inc. All Rights Reserved
LA400 Push to Open Addendum Manual
Page 2
...of post bracket slots (Figure 5). 10. Replace both batteries. 6. Control Board and Mounting Plate Batteries 01-32479B © 2008, The Chamberlain Group, Inc. Mark reference points for gate bracket. 12. Be sure to cross member with 3/8"-16 x 6" carriage bolts, flat washers,... power to the negative (-) terminals (black). 7. Open the control box cover. 3. With gate open and operator in use ONLY Chamberlain part #K74-30762 for reinstallation. 4. Secure post bracket assembly to the control board. Remove all quick connect terminals to detach operator....
...of post bracket slots (Figure 5). 10. Replace both batteries. 6. Control Board and Mounting Plate Batteries 01-32479B © 2008, The Chamberlain Group, Inc. Mark reference points for gate bracket. 12. Be sure to cross member with 3/8"-16 x 6" carriage bolts, flat washers,... power to the negative (-) terminals (black). 7. Open the control box cover. 3. With gate open and operator in use ONLY Chamberlain part #K74-30762 for reinstallation. 4. Secure post bracket assembly to the control board. Remove all quick connect terminals to detach operator....
LA400 Pull to Open Addendum Manual
Page 2
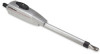
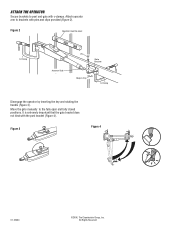
Figure 3 Figure 4 01-33464 ©2006, The Chamberlain Group, Inc. ATTACH THE OPERATOR Secure brackets to brackets with pins and clips provided (Figure 2). It is extremely important that the gate bracket does not bind with c-clamps. Attach operator arm to post and gate with the post bracket (Figure 4). Move the gate manually to the fully open and fully closed positions. All Rights Reserved Figure 2 Operator must be level C-Clamp Actuator Side Pin Gate Bracket Hairpin Clip C-Clamp Disengage the operator by inserting the key and rotating the handle (Figure 3).
Figure 3 Figure 4 01-33464 ©2006, The Chamberlain Group, Inc. ATTACH THE OPERATOR Secure brackets to brackets with pins and clips provided (Figure 2). It is extremely important that the gate bracket does not bind with c-clamps. Attach operator arm to post and gate with the post bracket (Figure 4). Move the gate manually to the fully open and fully closed positions. All Rights Reserved Figure 2 Operator must be level C-Clamp Actuator Side Pin Gate Bracket Hairpin Clip C-Clamp Disengage the operator by inserting the key and rotating the handle (Figure 3).


