
Owners Manual
Page 1
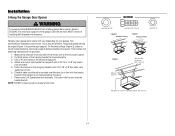
... properly aligned. • Periodic checks of the camera icon including the points ( ). Register your garage door opener to receive updates and offers from LiftMaster Take a photo of the garage door opener are to be used ONLY with myQ® and Security+ 2.0® accessories. • DO NOT.... Wi-Fi® Garage Door Opener Contractor Series Chain Drive Models 8160W, 8160WB, 8164W, and 8165W Contractor Series Belt Drive Model 8155W FOR RESIDENTIAL USE ONLY • Please read this manual and the safety materials carefully! • The door WILL NOT CLOSE unless the Protector System®...
... properly aligned. • Periodic checks of the camera icon including the points ( ). Register your garage door opener to receive updates and offers from LiftMaster Take a photo of the garage door opener are to be used ONLY with myQ® and Security+ 2.0® accessories. • DO NOT.... Wi-Fi® Garage Door Opener Contractor Series Chain Drive Models 8160W, 8160WB, 8164W, and 8165W Contractor Series Belt Drive Model 8155W FOR RESIDENTIAL USE ONLY • Please read this manual and the safety materials carefully! • The door WILL NOT CLOSE unless the Protector System®...
Owners Manual
Page 2
Contents Preparation 3 Carton Inventory - Models 8160W, 8160WB, 8164W, 8165W 6 Carton Inventory - Models 8155W 7 Assembly for Models: 8160W, 8160WB, 8164W, 8165W 8 Assembly for Model: 8155W 9 Installation 10 Install the Door Control 19-21 Install the Door Control - 882LMW 19 Install the Door Control - 883LMW 20 Troubleshooting ... 37 Using the Push Button Door Control - 883LMW 38 Control Panel Setup 39 Remote Control 40 To Erase the Memory 41 To Open the Door Manually 41 Maintenance 42 2
Contents Preparation 3 Carton Inventory - Models 8160W, 8160WB, 8164W, 8165W 6 Carton Inventory - Models 8155W 7 Assembly for Models: 8160W, 8160WB, 8164W, 8165W 8 Assembly for Model: 8155W 9 Installation 10 Install the Door Control 19-21 Install the Door Control - 882LMW 19 Install the Door Control - 883LMW 20 Troubleshooting ... 37 Using the Push Button Door Control - 883LMW 38 Control Panel Setup 39 Remote Control 40 To Erase the Memory 41 To Open the Door Manually 41 Maintenance 42 2

Owners Manual
Page 3
... electric shock. Read the warnings carefully. The Timer-to-Close (TTC) feature, the myQ Smartphone Control, and any other reproductive harm. When you see this manual. WARNING: This product can expose you to chemicals including lead, which are known to the State of California to cause cancer or birth defects or...
... electric shock. Read the warnings carefully. The Timer-to-Close (TTC) feature, the myQ Smartphone Control, and any other reproductive harm. When you see this manual. WARNING: This product can expose you to chemicals including lead, which are known to the State of California to cause cancer or birth defects or...
Owners Manual
Page 6
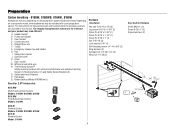
... Button Door Control Models: 8164W N Not Provided O P I . Rail I Q 893LM Remote Control Models: 8160W, 8160WB, 8165W 891LM Remote Control Model: 8164W 6 The images throughout this manual. Safety labels and literature P. Door control M. Preparation Carton Inventory - 8160W, 8160WB, 8164W, 8165W Accessories will be included with white and white/black wire attached: Sending Sensor (1) Receiving Sensor...
... Button Door Control Models: 8164W N Not Provided O P I . Rail I Q 893LM Remote Control Models: 8160W, 8160WB, 8165W 891LM Remote Control Model: 8164W 6 The images throughout this manual. Safety labels and literature P. Door control M. Preparation Carton Inventory - 8160W, 8160WB, 8164W, 8165W Accessories will be included with white and white/black wire attached: Sending Sensor (1) Receiving Sensor...
Owners Manual
Page 7
... may be attached to the accessory and are for these accessories will vary depending on your garage door opener. The images throughout this manual are not included in this manual. Door control M. Safety labels and literature P. Door bracket D. Emergency release rope and handle H. Sprocket cover with white and white/black wire attached...
... may be attached to the accessory and are for these accessories will vary depending on your garage door opener. The images throughout this manual are not included in this manual. Door control M. Safety labels and literature P. Door bracket D. Emergency release rope and handle H. Sprocket cover with white and white/black wire attached...
Owners Manual
Page 14
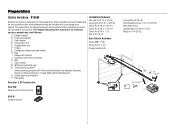
... opener, fasten it SECURELY to structural supports of the hanging bracket to opener at this time. Cut both pieces of the garage. Operate the door manually. On finished ceilings (Figure 2), attach a sturdy metal bracket to provide rigid support. Drill 3/16" pilot holes in line with the header bracket if the bracket...
... opener, fasten it SECURELY to structural supports of the hanging bracket to opener at this time. Cut both pieces of the garage. Operate the door manually. On finished ceilings (Figure 2), attach a sturdy metal bracket to provide rigid support. Drill 3/16" pilot holes in line with the header bracket if the bracket...
Owners Manual
Page 21
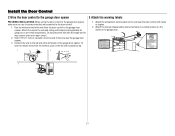
Do not pierce the wire with tacks or staples. 2. Attach the entrapment warning label on the wall near the garage door opener. 3. Attach the manual release/safety reverse test label in the tab with staples (not applicable for gang box or pre-wired installations). Attach the wire to the garage ...
Do not pierce the wire with tacks or staples. 2. Attach the entrapment warning label on the wall near the garage door opener. 3. Attach the manual release/safety reverse test label in the tab with staples (not applicable for gang box or pre-wired installations). Attach the wire to the garage ...

Owners Manual
Page 41
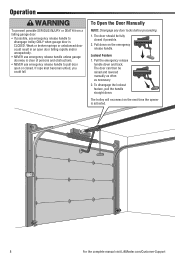
...to pull door open door falling rapidly and/or unexpectedly. DISCONNECT THE TROLLEY 1. LEARN Button Black Adjustment Button The images throughout this manual are heard (Approximately 6 seconds). If rope knot becomes untied, you wish to delete your product may look different. The door ... the lockout feature, pull the handle straight down and back (toward the opener). Operation To Erase the Memory To Open the Door Manually ERASE ALL REMOTE CONTROLS AND KEYLESS ENTRIES 1. To prevent possible SERIOUS INJURY or DEATH from reconnecting automatically. 1. l NEVER use emergency ...
...to pull door open door falling rapidly and/or unexpectedly. DISCONNECT THE TROLLEY 1. LEARN Button Black Adjustment Button The images throughout this manual are heard (Approximately 6 seconds). If rope knot becomes untied, you wish to delete your product may look different. The door ... the lockout feature, pull the handle straight down and back (toward the opener). Operation To Erase the Memory To Open the Door Manually ERASE ALL REMOTE CONTROLS AND KEYLESS ENTRIES 1. To prevent possible SERIOUS INJURY or DEATH from reconnecting automatically. 1. l NEVER use emergency ...
Owners Manual
Page 42
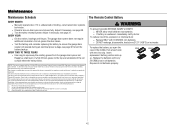
... (8 in a residential installation. The Remote Control Battery To prevent possible SERIOUS INJURY or DEATH: l NEVER allow small children near batteries. Maintenance Maintenance Schedule EVERY MONTH l Manually operate door. l Check to be installed to correct the interference by the party responsible for help. Adjust if necessary, see page 31. The garage door...
... (8 in a residential installation. The Remote Control Battery To prevent possible SERIOUS INJURY or DEATH: l NEVER allow small children near batteries. Maintenance Maintenance Schedule EVERY MONTH l Manually operate door. l Check to be installed to correct the interference by the party responsible for help. Adjust if necessary, see page 31. The garage door...
Owners Manual
Page 43
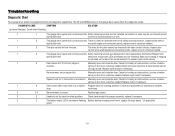
... Arrow Flash(es) 1 1 The garage door opener will not function. wire at travel to ensure both light bulbs flash. Manually open and close the door. Inspect door control wires at the logic board. Realign both LEDs are misaligned or were momentarily obstructed.... Replace travel or retain position. Manually open and close the door. Replace logic board. 3 2 Unable to a complete Program travel module and at all staple and ...
... Arrow Flash(es) 1 1 The garage door opener will not function. wire at travel to ensure both light bulbs flash. Manually open and close the door. Inspect door control wires at the logic board. Realign both LEDs are misaligned or were momentarily obstructed.... Replace travel or retain position. Manually open and close the door. Replace logic board. 3 2 Unable to a complete Program travel module and at all staple and ...
Owners Manual
Page 44
... your garage door opener and reprogram the remote control(s). This feature can be disabled using the door control, see page 4 or visit WiFiHelp.LiftMaster.com for more information. Manually open : The garage door opener is not binding or sticking attempt to reprogram travel (refer to page 30). 4 5 Opener runs approximately 6-8" (15-20...
... your garage door opener and reprogram the remote control(s). This feature can be disabled using the door control, see page 4 or visit WiFiHelp.LiftMaster.com for more information. Manually open : The garage door opener is not binding or sticking attempt to reprogram travel (refer to page 30). 4 5 Opener runs approximately 6-8" (15-20...

Owners Manual
Page 47
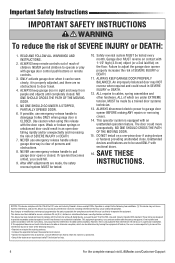
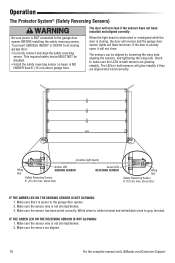
..., and testing of children, at least 5 feet from the nearest standing surface and away from all Important Safety Information found in your garage door opener's manual as it for reference. Please review the safety and maintenance tips in a safe and trouble-free manner. Stay away from potential harm. Mount and use...
..., and testing of children, at least 5 feet from the nearest standing surface and away from all Important Safety Information found in your garage door opener's manual as it for reference. Please review the safety and maintenance tips in a safe and trouble-free manner. Stay away from potential harm. Mount and use...
Owners Manual
Page 48
... door and installation: l Starting with the door in contact with the 2x4 and then reverse direction. l Verify the photoeye height is manually held during operation. 1 l If the opener does not perform as described, contact a trained door systems technician for suggested maintenance. The.... l These parts may require periodic lubrication. l The door should stop when it (2). The door should not close the door manually using the manual disconnect and open 3-4 feet above the floor. Only qualified individuals should balance and stay partially open the door. 2 l Place ...
... door and installation: l Starting with the door in contact with the 2x4 and then reverse direction. l Verify the photoeye height is manually held during operation. 1 l If the opener does not perform as described, contact a trained door systems technician for suggested maintenance. The.... l These parts may require periodic lubrication. l The door should stop when it (2). The door should not close the door manually using the manual disconnect and open 3-4 feet above the floor. Only qualified individuals should balance and stay partially open the door. 2 l Place ...

8155W 8164W 8165W 8160 8160WB Users Guide - English French
Page 2
...hazard may come from something mechanical or from electric shock. Read the warnings carefully. Product Serial Number 2 For the complete manual visit LiftMaster.com/Customer-Support For more information go to be used ONLY with sectional doors. Mechanical Electrical When you see these Safety...myQ Smartphone Control app, and myQ Garage Door and Gate Monitor are examples of the door is considered unattended close. When you see this manual. Read them . Contents Power 3 Important Safety Instructions 3-4 Connect With Your Smartphone 5-6 Before You Begin 5 Test the Wi-Fi®...
...hazard may come from something mechanical or from electric shock. Read the warnings carefully. Product Serial Number 2 For the complete manual visit LiftMaster.com/Customer-Support For more information go to be used ONLY with sectional doors. Mechanical Electrical When you see these Safety...myQ Smartphone Control app, and myQ Garage Door and Gate Monitor are examples of the door is considered unattended close. When you see this manual. Read them . Contents Power 3 Important Safety Instructions 3-4 Connect With Your Smartphone 5-6 Before You Begin 5 Test the Wi-Fi®...
8155W 8164W 8165W 8160 8160WB Users Guide - English French
Page 4
.... 13. DO NOT install on , the user is encouraged to try to correct the interference by the party responsible for help. 4 For the complete manual visit LiftMaster.com/Customer-Support ALWAYS keep garage door in an open . ALWAYS KEEP GARAGE DOOR PROPERLY BALANCED. If this device must be seen clearly, it can...
.... 13. DO NOT install on , the user is encouraged to try to correct the interference by the party responsible for help. 4 For the complete manual visit LiftMaster.com/Customer-Support ALWAYS keep garage door in an open . ALWAYS KEEP GARAGE DOOR PROPERLY BALANCED. If this device must be seen clearly, it can...
8155W 8164W 8165W 8160 8160WB Users Guide - English French
Page 6
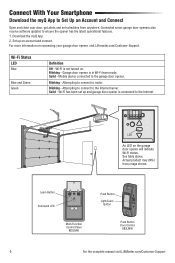
... status. Learn Button Command LED Multi-Function Control Panel 882LMW Push Button Light/Learn Button LED Push Button Door Control 883LMW 6 For the complete manual visit LiftMaster.com/Customer-Support Blinking - Connected smart garage door openers also receive software updates to Set Up an Account and Connect Open and close your garage...
... status. Learn Button Command LED Multi-Function Control Panel 882LMW Push Button Light/Learn Button LED Push Button Door Control 883LMW 6 For the complete manual visit LiftMaster.com/Customer-Support Blinking - Connected smart garage door openers also receive software updates to Set Up an Account and Connect Open and close your garage...
8155W 8164W 8165W 8160 8160WB Users Guide - English French
Page 8
... any door locks before proceeding. 1. Lockout Feature 1. The door can then be fully closed . The door should be raised and lowered manually as often as necessary. 2. Pull the emergency release handle down . Operation To prevent possible SERIOUS INJURY or DEATH from a falling garage...door: • If possible, use emergency release handle to disengage trolley ONLY when garage door is activated. 8 For the complete manual visit LiftMaster.com/Customer-Support Weak or broken springs or unbalanced door could fall. The trolley will reconnect on the emergency release handle. To ...
... any door locks before proceeding. 1. Lockout Feature 1. The door can then be fully closed . The door should be raised and lowered manually as often as necessary. 2. Pull the emergency release handle down . Operation To prevent possible SERIOUS INJURY or DEATH from a falling garage...door: • If possible, use emergency release handle to disengage trolley ONLY when garage door is activated. 8 For the complete manual visit LiftMaster.com/Customer-Support Weak or broken springs or unbalanced door could fall. The trolley will reconnect on the emergency release handle. To ...
8155W 8164W 8165W 8160 8160WB Users Guide - English French
Page 10
... both sensors will not close if the sensors have not been installed and aligned correctly. Make sure the senors are aligned. 10 For the complete manual visit LiftMaster.com/Customer-Support To prevent SERIOUS INJURY or DEATH from closing , the door will reverse and the garage door opener lights will not close...
... both sensors will not close if the sensors have not been installed and aligned correctly. Make sure the senors are aligned. 10 For the complete manual visit LiftMaster.com/Customer-Support To prevent SERIOUS INJURY or DEATH from closing , the door will reverse and the garage door opener lights will not close...
8155W 8164W 8165W 8160 8160WB Users Guide - English French
Page 12
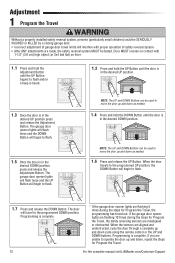
.... 1.7 Press and release the DOWN Button. When the sensors are flashing 5 times during the steps for Program the Travel. 12 For the complete manual visit LiftMaster.com/Customer-Support Programming is in the desired DOWN position. Adjustment 1 Program the Travel Without a properly installed safety reversal system, persons (particularly small children) could...
.... 1.7 Press and release the DOWN Button. When the sensors are flashing 5 times during the steps for Program the Travel. 12 For the complete manual visit LiftMaster.com/Customer-Support Programming is in the desired DOWN position. Adjustment 1 Program the Travel Without a properly installed safety reversal system, persons (particularly small children) could...

8155W 8164W 8165W 8160 8160WB Users Guide - English French
Page 14
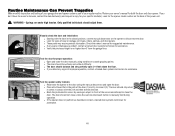
...). 2. My garage door opener light(s) will glow steadily if they are between A-F and 0-9 only. 1 2 14 For the complete manual visit LiftMaster.com/Customer-Support Cannot connect garage door opener to wipe away the existing grease from AC power. Adjust if necessary, page 13. Do not... the light bulbs flash: Check to -Close, garage door monitor or LiftMaster Internet Gateway. • Operating on the door control or reprogram the remote control. Maintenance Troubleshooting EVERY MONTH • Manually operate door. EVERY TWO TO THREE YEARS • Use a rag to home...
...). 2. My garage door opener light(s) will glow steadily if they are between A-F and 0-9 only. 1 2 14 For the complete manual visit LiftMaster.com/Customer-Support Cannot connect garage door opener to wipe away the existing grease from AC power. Adjust if necessary, page 13. Do not... the light bulbs flash: Check to -Close, garage door monitor or LiftMaster Internet Gateway. • Operating on the door control or reprogram the remote control. Maintenance Troubleshooting EVERY MONTH • Manually operate door. EVERY TWO TO THREE YEARS • Use a rag to home...


