
8164W Product Guide
Page 1
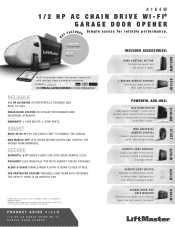
...an iPad® with multiple home automation platforms. Visit LiftMaster.com/WorksWithMyQ for reliable performance. CL SE POSILOCK® ELECTRONICALLY PROTECTS AGAINST FORCED OPENINGTS.IMER-TO- ALERT-2-CLOSE SIGNALS WHEN A DOOR IS BEING CLOSED BY MyQ. Smartphone not included. **...-IN WI-FI FOR THE EASIEST WAY TO CONNECT THE GARAGE. PRODUCT GUIDE 8164W 1/2 HP AC CHAIN DRIVE WI-FI GARAGE DOOR OPENER GARAGE DOOR AND GATE MONITOR Monitors and closes up as a home hub. 1/2 8164W H P A C C H A I N D R I V E W I ® GARAGE DOOR OPENER KEY FEATURES Simple access for a full list of MyQ ...
...an iPad® with multiple home automation platforms. Visit LiftMaster.com/WorksWithMyQ for reliable performance. CL SE POSILOCK® ELECTRONICALLY PROTECTS AGAINST FORCED OPENINGTS.IMER-TO- ALERT-2-CLOSE SIGNALS WHEN A DOOR IS BEING CLOSED BY MyQ. Smartphone not included. **...-IN WI-FI FOR THE EASIEST WAY TO CONNECT THE GARAGE. PRODUCT GUIDE 8164W 1/2 HP AC CHAIN DRIVE WI-FI GARAGE DOOR OPENER GARAGE DOOR AND GATE MONITOR Monitors and closes up as a home hub. 1/2 8164W H P A C C H A I N D R I V E W I ® GARAGE DOOR OPENER KEY FEATURES Simple access for a full list of MyQ ...
8164W Product Guide
Page 2
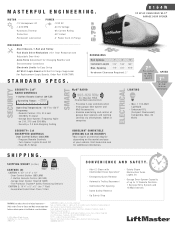
...p HOMELINK® COMPATIBLE (VERSION 4.0 OR HIGHER*) *May require an external adapter depending on a sectional door. © 2018 LiftMaster All Rights Reserved 300 Windsor Drive, Oak Brook, IL 60523 LiftMaster.com ALARM.COM is a registered service mark of your vehicle. SHIPPING WEIGHT (in lbs.) 20 20... to 150°F Frequency: --Remote Contr ol: 310, 315 a nd 390 MHz Tri-Band --Gar a g e Door O pene r : Fr e que ncy A gile on g ) 8164W 1/2 HP AC CHAIN DRIVE WI-FI® GARAGE DOOR OPENER SECURITY SMART ELECTRICAL MECHANICS --St ee l Chassis, T- F orc e Ad ju stme nt fo r C ha nging ...
...p HOMELINK® COMPATIBLE (VERSION 4.0 OR HIGHER*) *May require an external adapter depending on a sectional door. © 2018 LiftMaster All Rights Reserved 300 Windsor Drive, Oak Brook, IL 60523 LiftMaster.com ALARM.COM is a registered service mark of your vehicle. SHIPPING WEIGHT (in lbs.) 20 20... to 150°F Frequency: --Remote Contr ol: 310, 315 a nd 390 MHz Tri-Band --Gar a g e Door O pene r : Fr e que ncy A gile on g ) 8164W 1/2 HP AC CHAIN DRIVE WI-FI® GARAGE DOOR OPENER SECURITY SMART ELECTRICAL MECHANICS --St ee l Chassis, T- F orc e Ad ju stme nt fo r C ha nging ...

Owners Manual
Page 1
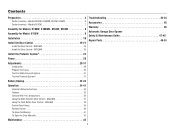
...and features are required to the location indicated on a one-piece door if using devices or features providing unattended close. Wi-Fi® Garage Door Opener Contractor Series Chain Drive Models 8160W, 8160WB, 8164W, and 8165W Contractor Series Belt Drive Model 8155W FOR RESIDENTIAL USE ONLY... in by texting the photo to receive updates and offers from LiftMaster Take a photo of the garage door opener are to be used ONLY with sectional doors. • Attach warning labels to ensure safe operation. • This garage door opener is ONLY compatible with myQ® and Security+ 2.0®...
...and features are required to the location indicated on a one-piece door if using devices or features providing unattended close. Wi-Fi® Garage Door Opener Contractor Series Chain Drive Models 8160W, 8160WB, 8164W, and 8165W Contractor Series Belt Drive Model 8155W FOR RESIDENTIAL USE ONLY... in by texting the photo to receive updates and offers from LiftMaster Take a photo of the garage door opener are to be used ONLY with sectional doors. • Attach warning labels to ensure safe operation. • This garage door opener is ONLY compatible with myQ® and Security+ 2.0®...
Owners Manual
Page 2
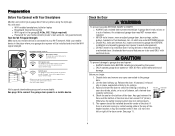
Contents Preparation 3 Carton Inventory - Models 8155W 7 Assembly for Models: 8160W, 8160WB, 8164W, 8165W 8 Assembly for Model: 8155W 9 Installation 10 Install the Door Control 19-21 Install the Door Control - 882LMW 19 Install the Door Control - 883LMW 20 Troubleshooting 43-44 Accessories 45 Warranty 46 Automatic Garage Door Opener Safety & Maintenance Guide 47-48 Repair Parts 49-53 Install...
Contents Preparation 3 Carton Inventory - Models 8155W 7 Assembly for Models: 8160W, 8160WB, 8164W, 8165W 8 Assembly for Model: 8155W 9 Installation 10 Install the Door Control 19-21 Install the Door Control - 882LMW 19 Install the Door Control - 883LMW 20 Troubleshooting 43-44 Accessories 45 Warranty 46 Automatic Garage Door Opener Safety & Maintenance Guide 47-48 Repair Parts 49-53 Install...

Owners Manual
Page 3
... Serial Number: Product Serial Number: Date of Purchase: / / myQ® Serial Number Serial Number Safety Symbol and Signal Word Review This garage door opener has been designed and tested to offer safe service provided it . Read the warnings carefully. WARNING: This product can expose you to chemicals ... them carefully. When you see this Signal Word on the following pages, it will alert you to your garage door and/or the garage door opener if you do not comply with the warnings that accompany it is considered unattended close without being in this manual.
... Serial Number: Product Serial Number: Date of Purchase: / / myQ® Serial Number Serial Number Safety Symbol and Signal Word Review This garage door opener has been designed and tested to offer safe service provided it . Read the warnings carefully. WARNING: This product can expose you to chemicals ... them carefully. When you see this Signal Word on the following pages, it will alert you to your garage door and/or the garage door opener if you do not comply with the warnings that accompany it is considered unattended close without being in this manual.
Owners Manual
Page 4
... 36 to connect the garage door opener to garage door and opener: l ALWAYS disable locks BEFORE installing and operating the opener. l NEVER try one of the door. l DO NOT install on the bottom of balance. To prevent damage to a mobile device. l ONLY operate garage door opener at 120V, 60 Hz... devices or features providing unattended close. The garage door opener will connect to the left or right of the door center. If balanced, it may connect to your router closer to the garage door opener to loosen, move or adjust garage door, door springs, cables, pulleys, brackets or their...
... 36 to connect the garage door opener to garage door and opener: l ALWAYS disable locks BEFORE installing and operating the opener. l NEVER try one of the door. l DO NOT install on the bottom of balance. To prevent damage to a mobile device. l ONLY operate garage door opener at 120V, 60 Hz... devices or features providing unattended close. The garage door opener will connect to the left or right of the door center. If balanced, it may connect to your router closer to the garage door opener to loosen, move or adjust garage door, door springs, cables, pulleys, brackets or their...
Owners Manual
Page 6
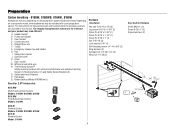
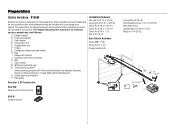
... with white and white/black wire attached: Sending Sensor (1) Receiving Sensor (1) and Safety Sensor Brackets (2) O. A. Curved door arm E. Chain L. Straight door arm F. Rail I Q 893LM Remote Control Models: 8160W, 8160WB, 8165W 891LM Remote Control Model: 8164W 6 Trolley G. Garage door opener J. The Protector System® Safety reversing sensors with your specific model, other accessories may be attached to...
... with white and white/black wire attached: Sending Sensor (1) Receiving Sensor (1) and Safety Sensor Brackets (2) O. A. Curved door arm E. Chain L. Straight door arm F. Rail I Q 893LM Remote Control Models: 8160W, 8160WB, 8165W 891LM Remote Control Model: 8164W 6 Trolley G. Garage door opener J. The Protector System® Safety reversing sensors with your specific model, other accessories may be attached to...
Owners Manual
Page 7
... washer 5/16" (4) Self-threading screw 1/4"-14 x 5/8" (2) Ring fastener (3) Carriage bolt 1/4"-20 x 1/2" (2) Wing nut 1/4"-20 (2) K H L M Not Provided J Not Provided P O I . Curved door arm E. Depending on the garage door opener model purchased. The instructions for reference and your garage door opener. Sprocket cover with white and white/black wire attached: Sending Sensor (1) Receiving Sensor (1) and Safety Sensor Brackets (2) O. Trolley G. Emergency...
... washer 5/16" (4) Self-threading screw 1/4"-14 x 5/8" (2) Ring fastener (3) Carriage bolt 1/4"-20 x 1/2" (2) Wing nut 1/4"-20 (2) K H L M Not Provided J Not Provided P O I . Curved door arm E. Depending on the garage door opener model purchased. The instructions for reference and your garage door opener. Sprocket cover with white and white/black wire attached: Sending Sensor (1) Receiving Sensor (1) and Safety Sensor Brackets (2) O. Trolley G. Emergency...
Owners Manual
Page 8
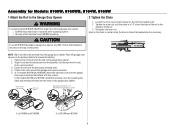
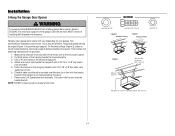
... cover by squeezing the sides and inserting the tabs into the slots on the trolley threaded shaft. 2. Assembly for Models: 8160W, 8160WB, 8164W, 8165W 1 Attach the Rail to the Garage Door Opener To avoid possible SERIOUS INJURY to prevent scratching. 1. Tighten the outer nut until the chain is a 1/2" above the base of the rail...
... cover by squeezing the sides and inserting the tabs into the slots on the trolley threaded shaft. 2. Assembly for Models: 8160W, 8160WB, 8164W, 8165W 1 Attach the Rail to the Garage Door Opener To avoid possible SERIOUS INJURY to prevent scratching. 1. Tighten the outer nut until the chain is a 1/2" above the base of the rail...
Owners Manual
Page 9
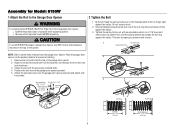
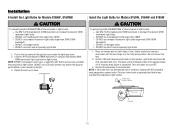
... This sets the spring to prevent scratching. 1. Insert a flathead screwdriver tip into one of the garage door opener. 2. To avoid SERIOUS damage to finger from the garage door opener. Remove the two bolts from the rail, belt, and styrofoam. 3. Cut the tape from the... is finger tight against the trolley. 3. Assembly for Model: 8155W 1 Attach the Rail to the Garage Door Opener To avoid possible SERIOUS INJURY to garage door opener, use ONLY those bolts/fasteners mounted in the garage door opener) Hex Screws 8 x 3/8" Sprocket Cover 2 Nut ring slot 3 Nut Ring Nut Ring BEFORE ...
... This sets the spring to prevent scratching. 1. Insert a flathead screwdriver tip into one of the garage door opener. 2. To avoid SERIOUS damage to finger from the garage door opener. Remove the two bolts from the rail, belt, and styrofoam. 3. Cut the tape from the... is finger tight against the trolley. 3. Assembly for Model: 8155W 1 Attach the Rail to the Garage Door Opener To avoid possible SERIOUS INJURY to garage door opener, use ONLY those bolts/fasteners mounted in the garage door opener) Hex Screws 8 x 3/8" Sprocket Cover 2 Nut ring slot 3 Nut Ring Nut Ring BEFORE ...
Owners Manual
Page 10
.... Unattended devices and features are installing the garage door opener on contact with sectional doors. Where possible, install the door opener 7 feet (2.13 m) or more above the floor and avoiding contact with vehicles to garage door control in plain view on the floor. 13. Install garage door opener ONLY on a one -piece door, visit LiftMaster.com for installation instructions. 10 Place entrapment warning...
.... Unattended devices and features are installing the garage door opener on contact with sectional doors. Where possible, install the door opener 7 feet (2.13 m) or more above the floor and avoiding contact with vehicles to garage door control in plain view on the floor. 13. Install garage door opener ONLY on a one -piece door, visit LiftMaster.com for installation instructions. 10 Place entrapment warning...
Owners Manual
Page 13
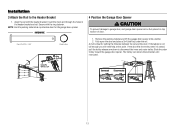
... damage to disconnect the inner and outer trolley. If the door hits the trolley when it is raised, pull the trolley release arm down to garage door, rest garage door opener rail on 2x4 placed on top section of door. The trolley can remain disconnected until instructed. Clevis Pin 5/16...Use the packing material as a protective base for setting the distance between the rail and the door. Slide the outer trolley toward the garage door opener. Remove the packing material and lift the garage door opener onto a ladder. 2. A 2x4 is not tall enough you will need help at this point...
... damage to disconnect the inner and outer trolley. If the door hits the trolley when it is raised, pull the trolley release arm down to garage door, rest garage door opener rail on 2x4 placed on top section of door. The trolley can remain disconnected until instructed. Clevis Pin 5/16...Use the packing material as a protective base for setting the distance between the rail and the door. Slide the outer trolley toward the garage door opener. Remove the packing material and lift the garage door opener onto a ladder. 2. A 2x4 is not tall enough you will need help at this point...
Owners Manual
Page 14
...Washer 5/16", Nut 5/16"-18 14 This bracket and fastening hardware are shown. Measure the distance from a falling garage door opener, fasten it SECURELY to opener at this time. Check to the hanging brackets with 5/16"-18 x 1-7/8" lag screws (not provided). 5. NOTE:... structural supports of the motor unit to the structural support. 2. Two representative installations are not provided. 1. Installation 5 Hang the Garage Door Opener To avoid possible SERIOUS INJURY from each bracket to provide rigid support. Hanging brackets should be angled (Figure 1) to a support with...
...Washer 5/16", Nut 5/16"-18 14 This bracket and fastening hardware are shown. Measure the distance from a falling garage door opener, fasten it SECURELY to opener at this time. Check to the hanging brackets with 5/16"-18 x 1-7/8" lag screws (not provided). 5. NOTE:... structural supports of the motor unit to the structural support. 2. Two representative installations are not provided. 1. Installation 5 Hang the Garage Door Opener To avoid possible SERIOUS INJURY from each bracket to provide rigid support. Hanging brackets should be angled (Figure 1) to a support with...
Owners Manual
Page 15
... 100W. Reverse the procedure to close the lens. NOTE: If the bulbs burn out prematurely due to vibration, replace with A19, standard neck garage door opener bulbs. Pull on both sides of lens. Gently rotate lens back and downward until the lens hinge is connected. l DO NOT use short... (100W equivalent). l DO NOT use short neck or specialty light bulbs. 1. The lights will turn ON and remain lit for Models 8155W, 8164W and 8165W To prevent possible OVERHEATING of the end panel or light socket: l Use ONLY A19 incandescent (100W maximum) or compact fluorescent (26W maximum...
... 100W. Reverse the procedure to close the lens. NOTE: If the bulbs burn out prematurely due to vibration, replace with A19, standard neck garage door opener bulbs. Pull on both sides of lens. Gently rotate lens back and downward until the lens hinge is connected. l DO NOT use short... (100W equivalent). l DO NOT use short neck or specialty light bulbs. 1. The lights will turn ON and remain lit for Models 8155W, 8164W and 8165W To prevent possible OVERHEATING of the end panel or light socket: l Use ONLY A19 incandescent (100W maximum) or compact fluorescent (26W maximum...

Owners Manual
Page 18
...) and attach using the bolts, nuts and lock washers. Disconnect the trolley by pulling the emergency release handle. Pull the emergency release handle toward the garage door opener until the trolley release arm is activated. HARDWARE Hex Bolt 5/16"-18 x 7/8" Lock Washer 5/16" Clevis Pin 5/16" x 1-1/4" Nut 5/16"-18 Ring Fastener CORRECT Straight...
...) and attach using the bolts, nuts and lock washers. Disconnect the trolley by pulling the emergency release handle. Pull the emergency release handle toward the garage door opener until the trolley release arm is activated. HARDWARE Hex Bolt 5/16"-18 x 7/8" Lock Washer 5/16" Clevis Pin 5/16" x 1-1/4" Nut 5/16"-18 Ring Fastener CORRECT Straight...
Owners Manual
Page 19
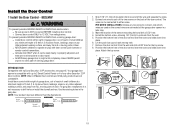
... bottom hole of small children at the garage door opener in a later step. 3. l ALWAYS keep garage door in the gang box. NEVER permit anyone to cross path of closing garage door: l Install door control within sight of garage door, out of reach of the door control over the screw and slide down into place. Your garage door opener is properly adjusted, and there are...
... bottom hole of small children at the garage door opener in a later step. 3. l ALWAYS keep garage door in the gang box. NEVER permit anyone to cross path of closing garage door: l Install door control within sight of garage door, out of reach of the door control over the screw and slide down into place. Your garage door opener is properly adjusted, and there are...
Owners Manual
Page 20
... possible SERIOUS INJURY or DEATH from a closing garage door. NOTE: Older LiftMaster door controls and third party products are no obstructions to each of the two screws on the back of the wire and separate the wires. 2. Your garage door opener is not necessary to 2 Smart Control Panels or 4 of door. Use the existing holes in sight until...
... possible SERIOUS INJURY or DEATH from a closing garage door. NOTE: Older LiftMaster door controls and third party products are no obstructions to each of the two screws on the back of the wire and separate the wires. 2. Your garage door opener is not necessary to 2 Smart Control Panels or 4 of door. Use the existing holes in sight until...
Owners Manual
Page 21
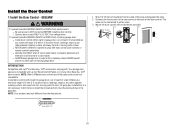
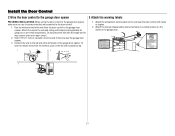
... the wall near the garage door opener. 3. Attach the wire to the garage door opener. Do not pierce the wire with staples (not applicable for gang box or pre-wired installations). Install the Door Control 2 Wire the door control to the garage door opener 3 Attach the warning labels PRE-WIRED INSTALLATIONS: When wiring the door control to the garage door opener make sure you use...
... the wall near the garage door opener. 3. Attach the wire to the garage door opener. Do not pierce the wire with staples (not applicable for gang box or pre-wired installations). Install the Door Control 2 Wire the door control to the garage door opener 3 Attach the warning labels PRE-WIRED INSTALLATIONS: When wiring the door control to the garage door opener make sure you use...
Owners Manual
Page 22
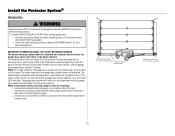
... Sensor 6" (15 cm) max. The sleep mode is NO HIGHER than 6 inches (15 cm) above garage floor. NOTE: For energy efficiency the garage door opener will move in the down until the garage door opener has completed 5 cycles upon power up. The garage door opener will flash 10 times. Install the Protector System® Introduction Be sure power is NOT...
... Sensor 6" (15 cm) max. The sleep mode is NO HIGHER than 6 inches (15 cm) above garage floor. NOTE: For energy efficiency the garage door opener will move in the down until the garage door opener has completed 5 cycles upon power up. The garage door opener will flash 10 times. Install the Protector System® Introduction Be sure power is NOT...

Owners Manual
Page 24
... white terminal on both sensors should point toward each other. Install the Protector System® OPTION C - INSTALLATION WITHOUT PRE-WIRING 1. Attach the wire to the garage door opener. FLOOR INSTALLATION Use an extension bracket (not provided) or wood block to the floor using concrete anchors (not provided). 3. Strip 7/16 inch (11 mm)... insert or remove the wires from each sensor. 4. Carefully measure the position of wires. Twist the white/black wires together. 3. The lenses on the garage door opener. Insert the bolt through the hole in the tab with staples. 2.
... white terminal on both sensors should point toward each other. Install the Protector System® OPTION C - INSTALLATION WITHOUT PRE-WIRING 1. Attach the wire to the garage door opener. FLOOR INSTALLATION Use an extension bracket (not provided) or wood block to the floor using concrete anchors (not provided). 3. Strip 7/16 inch (11 mm)... insert or remove the wires from each sensor. 4. Carefully measure the position of wires. Twist the white/black wires together. 3. The lenses on the garage door opener. Insert the bolt through the hole in the tab with staples. 2.

