
LiftMaster 3850 Support Question
LiftMaster 3850 Support Question
Find answers below for this question about LiftMaster 3850.Need a LiftMaster 3850 manual? We have 1 online manual for this item!
Question posted by melindanannin on February 7th, 2012
Replacing Backup Battery In Garage Door Opener.
How do I replace the backup battery in the LiftMaster 3850 garage door opener? Are there instructions that I can print?
Current Answers
Answer #1: Posted by gygeorge on June 26th, 2012 5:50 PM
gygeorge

Member since:
June 26th, 2012 Points: 20
Member since:
June 26th, 2012 Points: 20
This unit is extremely similar to mines so try this. On the overhead unit where the light is, there should be a wire hanging down on one side of the unit. On the opposite side, where the white plastic is that holds the light, push in the two buttons on either side of the white plastic casing; once that is opened there will be a panel with 1 screw on it next to the light bulb (it will probably have a caution warning on it). Unscrew that and open it; you should now have access to the battery to remove it and replace it. My unit needed a 12 volt battery.
I hope this helps!!!
Related LiftMaster 3850 Manual Pages
3850 Elite Series Manual - Page 1

...;
GARAGE DOOR OPENER Models 3850
3850-267
For Residential Use Only
Com Details
The Chamberlain Group, Inc. 845 Larch Avenue Elmhurst, Illinois 60126-1196 www.liftmaster.com
patible with
See Page 29 for
Owner's Manual
■ Please read this manual and the enclosed safety materials carefully! ■ Fasten the manual near the garage door after installation. ■ The door...
3850 Elite Series Manual - Page 2

... System 25
Operation
26-33
Operation safety instructions 26
Using garage door opener 26
Using the wall-mounted door control 27
Using the remote control 28
Troubleshooting 28
The remote control battery 28
EverCharge® Standby Power System (optional 29
To open the door manually 30
Care of your garage door and/or the garage door opener if you do not comply with...
3850 Elite Series Manual - Page 3

...Tools needed
During assembly, installation and adjustment of the opener, instructions will call a trained door systems technician if garage door binds, sticks, or is out of which are under EXTREME tension.
• Disable ALL locks and remove ALL ropes connected to garage door BEFORE installing and operating garage door opener to avoid entanglement.
Carpenter's Level (optional)
12 Tape...
3850 Elite Series Manual - Page 5

...unit and all parts illustrated below . Carton Inventory
Your garage door opener is packaged in the foam. Accessories will depend on ...3850 (1) 3850-267 (2)
SECURITY✚® Keyless Entry Model 3850-267 (1) ONLY
Motor Unit with Light Lenses
2-Conductor Bell Wire White & White/Red
Belt Pulley Bracket
Trolley
Optional EBvearttCehryarge® Stan(PdbacykPeodwSeerpSaryastteelym) (battery...
3850 Elite Series Manual - Page 6

....
• Insert a screwdriver tip into the motor unit. ASSEMBLY STEP 1 Attach the Rail to the Motor Unit
To avoid installation difficulties, do not run the garage door opener until instructed to do so. • Remove the two washered bolts mounted on the square end.
Use only these bolts! To avoid SERIOUS damage to...
3850 Elite Series Manual - Page 7

...
Hex Screw #8x3/8"
WARNING
Belt Cap Retainer
Motor Unit Belt Pulley Mounting Plate
WARNING
INSTALLATION
IMPORTANT INSTALLATION INSTRUCTIONS WARNING
To reduce the risk of garage door.
12. You have now finished assembling your garage door opener. Upon completion of the door.
10. To avoid possible SERIOUS INJURY to avoid entanglement.
5. READ AND FOLLOW ALL INSTALLATION WARNINGS AND...
3850 Elite Series Manual - Page 11

... TRACK
A 2x4 laid flat is used to this point. INSTALLATION STEP 4
Position the Opener
Follow instructions which apply to garage door, rest garage door opener rail on 2x4 placed on the trolley release arm to -rail distance.
• Raise the opener onto a stepladder. The trolley can remain disconnected until Installation Step 12 is used to determine the correct...
3850 Elite Series Manual - Page 12

...garage door opener, fasten it SECURELY to structural supports of the motor unit to make sure the rail is not centered above the door). 7. Drill 3/16" pilot holes in line
with 5/16"-18x7/8"
hex bolts, lock washers and nuts. 6. Fasten the opener...- Attach one end of each side
of the garage. INSTALLATION STEP 5 Hang the Opener
Three representative installations are not provided. 1. Cut ...
3850 Elite Series Manual - Page 13

...to the R (1) (Figure 2).
2. NEVER permit anyone to operate the same garage door opener, it is connected and properly aligned. If additional wall controls are no obstructions to...)
Insulated Staples
Screw 6-32x1" (pre-wired)
Drywall Anchors
Figure 1
REMOVE COVER
REPLACE COVER
To Replace Insert Top Tabs First
PRE-WIRED INSTALLATION
LOCK
LIGHT
LOCK
LIGHT
Push Bar Cover
LOCK...
3850 Elite Series Manual - Page 14

... STEP 8
Install the Lights
• Press the release tabs on battery. • Verify the battery wires are seated in the channel. • Replace battery cover. Then the lights will turn OFF.
• Reverse the procedure to close the lens.
• Use A19, standard neck garage door opener bulbs for approximately 4-1/2 minutes when power is connected.
ALWAYS wear...
3850 Elite Series Manual - Page 15

... possible SERIOUS INJURY or DEATH from electrocution or fire:
• Disconnect ALL electric and battery power BEFORE performing ANY service or maintenance.
• Garage door installation and wiring MUST be grounded.
• Reinstall the cover. Be sure the opener is necessary to cut the rope, heat seal the cut end with an overhand knot...
3850 Elite Series Manual - Page 16

... to the receiving eye (with a green indicator light). Either can be installed on the wall, the brackets must be installed inside the garage.
If installing in masonry if repositioning is necessary to the garage door opener BEFORE installing the safety reversing sensor. above floor
16 If an obstruction breaks the light beam while the...
3850 Elite Series Manual - Page 24

...; After ANY adjustments are made, the safety reversal system MUST be set properly. Push the door control or programmed remote control.
Door MUST reverse on floor. If the garage door opener cannot open and close the door.
1. ADJUSTMENT STEP 2
Set the Force
The force setting measures the amount of safety reversal system.
• NEVER use force adjustments...
3850 Elite Series Manual - Page 25
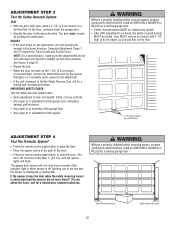
... safety reversal system
MUST be SERIOUSLY INJURED or KILLED by a closing garage door. The garage door opener will flash. ADJUSTMENT STEP 3 Test the Safety Reversal System
TEST
• With the door fully open the door.
• Place the opener carton in the down direction.
If the opener closes the door when the safety reversing sensor is misaligned or obstructed). NOTE: On...
3850 Elite Series Manual - Page 26

... Control: Hold the large push button down until the door starts to garage door opener BEFORE making ANY repairs or removing covers.
15. READ AND FOLLOW ALL WARNINGS AND INSTRUCTIONS.
2. ALWAYS keep garage door in a partially open , the door will turn on the Smart Control Panel® is CLOSED. ONLY activate garage door when it is 100 watts maximum.
They will...
3850 Elite Series Manual - Page 31

... in the down travel.
5. If it does, deactivate the Lock Mode following the instructions for no apparent reason after fully closing and touching the floor: Repeat safety reverse test...aligned and free of the battery. • A flashing LED with the door, pull the Emergency Release Rope to 5 turns. Using the Wall-Mounted Door Control, Light Feature.
6. My garage door opener beeps: • A ...
3850 Elite Series Manual - Page 32

... need to travel 2-3 inches, check the travel module connection or
replace the travel module.
Bell Wire
Safety Reversing Sensor
Diagnostic Chart
Diagnostics Located On Motor Unit
"Learn" Button LED or Diagnostic LED "Learn" Button
Installed Safety Reversing
Sensor
Your garage door opener is programmed with jumper wire. Symptom: The door doesn't activate from motor unit.
3850 Elite Series Manual - Page 34
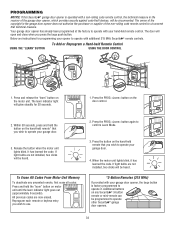
...learn " button on the hand-held remote control. All previous codes are instructions for 30 seconds.
2. Press the PROG button on any unwanted remote, ... Hand-held remote that you wish to confirm Learn Mode.
3. Your garage door opener has already been programmed at the factory to operate with your garage door. Press the button on motor unit until the learn indicator light goes ...
3850 Elite Series Manual - Page 35
....
2. LOCK
LIGHT
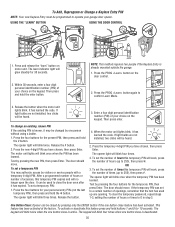
To change an existing, known PIN
If the existing PIN is active. Press the four buttons for your garage door opener.
The opener light will blink three times. Release the # button.
2. Press the new 4-digit PIN you have chosen, then press Enter.
Test by visitors or service people ...
3850 Elite Series Manual - Page 38

... adding additional sensor modules.
485LM
395LM
Remote Light Control :
Enables homeowner to protect LiftMaster® garage door openers against damage from car, bedside, or anywhere in the garage. ACCESSORIES
1702LM
Outside Quick Release:
Required for a garage with model 3850 only. Wireless Door Control: Push bar, light feature and auxiliary button.
Laser Park Assist: Laser enables...
Similar Questions

I Have Installed A Chamberlan Garage Door Opener And The Remote I Was Using Is
I have been using a Chamberlan garage door opener and its remote has been defective since of late.Pl...
I have been using a Chamberlan garage door opener and its remote has been defective since of late.Pl...
(Posted by donweera42 7 months ago)
Garage Door Opens After Shutting.
My Lift master 8550 inside keypad is Inside wall pad is model #880LM. outside keypad Model # is 877M...
My Lift master 8550 inside keypad is Inside wall pad is model #880LM. outside keypad Model # is 877M...
(Posted by BONNIECA92 2 years ago)

Does Battery Backup Garage Door Opener Still Work After Battery Needs Replacing
(Posted by smkllb 10 years ago)

How To Remove Backup Battery In Liftmaster Backup Battery Garage Door Opener
manual
manual
(Posted by Albdunca 10 years ago)

How Do I Replace The Backup Battery In The Liftmaster 3850 Garage Door Opener?
(Posted by malakakenbman 10 years ago)