

3850 Elite Series Manual
Page 1
....liftmaster.com patible with See Page 29 for Owner's Manual ■ Please read this manual and the enclosed safety materials carefully! ■ Fasten the manual near the garage door after installation. ■ The door WILL NOT CLOSE unless the Protector System® is connected and properly aligned. ■ Periodic checks of the opener are required to ensure safe operation. ■ The model number label is located under the light...
....liftmaster.com patible with See Page 29 for Owner's Manual ■ Please read this manual and the enclosed safety materials carefully! ■ Fasten the manual near the garage door after installation. ■ The door WILL NOT CLOSE unless the Protector System® is connected and properly aligned. ■ Periodic checks of the opener are required to ensure safe operation. ■ The model number label is located under the light...

3850 Elite Series Manual
Page 2
... Power System (optional 14 Install the lights 14 Attach the emergency release rope and handle 15 Electrical requirements 15 Install the Protector System 16-18 Fasten the door bracket 19-20 Connect door arm to trolley 21-22 Adjustment 23-25 Program the travel limits 23 Set the force 24 Test the safety reversal system 25 Test the Protector System 25 Operation 26-33 Operation safety instructions 26 Using garage door opener 26 Using the wall-mounted door control 27 Using the remote control 28 Troubleshooting 28 The remote control battery...
... Power System (optional 14 Install the lights 14 Attach the emergency release rope and handle 15 Electrical requirements 15 Install the Protector System 16-18 Fasten the door bracket 19-20 Connect door arm to trolley 21-22 Adjustment 23-25 Program the travel limits 23 Set the force 24 Test the safety reversal system 25 Test the Protector System 25 Operation 26-33 Operation safety instructions 26 Using garage door opener 26 Using the wall-mounted door control 27 Using the remote control 28 Troubleshooting 28 The remote control battery...

3850 Elite Series Manual
Page 5
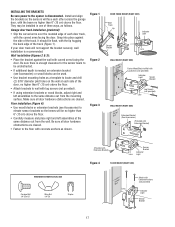
...174; 3-Button Remote Control Models 3850 (1) 3850-267 (2) SECURITY✚® Keyless Entry Model 3850-267 (1) ONLY Motor Unit with Light Lenses 2-Conductor Bell Wire White & White/Red Belt Pulley Bracket Trolley Optional EBvearttCehryarge® Stan(PdbacykPeodwSeerpSaryastteelym) (battery) Belt RReemmootteeCCoonnttrrooll VVisisoorrCClilpip : Styrofoam Belt Cap Retainer One-Piece Rail CEYILING MOUNT ONL UP Header Bracket Door Bracket Curved Door Arm Section Safety Sensor Bracket (2) The Protector System® (2) Safety Reversing Sensors (1 Sending Eye and 1 Receiving Eye) with...
...174; 3-Button Remote Control Models 3850 (1) 3850-267 (2) SECURITY✚® Keyless Entry Model 3850-267 (1) ONLY Motor Unit with Light Lenses 2-Conductor Bell Wire White & White/Red Belt Pulley Bracket Trolley Optional EBvearttCehryarge® Stan(PdbacykPeodwSeerpSaryastteelym) (battery) Belt RReemmootteeCCoonnttrrooll VVisisoorrCClilpip : Styrofoam Belt Cap Retainer One-Piece Rail CEYILING MOUNT ONL UP Header Bracket Door Bracket Curved Door Arm Section Safety Sensor Bracket (2) The Protector System® (2) Safety Reversing Sensors (1 Sending Eye and 1 Receiving Eye) with...

3850 Elite Series Manual
Page 7
... safety reversal system. Install garage door opener ONLY on the floor. 13. Install wall-mounted garage door control: • within sight of the garage door. • out of reach of children at minimum height of 5 feet (1.5 m). • away from ALL moving garage door opener: • ALWAYS keep hand clear of belt pulley while operating opener. • SECURELY attach belt pulley cover BEFORE operating. 8x3/8" Hex Screws HARDWARE SHOWN ACTUAL SIZE Hex Screw #8x3/8" WARNING Belt Cap Retainer Motor Unit Belt...
... safety reversal system. Install garage door opener ONLY on the floor. 13. Install wall-mounted garage door control: • within sight of the garage door. • out of reach of children at minimum height of 5 feet (1.5 m). • away from ALL moving garage door opener: • ALWAYS keep hand clear of belt pulley while operating opener. • SECURELY attach belt pulley cover BEFORE operating. 8x3/8" Hex Screws HARDWARE SHOWN ACTUAL SIZE Hex Screw #8x3/8" WARNING Belt Cap Retainer Motor Unit Belt...

3850 Elite Series Manual
Page 12
... metal bracket to opener at this time. This bracket and fastening hardware are shown. Drill 3/16" pilot holes in line with rail grease. Remove the 2x4. Concrete anchors MUST be different. Yours may be used if installing ANY brackets into masonry. Cut both pieces of each side of the motor unit to the structural support. 2. Fasten the opener to required lengths. 3. If the door...
... metal bracket to opener at this time. This bracket and fastening hardware are shown. Drill 3/16" pilot holes in line with rail grease. Remove the 2x4. Concrete anchors MUST be different. Yours may be used if installing ANY brackets into masonry. Cut both pieces of each side of the motor unit to the structural support. 2. Fasten the opener to required lengths. 3. If the door...

3850 Elite Series Manual
Page 13
... and use model 378LM wireless wall control as follows: • Install bottom screw, allowing 1/8" (3 mm) to protrude above wall surface. • Position bottom of door control on the motor unit: white to white and white/red to motor unit. If installing into gang box) as the secondary door control. 1. DO NOT overtighten. • Replace cover by color: white wire to the W (2) and white/red wire to secure wire in tabpwusithhisnctraebwwdritivher tip screwdriver tip Antenna Red White Grey Red White...
... and use model 378LM wireless wall control as follows: • Install bottom screw, allowing 1/8" (3 mm) to protrude above wall surface. • Position bottom of door control on the motor unit: white to white and white/red to motor unit. If installing into gang box) as the secondary door control. 1. DO NOT overtighten. • Replace cover by color: white wire to the W (2) and white/red wire to secure wire in tabpwusithhisnctraebwwdritivher tip screwdriver tip Antenna Red White Grey Red White...

3850 Elite Series Manual
Page 14
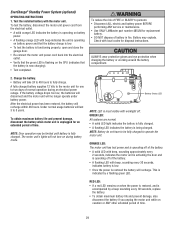
...; Reverse the procedure to close the lens. • Use A19, standard neck garage door opener bulbs for approximately 4-1/2 minutes when power is unplugged. • Using a Phillips head screwdriver, remove the battery cover on battery. • Verify the battery wires are seated in the channel. • Replace battery cover. Light bulb size should be A19, standard neck only. Use ONLY incandescent. INSTALLATION STEP 7 Install the EverCharge® Standby Power System (optional) • Make sure motor unit is connected...
...; Reverse the procedure to close the lens. • Use A19, standard neck garage door opener bulbs for approximately 4-1/2 minutes when power is unplugged. • Using a Phillips head screwdriver, remove the battery cover on battery. • Verify the battery wires are seated in the channel. • Replace battery cover. Light bulb size should be A19, standard neck only. Use ONLY incandescent. INSTALLATION STEP 7 Install the EverCharge® Standby Power System (optional) • Make sure motor unit is connected...

3850 Elite Series Manual
Page 15
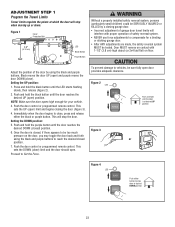
... red handle so "NOTICE" reads right side up as shown. Secure with a third grounding pin. Overhand Knot Emergency Release Handle Rope NOTICE Trolley Release Arm Overhand Knot INSTALLATION STEP 10 Electrical Requirements To avoid installation difficulties, do not run the opener at least 1" (2.5 cm) from a falling garage door: • If possible, use an extension cord, 2-wire adapter, or change plug in compliance with ALL local electrical and building codes. • NEVER use emergency release...
... red handle so "NOTICE" reads right side up as shown. Secure with a third grounding pin. Overhand Knot Emergency Release Handle Rope NOTICE Trolley Release Arm Overhand Knot INSTALLATION STEP 10 Electrical Requirements To avoid installation difficulties, do not run the opener at least 1" (2.5 cm) from a falling garage door: • If possible, use an extension cord, 2-wire adapter, or change plug in compliance with ALL local electrical and building codes. • NEVER use emergency release...

3850 Elite Series Manual
Page 16
...; Install the safety reversing sensor so beam is closing, the door will stop and reverse to full open position, and the opener lights will flash 10 times. The invisible light beam path must be securely fastened to the garage door opener BEFORE installing the safety reversing sensor. Safety Reversing Sensor 6" (15 cm) max. If an obstruction breaks the light beam while the door is NO HIGHER than 6" (15 cm) above garage floor. Either can be installed on the wall, the brackets must be unobstructed. Safety Reversing Sensor...
...; Install the safety reversing sensor so beam is closing, the door will stop and reverse to full open position, and the opener lights will flash 10 times. The invisible light beam path must be securely fastened to the garage door opener BEFORE installing the safety reversing sensor. Safety Reversing Sensor 6" (15 cm) max. If an obstruction breaks the light beam while the door is NO HIGHER than 6" (15 cm) above garage floor. Either can be installed on the wall, the brackets must be unobstructed. Safety Reversing Sensor...
3850 Elite Series Manual
Page 17
... Wall with Lag Screws (not provided) Indicator Light Sensor Bracket Lag Screws (not provided) Lens WALL MOUNT (RIGHT SIDE) IGWnasariladl gee Extension Bracket (See Accessories) (Provided with Extension Bracket) HARDWARE SHOWN ACTUAL SIZE Carriage Bolt 1/4"-20x1/2" Wing Nut 1/4"-20 Staples (Provided with Extension Bracket) Sensor Bracket Indicator Lens Light Figure 4 FLOOR MOUNT (RIGHT SIDE) IGWnasarildalgee Lens Attach with curved arms facing the door. Install and align the brackets so the sensors will not support the bracket securely, wall installation...
... Wall with Lag Screws (not provided) Indicator Light Sensor Bracket Lag Screws (not provided) Lens WALL MOUNT (RIGHT SIDE) IGWnasariladl gee Extension Bracket (See Accessories) (Provided with Extension Bracket) HARDWARE SHOWN ACTUAL SIZE Carriage Bolt 1/4"-20x1/2" Wing Nut 1/4"-20 Staples (Provided with Extension Bracket) Sensor Bracket Indicator Lens Light Figure 4 FLOOR MOUNT (RIGHT SIDE) IGWnasarildalgee Lens Attach with curved arms facing the door. Install and align the brackets so the sensors will not support the bracket securely, wall installation...
3850 Elite Series Manual
Page 23
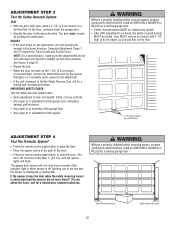
... to vehicles, be SERIOUSLY INJURED or KILLED by using the black and purple buttons to compensate for your vehicle. 3. Figure 1 Cover Protection Bolt 2-4" (5-10 cm) LED Black Button Purple Button Without a properly installed safety reversal system, persons (particularly small children) could be sure fully open ) limit and begins closing garage door. • Incorrect adjustment of safety reversal system. • NEVER use force adjustments to reach the desired closed ) position. 6. Push the door control or programmed remote control.
... to vehicles, be SERIOUSLY INJURED or KILLED by using the black and purple buttons to compensate for your vehicle. 3. Figure 1 Cover Protection Bolt 2-4" (5-10 cm) LED Black Button Purple Button Without a properly installed safety reversal system, persons (particularly small children) could be sure fully open ) limit and begins closing garage door. • Incorrect adjustment of safety reversal system. • NEVER use force adjustments to reach the desired closed ) position. 6. Push the door control or programmed remote control.

3850 Elite Series Manual
Page 24
... open and close (DOWN). 3. Push the door control or programmed remote control again. ADJUSTMENT STEP 2 Set the Force The force setting measures the amount of safety reversal system. • NEVER use force adjustments to compensate for the force to ensure that it is balanced properly and is not stopping exactly where you would like it, repeat Program the Travel Limits. Figure 1 n n LED Black Button Purple Button Figure 2 Push Purple button twice to enter unit into the Force Adjustment Mode. Push the door control or programmed remote control a third time...
... open and close (DOWN). 3. Push the door control or programmed remote control again. ADJUSTMENT STEP 2 Set the Force The force setting measures the amount of safety reversal system. • NEVER use force adjustments to compensate for the force to ensure that it is balanced properly and is not stopping exactly where you would like it, repeat Program the Travel Limits. Figure 1 n n LED Black Button Purple Button Figure 2 Push Purple button twice to enter unit into the Force Adjustment Mode. Push the door control or programmed remote control a third time...
3850 Elite Series Manual
Page 25
... under the garage door. • Operate the door in the down position. The garage door opener will flash. Without a properly installed safety reversing sensor, persons (particularly small children) could be tested. ADJUST • If the door stops on striking the obstruction. IMPORTANT SAFETY CHECK: Test the Safety Reverse System after: • Each adjustment of door arm length, limits, or force controls. • Any repair to or adjustment of the garage door (including springs and hardware). • Any repair to or...
... under the garage door. • Operate the door in the down position. The garage door opener will flash. Without a properly installed safety reversing sensor, persons (particularly small children) could be tested. ADJUST • If the door stops on striking the obstruction. IMPORTANT SAFETY CHECK: Test the Safety Reverse System after: • Each adjustment of door arm length, limits, or force controls. • Any repair to or adjustment of the garage door (including springs and hardware). • Any repair to or...

3850 Elite Series Manual
Page 26
... will not close . The opener lights will close when the beam is initially plugged in a partially open . 2. Bulb power is activated. If you purchase a new remote, or if you can be tested every month. However, you wish to move . • The Wall-Mounted Door Control: Hold the push button or bar down travel . 4. WARNING OPERATION IMPORTANT SAFETY INSTRUCTIONS WARNING To reduce the risk of persons and obstructions. 8. If open, the door will turn on...
... will not close . The opener lights will close when the beam is initially plugged in a partially open . 2. Bulb power is activated. If you purchase a new remote, or if you can be tested every month. However, you wish to move . • The Wall-Mounted Door Control: Hold the push button or bar down travel . 4. WARNING OPERATION IMPORTANT SAFETY INSTRUCTIONS WARNING To reduce the risk of persons and obstructions. 8. If open, the door will turn on...
3850 Elite Series Manual
Page 28
... batteries, remove the two screws and open the remote control housing. Replace the batteries with a proximity lighting feature. If bent the proximity sensor will blink rapidly. This allows the sensor to the remote control, the LED lights turn on or off the proximity lighting feature if the proximity lighting is turned on the Smart Control Panel®. 3. When moving a hand within close proximity to recalibrate itself. To Control the Opener Lights With 315 MHz Security✚® remote controls, a remote push button...
... batteries, remove the two screws and open the remote control housing. Replace the batteries with a proximity lighting feature. If bent the proximity sensor will blink rapidly. This allows the sensor to the remote control, the LED lights turn on or off the proximity lighting feature if the proximity lighting is turned on the Smart Control Panel®. 3. When moving a hand within close proximity to recalibrate itself. To Control the Opener Lights With 315 MHz Security✚® remote controls, a remote push button...
3850 Elite Series Manual
Page 29
... ANY service or maintenance. • Use ONLY LiftMaster part number 485LM for disposal instructions. EverCharge® Standby Power System (optional) OPERATING INSTRUCTIONS 1. Test the installed battery with beep indicates the unit is operating on battery power and that the battery charge is low. • To test the battery is functioning properly, open and close the garage door. • Re-connect the motor unit power cord back into the electrical outlet. • Verify that the battery is accompanied by a flashing green LED. To...
... ANY service or maintenance. • Use ONLY LiftMaster part number 485LM for disposal instructions. EverCharge® Standby Power System (optional) OPERATING INSTRUCTIONS 1. Test the installed battery with beep indicates the unit is operating on battery power and that the battery charge is low. • To test the battery is functioning properly, open and close the garage door. • Re-connect the motor unit power cord back into the electrical outlet. • Verify that the battery is accompanied by a flashing green LED. To...

3850 Elite Series Manual
Page 31
... against the stop . The trolley should travel . • Refer to force or travel limits. Using the Wall-Mounted Door Control, Light Feature. 6. Weather conditions in particular can affect door travel . 5. Decrease down direction. • Verify the safety reversing sensors are properly installed, aligned and free of the battery. • A flashing LED with a security light feature. My motor unit hums briefly: • First verify that the trolley is accompanied by adjusting the outer nut 4 to Programming. • If remote will not...
... against the stop . The trolley should travel . • Refer to force or travel limits. Using the Wall-Mounted Door Control, Light Feature. 6. Weather conditions in particular can affect door travel . 5. Decrease down direction. • Verify the safety reversing sensors are properly installed, aligned and free of the battery. • A flashing LED with a security light feature. My motor unit hums briefly: • First verify that the trolley is accompanied by adjusting the outer nut 4 to Programming. • If remote will not...

3850 Elite Series Manual
Page 32
.... Symptom: Door travels 2-3 inches and stops. • Reprogram limits and forces. The "Learn" button/diagnostic LED will flash a number of motor unit. • Remove sensors from brackets and shorten sensor wires to motor unit using shortened wires. OR 2 FLASHES Safety reversing sensors wire shorted or black/white wire reversed. Consult Diagnostic Chart below. 1 FLASH Safety reversing sensors wire open (broken or disconnected). If sending eye indicator light glows steadily, attach the receiving eye. • Align sensors, if the indicator lights glow replace the wires for...
.... Symptom: Door travels 2-3 inches and stops. • Reprogram limits and forces. The "Learn" button/diagnostic LED will flash a number of motor unit. • Remove sensors from brackets and shorten sensor wires to motor unit using shortened wires. OR 2 FLASHES Safety reversing sensors wire shorted or black/white wire reversed. Consult Diagnostic Chart below. 1 FLASH Safety reversing sensors wire open (broken or disconnected). If sending eye indicator light glows steadily, attach the receiving eye. • Align sensors, if the indicator lights glow replace the wires for...

3850 Elite Series Manual
Page 38
... key ring and fastening strip. For use with NO access door. Surge Protector: The Garage Door Opener Surge Protector is open garage door manually from outside by disengaging trolley. 373P 41A5281 Extension Brackets: (Optional) For safety reversing sensor installation onto the wall or floor. 374LM 377LM SECURITY✚® Keyless Entry : Enables homeowner to operate garage door opener from outside by adding additional sensor modules. 485LM 395LM Remote Light Control : Enables homeowner to a programmable number of hours or entries. 370LM 378LM 915LM CLOSED OPEN Garage Door...
... key ring and fastening strip. For use with NO access door. Surge Protector: The Garage Door Opener Surge Protector is open garage door manually from outside by disengaging trolley. 373P 41A5281 Extension Brackets: (Optional) For safety reversing sensor installation onto the wall or floor. 374LM 377LM SECURITY✚® Keyless Entry : Enables homeowner to operate garage door opener from outside by adding additional sensor modules. 485LM 395LM Remote Light Control : Enables homeowner to a programmable number of hours or entries. 370LM 378LM 915LM CLOSED OPEN Garage Door...
3850 Elite Series Manual
Page 40
... CAUSED BY IMPROPER INSTALLATION, OPERATION OR CARE (INCLUDING, BUT NOT LIMITED TO ABUSE, MISUSE, FAILURE TO PROVIDE REASONABLE AND NECESSARY MAINTENANCE, UNAUTHORIZED REPAIRS OR ANY ALTERATIONS TO THIS PRODUCT), LABOR CHARGES FOR REINSTALLING A REPAIRED OR REPLACED UNIT, REPLACEMENT OF BATTERIES IN REMOTE CONTROL TRANSMITTERS AND LIGHT BULBS OR UNITS INSTALLED FOR NON-RESIDENTIAL USE. LIFTMASTER® SERVICE IS ON CALL OUR LARGE SERVICE ORGANIZATION SPANS AMERICA INSTALLATION AND SERVICE INFORMATION IS AS NEAR AS...
... CAUSED BY IMPROPER INSTALLATION, OPERATION OR CARE (INCLUDING, BUT NOT LIMITED TO ABUSE, MISUSE, FAILURE TO PROVIDE REASONABLE AND NECESSARY MAINTENANCE, UNAUTHORIZED REPAIRS OR ANY ALTERATIONS TO THIS PRODUCT), LABOR CHARGES FOR REINSTALLING A REPAIRED OR REPLACED UNIT, REPLACEMENT OF BATTERIES IN REMOTE CONTROL TRANSMITTERS AND LIGHT BULBS OR UNITS INSTALLED FOR NON-RESIDENTIAL USE. LIFTMASTER® SERVICE IS ON CALL OUR LARGE SERVICE ORGANIZATION SPANS AMERICA INSTALLATION AND SERVICE INFORMATION IS AS NEAR AS...


