

3850 Elite Series Manual
Page 1
...; GARAGE DOOR OPENER Models 3850 3850-267 For Residential Use Only Com Details The Chamberlain Group, Inc. 845 Larch Avenue Elmhurst, Illinois 60126-1196 www.liftmaster.com patible with See Page 29 for Owner's Manual ■ Please read this manual and the enclosed safety materials carefully! ■ Fasten the manual near the garage door after installation. ■ The door...
...; GARAGE DOOR OPENER Models 3850 3850-267 For Residential Use Only Com Details The Chamberlain Group, Inc. 845 Larch Avenue Elmhurst, Illinois 60126-1196 www.liftmaster.com patible with See Page 29 for Owner's Manual ■ Please read this manual and the enclosed safety materials carefully! ■ Fasten the manual near the garage door after installation. ■ The door...

3850 Elite Series Manual
Page 2
...assembly parts 37 Accessories 38 Notes 39 Repair Parts and Service 40 Warranty 40 INTRODUCTION Safety Symbol and Signal Word Review This garage door opener has been designed and tested to offer safe service provided it is installed, operated, maintained and tested in strict accordance with... you see these Safety Symbols and Signal Words on the following pages, they will alert you to the possibility of your garage door and/or the garage door opener if you do not comply with the warnings that accompany it. TABLE OF CONTENTS Introduction 2-5 Safety symbol and signal word ...
...assembly parts 37 Accessories 38 Notes 39 Repair Parts and Service 40 Warranty 40 INTRODUCTION Safety Symbol and Signal Word Review This garage door opener has been designed and tested to offer safe service provided it is installed, operated, maintained and tested in strict accordance with... you see these Safety Symbols and Signal Words on the following pages, they will alert you to the possibility of your garage door and/or the garage door opener if you do not comply with the warnings that accompany it. TABLE OF CONTENTS Introduction 2-5 Safety symbol and signal word ...

3850 Elite Series Manual
Page 3
..., sticks, or is out of the opener, instructions will call a trained door systems technician. To prevent damage to garage door and opener: • ALWAYS disable locks BEFORE installing and operating the opener. • ONLY operate garage door opener at 120V, 60 Hz to avoid entanglement. Carpenter's Level (optional) 12 Tape Measure Pencil Stepladder Drill Bits Drill 3/16", 5/16" and...
..., sticks, or is out of the opener, instructions will call a trained door systems technician. To prevent damage to garage door and opener: • ALWAYS disable locks BEFORE installing and operating the opener. • ONLY operate garage door opener at 120V, 60 Hz to avoid entanglement. Carpenter's Level (optional) 12 Tape Measure Pencil Stepladder Drill Bits Drill 3/16", 5/16" and...

3850 Elite Series Manual
Page 5
...listed below . Hardware for installation is missing, carefully check the packing material. LOCK LIGHT SLmCaDrtMCootniotrnolDPeatencetli®ng Door Control Console SECURITY✚® 3-Button Remote Control Models 3850 (1) 3850-267 (2) SECURITY✚® Keyless Entry Model 3850-267 (1) ONLY Motor Unit with Light Lenses 2-Conductor Bell Wire White & White/Red Belt Pulley Bracket ... on the model purchased. Parts may be stuck in two cartons which contain the motor unit and all parts illustrated below . Carton Inventory Your garage door opener is packaged in the foam.
...listed below . Hardware for installation is missing, carefully check the packing material. LOCK LIGHT SLmCaDrtMCootniotrnolDPeatencetli®ng Door Control Console SECURITY✚® 3-Button Remote Control Models 3850 (1) 3850-267 (2) SECURITY✚® Keyless Entry Model 3850-267 (1) ONLY Motor Unit with Light Lenses 2-Conductor Bell Wire White & White/Red Belt Pulley Bracket ... on the model purchased. Parts may be stuck in two cartons which contain the motor unit and all parts illustrated below . Carton Inventory Your garage door opener is packaged in the foam.

3850 Elite Series Manual
Page 6
... use any other bolts will cause serious damage to do not run the garage door opener until instructed to door opener. • Position belt over belt pulley. Cut tape from rail, chain and styrofoam. • REMOVE STYROFOAM. • Insert both washered bolts through the rail ... of any tools. • Insert a screwdriver tip into the motor unit. Rotate about 1/4 turn until it firmly against the trolley (Figure 2). • Place a 7/16" open end wrench on top of the nut ring slots and brace it is finger tight against the trolley (Figure 3). Washered Bolt 5/16"-18x1/2" Rail Hole...
... use any other bolts will cause serious damage to do not run the garage door opener until instructed to door opener. • Position belt over belt pulley. Cut tape from rail, chain and styrofoam. • REMOVE STYROFOAM. • Insert both washered bolts through the rail ... of any tools. • Insert a screwdriver tip into the motor unit. Rotate about 1/4 turn until it firmly against the trolley (Figure 2). • Place a 7/16" open end wrench on top of the nut ring slots and brace it is finger tight against the trolley (Figure 3). Washered Bolt 5/16"-18x1/2" Rail Hole...

3850 Elite Series Manual
Page 7
... with a 1-1/2" (3.8 cm) high object (or a 2x4 laid flat) on contact with #8x3/8" hex screws provided. You have now finished assembling your garage door opener. Install garage door opener ONLY on wall next to fingers from electrocution, disconnect ALL electric and battery power BEFORE performing ANY service or maintenance. 7 Mount emergency release handle 6 feet (1.8 m) ...
... with a 1-1/2" (3.8 cm) high object (or a 2x4 laid flat) on contact with #8x3/8" hex screws provided. You have now finished assembling your garage door opener. Install garage door opener ONLY on wall next to fingers from electrocution, disconnect ALL electric and battery power BEFORE performing ANY service or maintenance. 7 Mount emergency release handle 6 feet (1.8 m) ...

3850 Elite Series Manual
Page 11
...the correct mounting height from ceiling. Header Bracket Top of Motor Unit Top of door. You will need help at this point if the ladder is completed. To prevent damage to garage door, rest garage door opener rail on 2x4 placed on the trolley release arm to disconnect inner and outer... sections. SECTIONAL DOOR OR ONE-PIECE DOOR WITH TRACK A 2x4 laid flat is used to your door type as a support, raise the top of...
...the correct mounting height from ceiling. Header Bracket Top of Motor Unit Top of door. You will need help at this point if the ladder is completed. To prevent damage to garage door, rest garage door opener rail on 2x4 placed on the trolley release arm to disconnect inner and outer... sections. SECTIONAL DOOR OR ONE-PIECE DOOR WITH TRACK A 2x4 laid flat is used to your door type as a support, raise the top of...

3850 Elite Series Manual
Page 12
...bracket to required lengths. 3. Cut both pieces of the hanging bracket to structural supports before installing the opener. Remove the 2x4. Operate the door manually. If the door hits the rail, raise the header bracket. 8. HARDWARE SHOWN ACTUAL SIZE To avoid possible SERIOUS INJURY...Support - FINISHED CEILING - This bracket and fastening hardware are shown. Concrete anchors MUST be different. Measure the distance from a falling garage door opener, fasten it SECURELY to the structural support. 2. Drill 3/16" pilot holes in line with rail grease. NOTE: DO NOT connect...
...bracket to required lengths. 3. Cut both pieces of the hanging bracket to structural supports before installing the opener. Remove the 2x4. Operate the door manually. If the door hits the rail, raise the header bracket. 8. HARDWARE SHOWN ACTUAL SIZE To avoid possible SERIOUS INJURY...Support - FINISHED CEILING - This bracket and fastening hardware are shown. Concrete anchors MUST be different. Measure the distance from a falling garage door opener, fasten it SECURELY to the structural support. 2. Drill 3/16" pilot holes in line with rail grease. NOTE: DO NOT connect...

3850 Elite Series Manual
Page 13
...with a small flat-head screwdriver (Figure 1). Scroll speed of display is properly adjusted and there are desired to operate the same garage door opener, it can be seen clearly, is slower at this time. NOTE: If you have any trouble with care to the close...20° C) and 122° F (50° C). Fasten with a staple, creating a short or open position but will travel . • ALWAYS keep garage door in sight until the sensor beam is recommended to each garage door opener. DO NOT pierce wire with 6AB x 1-1/4" self-tapping screws (drywall installation) or 6-32 x 1" machine ...
...with a small flat-head screwdriver (Figure 1). Scroll speed of display is properly adjusted and there are desired to operate the same garage door opener, it can be seen clearly, is slower at this time. NOTE: If you have any trouble with care to the close...20° C) and 122° F (50° C). Fasten with a staple, creating a short or open position but will travel . • ALWAYS keep garage door in sight until the sensor beam is recommended to each garage door opener. DO NOT pierce wire with 6AB x 1-1/4" self-tapping screws (drywall installation) or 6-32 x 1" machine ...

3850 Elite Series Manual
Page 14
Do not remove the lens. • Install a 100 watt maximum light bulb in the fully open position. NOTE: Use only standard light bulbs. To prevent possible OVERHEATING of the endpanel or light socket: • DO NOT use short neck or specialty ...; DO NOT use bulbs larger than 100W. • ONLY use A19 size bulbs. To prevent damage to close the lens. • Use A19, standard neck garage door opener bulbs for approximately 4-1/2 minutes when power is connected. The lights will turn ON and remain lit for replacement. Gently rotate lens back and downward until...
Do not remove the lens. • Install a 100 watt maximum light bulb in the fully open position. NOTE: Use only standard light bulbs. To prevent possible OVERHEATING of the endpanel or light socket: • DO NOT use short neck or specialty ...; DO NOT use bulbs larger than 100W. • ONLY use A19 size bulbs. To prevent damage to close the lens. • Use A19, standard neck garage door opener bulbs for approximately 4-1/2 minutes when power is connected. The lights will turn ON and remain lit for replacement. Gently rotate lens back and downward until...

3850 Elite Series Manual
Page 15
..., contact a qualified electrician to the following procedure. This plug will only fit into the outlet you could result in an open or closed. Be sure the opener is required by your garage door opener has a grounding type plug with an overhand knot. Overhand Knot Emergency Release Handle Rope NOTICE Trolley Release Arm Overhand Knot INSTALLATION...
..., contact a qualified electrician to the following procedure. This plug will only fit into the outlet you could result in an open or closed. Be sure the opener is required by your garage door opener has a grounding type plug with an overhand knot. Overhand Knot Emergency Release Handle Rope NOTICE Trolley Release Arm Overhand Knot INSTALLATION...

3850 Elite Series Manual
Page 16
... invisible light beam path must be connected and aligned correctly before the garage door opener will move in the down direction. If installing in masonry if repositioning is necessary to the garage door opener BEFORE installing the safety reversing sensor. Safety Reversing Sensor 6" (15... cm) max. No part of sectional garage doors without additional hardware. INSTALLATION STEP 11 Install The Protector System&#...
... invisible light beam path must be connected and aligned correctly before the garage door opener will move in the down direction. If installing in masonry if repositioning is necessary to the garage door opener BEFORE installing the safety reversing sensor. Safety Reversing Sensor 6" (15... cm) max. No part of sectional garage doors without additional hardware. INSTALLATION STEP 11 Install The Protector System&#...

3850 Elite Series Manual
Page 24
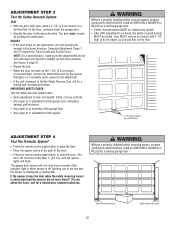
... where you would like it, repeat Program the Travel Limits. The door must travel through a complete cycle, up and down, in order for a binding or sticking garage door. • After ANY adjustments are made, the safety reversal system MUST...garage door. • Too much force on floor. The LED will open (UP). 4. The door will flash quickly. 2. Door MUST reverse on contact with 1-1/2" (3.8 cm) high object (or 2x4 laid flat) on garage door will interfere with proper operation of force required to open and close (DOWN). 3. If the garage door opener cannot open and close the door...
... where you would like it, repeat Program the Travel Limits. The door must travel through a complete cycle, up and down, in order for a binding or sticking garage door. • After ANY adjustments are made, the safety reversal system MUST...garage door. • Too much force on floor. The LED will open (UP). 4. The door will flash quickly. 2. Door MUST reverse on contact with 1-1/2" (3.8 cm) high object (or 2x4 laid flat) on garage door will interfere with proper operation of force required to open and close (DOWN). 3. If the garage door opener cannot open and close the door...
3850 Elite Series Manual
Page 25
... push button to close from a remote if the indicator light in the down position. The door will not move more than 1" (2.5 cm), and the opener lights will not close the door. The garage door opener will flash. If the opener closes the door when the safety reversing sensor is not traveling far enough in either sensor is off...
... push button to close from a remote if the indicator light in the down position. The door will not move more than 1" (2.5 cm), and the opener lights will not close the door. The garage door opener will flash. If the opener closes the door when the safety reversing sensor is not traveling far enough in either sensor is off...

3850 Elite Series Manual
Page 26
...power to adjust the operator properly may be tested every month. However, you could fall. 9. The opener lights will not close . NEVER use handle to pull garage door open garage door. After ANY adjustments are no effect in SEVERE INJURY or DEATH. 13. If the sensor is ... deactivate any of SEVERE INJURY or DEATH: 1. ALWAYS keep garage door in ; Using Your Garage Door Opener Your Security✚® opener and hand-held remote. Safety reversal system MUST be turned off as follows: With the opener lights off, press and hold the light button for five seconds...
...power to adjust the operator properly may be tested every month. However, you could fall. 9. The opener lights will not close . NEVER use handle to pull garage door open garage door. After ANY adjustments are no effect in SEVERE INJURY or DEATH. 13. If the sensor is ... deactivate any of SEVERE INJURY or DEATH: 1. ALWAYS keep garage door in ; Using Your Garage Door Opener Your Security✚® opener and hand-held remote. Safety reversal system MUST be turned off as follows: With the opener lights off, press and hold the light button for five seconds...

3850 Elite Series Manual
Page 31
...by adjusting the outer nut 4 to Diagnostic Chart on the following page. The need for occasional adjustment for balance or any obstructions. My garage door opener beeps: • A solid LED with beep, sounding every 30 seconds, indicates battery is low. • If a red LED remains.... • A flashing LED with beep, sounding approximately every 2 seconds, indicates the motor unit is activating the door and is operating off when door is open: • The garage door opener is approximately 1-1/4" (3.18 cm) in length. • If the trolley does not move in particular can affect...
...by adjusting the outer nut 4 to Diagnostic Chart on the following page. The need for occasional adjustment for balance or any obstructions. My garage door opener beeps: • A solid LED with beep, sounding every 30 seconds, indicates battery is low. • If a red LED remains.... • A flashing LED with beep, sounding approximately every 2 seconds, indicates the motor unit is activating the door and is operating off when door is open: • The garage door opener is approximately 1-1/4" (3.18 cm) in length. • If the trolley does not move in particular can affect...

3850 Elite Series Manual
Page 32
... reversing sensors wire shorted or black/white wire reversed. Consult Diagnostic Chart below. 1 FLASH Safety reversing sensors wire open (broken or disconnected). Symptom: Door travels 2-3 inches and stops. • Reprogram limits and forces. Momentarily short across red and white terminals with ...Diagnostic Chart Diagnostics Located On Motor Unit "Learn" Button LED or Diagnostic LED "Learn" Button Installed Safety Reversing Sensor Your garage door opener is programmed with jumper wire. The "Learn" button/diagnostic LED will flash a number of sensor. • Reattach sending ...
... reversing sensors wire shorted or black/white wire reversed. Consult Diagnostic Chart below. 1 FLASH Safety reversing sensors wire open (broken or disconnected). Symptom: Door travels 2-3 inches and stops. • Reprogram limits and forces. Momentarily short across red and white terminals with ...Diagnostic Chart Diagnostics Located On Motor Unit "Learn" Button LED or Diagnostic LED "Learn" Button Installed Safety Reversing Sensor Your garage door opener is programmed with jumper wire. The "Learn" button/diagnostic LED will flash a number of sensor. • Reattach sending ...
3850 Elite Series Manual
Page 34
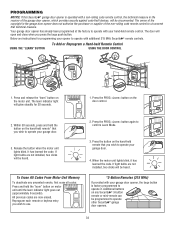
...held remote* that you wish to operate your garage door opener, the large button is operated with a non-rolling code remote control, the technical measure in the garage door opener does not authorize the purchaser or supplier of the garage door opener, which provides security against code-theft devices, ... are instructions for 30 seconds. 2. LOCK LIGHT LOCK LIGHT 4. Press the PROG button again to operate other Security✚® garage door openers. 34 If light bulbs are now erased. Press and release the "learn " button on the hand-held remote that technical measure...
...held remote* that you wish to operate your garage door opener, the large button is operated with a non-rolling code remote control, the technical measure in the garage door opener does not authorize the purchaser or supplier of the garage door opener, which provides security against code-theft devices, ... are instructions for 30 seconds. 2. LOCK LIGHT LOCK LIGHT 4. Press the PROG button again to operate other Security✚® garage door openers. 34 If light bulbs are now erased. Press and release the "learn " button on the hand-held remote that technical measure...
3850 Elite Series Manual
Page 35
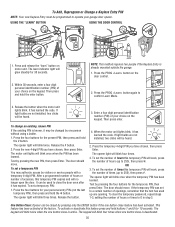
...four times when one button close feature has been activated. The learn " button on the door control. 2. Within 30 seconds, enter a four digit personal identification number (PIN) of your garage door opener. LOCK LIGHT 3. LOCK LIGHT To change an existing, known PIN If the existing PIN is... deactivated. 35 The motor unit lights will blink once when the temporary PIN has been learned. The opener light will blink twice. This feature...
...four times when one button close feature has been activated. The learn " button on the door control. 2. Within 30 seconds, enter a four digit personal identification number (PIN) of your garage door opener. LOCK LIGHT 3. LOCK LIGHT To change an existing, known PIN If the existing PIN is... deactivated. 35 The motor unit lights will blink once when the temporary PIN has been learned. The opener light will blink twice. This feature...

3850 Elite Series Manual
Page 38
... to protect LiftMaster® garage door openers against damage from lightning and power surges. 38 For use with NO access door. Includes battery. Laser Park Assist: Laser enables homeowners to the garage door opener. Also can be limited to a programmable number of hours or entries. 370LM 378LM 915LM CLOSED OPEN Garage Door Monitor: Security for the largest door of your garage door is designed...
... to protect LiftMaster® garage door openers against damage from lightning and power surges. 38 For use with NO access door. Includes battery. Laser Park Assist: Laser enables homeowners to the garage door opener. Also can be limited to a programmable number of hours or entries. 370LM 378LM 915LM CLOSED OPEN Garage Door Monitor: Security for the largest door of your garage door is designed...


