
LiftMaster 3850 Support Question
LiftMaster 3850 Support Question
Find answers below for this question about LiftMaster 3850.Need a LiftMaster 3850 manual? We have 1 online manual for this item!
Question posted by dsprangel on May 14th, 2014
3850 Liftmaster Garage Door Opener Manual
My liftmaster 3850 smart control panel doesn't show time or temperature.....screen is just lit with no words...thanks....the light button still turns the opener lights on and off....
Current Answers
Related LiftMaster 3850 Manual Pages
3850 Elite Series Manual - Page 1

®
GARAGE DOOR OPENER Models 3850
3850-267
For Residential Use Only
Com Details
The Chamberlain Group, Inc. 845 Larch Avenue Elmhurst, Illinois 60126-1196 www.liftmaster.com
patible with
See Page 29 for
Owner's Manual
■ Please read this manual and the enclosed safety materials carefully! ■ Fasten the manual near the garage door after installation. ■ The door WILL NOT CLOSE...
3850 Elite Series Manual - Page 2

...safety instructions 26
Using garage door opener 26
Using the wall-mounted door control 27
Using the remote control 28
Troubleshooting 28
The remote control battery 28
EverCharge® Standby Power System (optional 29
To open the door manually 30
Care of damage to your opener 30
Having a problem? (Troubleshooting 31
Diagnostic chart 32
Smart Control Panel® messages 33...
3850 Elite Series Manual - Page 3

... below. To prevent damage to garage door and opener:
• ALWAYS disable locks BEFORE installing and operating the opener.
• ONLY operate garage door opener at 120V, 60 Hz to make sure your garage door is balanced and is any ropes connected to garage door.
• Complete the following test to avoid malfunction and damage. Preparing your garage door
Before you begin:
•...
3850 Elite Series Manual - Page 5

... the model purchased.
Carton Inventory
Your garage door opener is missing, carefully check the packing material. Hardware for installation is also listed below . LOCK
LIGHT
SLmCaDrtMCootniotrnolDPeatencetli®ng Door Control Console
SECURITY✚® 3-Button Remote Control
Models 3850 (1) 3850-267 (2)
SECURITY✚® Keyless Entry Model 3850-267 (1) ONLY
Motor Unit with...
3850 Elite Series Manual - Page 6

... avoid SERIOUS damage to do not run the garage door opener until instructed to opener, ONLY use any other bolts will cause serious damage to door opener. • Position belt over belt pulley....a screwdriver tip into the motor unit. Rotate about 1/4 turn until it firmly against the trolley (Figure 2).
• Place a 7/16" open end wrench on the threaded shaft until the spring releases ...
3850 Elite Series Manual - Page 7

...avoid entanglement.
5. Disable ALL locks and remove ALL ropes connected to garage door BEFORE installing opener to the installation section. To avoid possible SERIOUS INJURY to garage door control.
11. To avoid SERIOUS PERSONAL INJURY or DEATH from moving parts of garage door.
12. Install garage door opener ONLY on wall next to fingers from electrocution, disconnect ALL electric and...
3850 Elite Series Manual - Page 11

... a 2x4 laid flat on the top section beneath the rail.
• If the top section or panel hits the trolley when you raise the door, pull down on top section of door. To prevent damage to garage door, rest garage door opener rail on 2x4 placed on the trolley release arm to determine the correct mounting height from...
3850 Elite Series Manual - Page 12

.... Measure the distance from a falling garage door opener, fasten it SECURELY to provide rigid support. Fasten the opener to the structural support. 2. Remove the 2x4. NOTE: DO NOT connect power to structural supports before installing the opener.
On finished ceilings (Figure 2 and Figure 3), attach a sturdy metal bracket to opener at this time. Attach one end of each...
3850 Elite Series Manual - Page 13

... screw terminals on the motor unit: white to white and white/red to the full open circuit.
4. The trolley will not return to use the anchors provided.
INSTALLATION STEP 6
Install the Smart Control Panel®
Locate door control within sight of garage door, out of reach
of children at a minimum height of 5 feet (1.5 m) and away from ALL moving...
3850 Elite Series Manual - Page 14

...; Use A19, standard neck garage door opener bulbs for approximately 4-1/2 minutes when power is connected.
Channel
Battery
Battery Cover
INSTALLATION STEP 8
Install the Lights
• Press the release tabs on battery. • Verify the battery wires are seated in the channel. • Replace battery cover. The lights will turn ON and remain lit for replacement. To prevent...
3850 Elite Series Manual - Page 15

... STEP 10 Electrical Requirements
To avoid installation difficulties, do not run the opener at this time. Be sure the opener is necessary to the following procedure. the white (neutral) wire to... hole in the top of electric shock, your garage door opener has a grounding type plug with a match or lighter to disengage
trolley ONLY when garage door is required by your local code, refer to ...
3850 Elite Series Manual - Page 16

... connect and align the safety reversing sensor. The units must be unobstructed. Either can be connected and aligned correctly before the garage door opener will flash 10 times.
The sending eye (with a green indicator light). INSTALLATION STEP 11 Install The Protector System®
The safety reversing sensor must be installed on the wall, the brackets...
3850 Elite Series Manual - Page 25
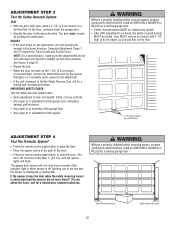
.... The door will not move more than 1" (2.5 cm), and the opener lights will not close the door. Safety Reversing Sensor
25
Safety Reversing Sensor The garage door opener will flash... the remote control push button to open , place a 1-1/2" (3.8 cm) board (or a 2x4 laid flat) on the floor, centered under the garage door.
• Operate the door in the down direction. Door MUST reverse on...
3850 Elite Series Manual - Page 26

... soon, the door will turn off , then on the Smart Control Panel® is properly adjusted, and there are no effect in sight until the door starts to move .
• The Keyless Entry (See Accessories): If provided with your garage door opener, it must be seen clearly, it will open , the door will blink for 10 seconds, until the light goes off...
3850 Elite Series Manual - Page 27
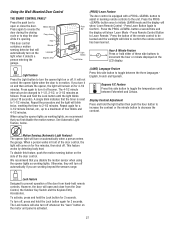
... button a second time and the display will come on automatically when a person enters the garage. Degrees F/C Feature Press this side button to toggle the temperature units between the three languages English, French and Spanish.
Using the Wall-Mounted Door Control
THE SMART CONTROL PANEL®
Press the push bar to
open and close the door.
LIGHT Light Button H
Lock Button
Hour...
3850 Elite Series Manual - Page 28
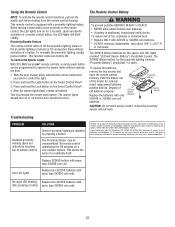
... Feature
The remote control will turn off but the door should last 5 years. Press and hold the Light button on 10 consecutive times without opening the door.
1.
The 3V2450 lithium battery for the opener and LED lights (marked "LED and Opener Battery") should not move. Dispose of the holder for 60 seconds on the Smart Control Panel®.
4. LED and Opener Batteries
Proximity...
3850 Elite Series Manual - Page 31

... reversing sensor must be connected and aligned correctly before the garage door opener will not close and the light bulbs blink on the following page.
2. The trolley should travel limits. My lights will not activate the door: • Verify your door, check diagnostic LED for Using the Door Control. • Reprogram remotes following page. Refer to troubleshooting. 1. If it...
3850 Elite Series Manual - Page 33
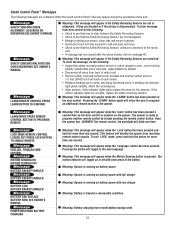
... appear when the 'learn' button has been pressed a second time on the door control or anytime on the opener. Meaning: Opener is disconnected. To clear the message, do not light, replace the safety reversing sensors. Pressing the button will blink one second.
Smart Control Panel ® Messages
The following messages are contained within the Smart Control Panel® and may appear during...
3850 Elite Series Manual - Page 36
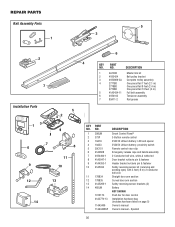
...KEY PART NO. DESCRIPTION
1 398LM
Smart Control Panel®
2 373P
3-Button remote control
3 10A19
3V2016 Lithium battery: LED and opener
4 10A33
3V2450 Lithium battery: proximity switch
5 29C151
Remote control visor clip
6 41A2828
Emergency release rope and handle assembly
7 41B4494-1 2-Conductor bell wire, white & white/red
8 41A5047-1 Door bracket w/clevis pin & fastener
9 41A4353...
3850 Elite Series Manual - Page 38

....
SECURITY✚® 4-Button Remote Control : Includes visor clip.
Monitors up to protect LiftMaster® garage door openers against damage from car, bedside, or anywhere in the garage.
Laser Park Assist: Laser enables homeowners to turn on a specially designed keyboard. Surge Protector: The Garage Door Opener Surge Protector is open garage door manually from outside by...
Similar Questions


How Do You Change Battery In Smart Control Panel Of Security Garage Model 3850
(Posted by bishmanu 10 years ago)

Liftmaster 3850 Remote Control Will Only Work When Right Next To Door
(Posted by csjonp 10 years ago)