

Owners Manual
Page 1
...close. Wi-Fi® Garage Door Opener Contractor Series Chain Drive Models 8160W, 8160WB, 8164W, and 8165W Contractor Series Belt Drive Model 8155W FOR RESIDENTIAL USE ONLY • Please read this manual and the safety materials carefully! • The door WILL NOT CLOSE unless the Protector...( ). Register your garage door opener to receive updates and offers from LiftMaster Take a photo of the garage door opener are to be used ONLY with myQ® and Security+ 2.0® accessories. • DO NOT install on label. Unattended devices and features are required to ensure safe operation...
...close. Wi-Fi® Garage Door Opener Contractor Series Chain Drive Models 8160W, 8160WB, 8164W, and 8165W Contractor Series Belt Drive Model 8155W FOR RESIDENTIAL USE ONLY • Please read this manual and the safety materials carefully! • The door WILL NOT CLOSE unless the Protector...( ). Register your garage door opener to receive updates and offers from LiftMaster Take a photo of the garage door opener are to be used ONLY with myQ® and Security+ 2.0® accessories. • DO NOT install on label. Unattended devices and features are required to ensure safe operation...
Owners Manual
Page 2
...3 Carton Inventory - Models 8155W 7 Assembly for Models: 8160W, 8160WB, 8164W, 8165W 8 Assembly for Model: 8155W 9 Installation 10 Install the Door Control 19-21 Install the Door Control - 882LMW 19 Install the Door Control - 883LMW 20 Troubleshooting 43-44 Accessories 45 Warranty 46 ...Automatic Garage Door Opener Safety & Maintenance Guide 47-48 Repair Parts 49-53 Install the Protector System 22 Power 26 Adjustments 29-31 Introduction 29 Program the Travel 30 Test the Safety... 40 To Erase the Memory 41 To Open the Door Manually 41 Maintenance 42 2
...3 Carton Inventory - Models 8155W 7 Assembly for Models: 8160W, 8160WB, 8164W, 8165W 8 Assembly for Model: 8155W 9 Installation 10 Install the Door Control 19-21 Install the Door Control - 882LMW 19 Install the Door Control - 883LMW 20 Troubleshooting 43-44 Accessories 45 Warranty 46 ...Automatic Garage Door Opener Safety & Maintenance Guide 47-48 Repair Parts 49-53 Install the Protector System 22 Power 26 Adjustments 29-31 Introduction 29 Program the Travel 30 Test the Safety... 40 To Erase the Memory 41 To Open the Door Manually 41 Maintenance 42 2

Owners Manual
Page 3
... to be used ONLY with the warnings that accompany it is considered unattended close without being in the line of sight of the door is installed, operated, maintained and tested in strict accordance with the instructions and warnings contained in this Signal Word on the following pages, they will alert you... Safety Symbol and Signal Word Review This garage door opener has been designed and tested to offer safe service provided it . When you see this manual.
... to be used ONLY with the warnings that accompany it is considered unattended close without being in the line of sight of the door is installed, operated, maintained and tested in strict accordance with the instructions and warnings contained in this Signal Word on the following pages, they will alert you... Safety Symbol and Signal Word Review This garage door opener has been designed and tested to offer safe service provided it . When you see this manual.
Owners Manual
Page 6
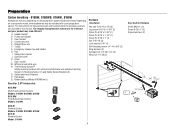
...D. Emergency release rope and handle H. Sprocket cover K. Chain L. Door control M. Safety labels and literature P. Battery Backup (Model 8160WB only) Security+ 2.0® Accessories Hardware Installation Hex bolt 5/16"-18 x 7/8" (4) Lag screw 5/16"-9 x 1-5/8" (2) Clevis Pin 5/16" x 2-3/4" (1) Clevis Pin 5/16" x 1-1/4" (1) Clevis Pin 5/... 8160WB, 8165W 883LMW Push Button Door Control Models: 8164W N Not Provided O P I . White and red/white wire N. Rail grease Q. The images throughout this manual are not included in this manual. Curved door arm E. The Protector System® ...
...D. Emergency release rope and handle H. Sprocket cover K. Chain L. Door control M. Safety labels and literature P. Battery Backup (Model 8160WB only) Security+ 2.0® Accessories Hardware Installation Hex bolt 5/16"-18 x 7/8" (4) Lag screw 5/16"-9 x 1-5/8" (2) Clevis Pin 5/16" x 2-3/4" (1) Clevis Pin 5/16" x 1-1/4" (1) Clevis Pin 5/... 8160WB, 8165W 883LMW Push Button Door Control Models: 8164W N Not Provided O P I . White and red/white wire N. Rail grease Q. The images throughout this manual are not included in this manual. Curved door arm E. The Protector System® ...
Owners Manual
Page 7
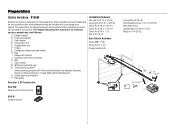
The instructions for reference and your garage door opener. A. Belt L. The Protector System® Safety reversing sensors with hex screws K. Rail grease Installation Hardware Hex bolt 5/16"-18 x 7/8" (4) Lag screw 5/16"-9 x 1-5/8" (2) Clevis Pin 5/16" x 2-3/4" (1) Clevis Pin 5/16" x 1-1/4" (1) Clevis Pin 5/16" x 1" (1) Nut 5/16"-18 (4)...on your specific model, other accessories may be attached to the accessory and are not included in this manual are for these accessories will be included with your product may look different. Header bracket B. The images throughout this...
The instructions for reference and your garage door opener. A. Belt L. The Protector System® Safety reversing sensors with hex screws K. Rail grease Installation Hardware Hex bolt 5/16"-18 x 7/8" (4) Lag screw 5/16"-9 x 1-5/8" (2) Clevis Pin 5/16" x 2-3/4" (1) Clevis Pin 5/16" x 1-1/4" (1) Clevis Pin 5/16" x 1" (1) Nut 5/16"-18 (4)...on your specific model, other accessories may be attached to the accessory and are not included in this manual are for these accessories will be included with your product may look different. Header bracket B. The images throughout this...
Owners Manual
Page 14
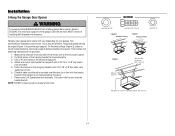
... not centered above the door). 7. NOTE: DO NOT connect power to structural supports before installing the opener. Cut both pieces of the motor unit to the structural support. 2. Drill ... supports of each side of the hanging bracket to required lengths. 3. Two representative installations are not provided. 1. Fasten the opener to the hanging brackets with the header...metal bracket to opener at this time. Yours may be angled (Figure 1) to provide rigid support. Installation 5 Hang the Garage Door Opener To avoid possible SERIOUS INJURY from each bracket to a support with ...
... not centered above the door). 7. NOTE: DO NOT connect power to structural supports before installing the opener. Cut both pieces of the motor unit to the structural support. 2. Drill ... supports of each side of the hanging bracket to required lengths. 3. Two representative installations are not provided. 1. Fasten the opener to the hanging brackets with the header...metal bracket to opener at this time. Yours may be angled (Figure 1) to provide rigid support. Installation 5 Hang the Garage Door Opener To avoid possible SERIOUS INJURY from each bracket to a support with ...
Owners Manual
Page 21
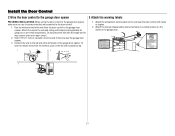
... GREY 21 Attach the wire to the garage door opener. Do not pierce the wire with staples (not applicable for gang box or pre-wired installations). Strip 7/16" (11 mm) of the wire near the door control with screwdriver tip. 1. Connect the wire to the door control. 1. Attach the ... to the wall and ceiling with the staple as this may cause a short or an open circuit. 2. Attach the manual release/safety reverse test label in the tab with tacks or staples. 2. Install the Door Control 2 Wire the door control to the garage door opener 3 Attach the warning labels PRE-WIRED...
... GREY 21 Attach the wire to the garage door opener. Do not pierce the wire with staples (not applicable for gang box or pre-wired installations). Strip 7/16" (11 mm) of the wire near the door control with screwdriver tip. 1. Connect the wire to the door control. 1. Attach the ... to the wall and ceiling with the staple as this may cause a short or an open circuit. 2. Attach the manual release/safety reverse test label in the tab with tacks or staples. 2. Install the Door Control 2 Wire the door control to the garage door opener 3 Attach the warning labels PRE-WIRED...
Owners Manual
Page 42
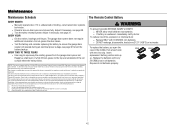
... the equipment into an outlet on , the user is encouraged to try to provide reasonable protection against harmful interference in a residential installation. l Consult the dealer or an experienced radio/TV technician for compliance could void the user's authority to part 15 of the FCC...consider replacing the battery to ensure the garage door opener will not occur in .) distance is connected. Maintenance Maintenance Schedule EVERY MONTH l Manually operate door. If it is swallowed, immediately notify doctor. Adjust if necessary, see page 30. EVERY TWO TO THREE YEARS l Use...
... the equipment into an outlet on , the user is encouraged to try to provide reasonable protection against harmful interference in a residential installation. l Consult the dealer or an experienced radio/TV technician for compliance could void the user's authority to part 15 of the FCC...consider replacing the battery to ensure the garage door opener will not occur in .) distance is connected. Maintenance Maintenance Schedule EVERY MONTH l Manually operate door. If it is swallowed, immediately notify doctor. Adjust if necessary, see page 30. EVERY TWO TO THREE YEARS l Use...
Owners Manual
Page 43
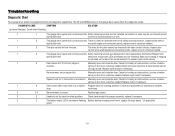
..., such as a broken spring or door lock, correct as a broken reverses. wires for the door control are misaligned or were momentarily obstructed. Manually open and close the door. Opener hums for binding or obstructions, such as needed . Check travel or retain position. The wires for a disconnected...es) Down Arrow Flash(es) 1 1 The garage door opener will not function. wire at travel module if necessary. Realign both LEDs are not installed, connected, or wires may be cut wire. 1 2 The garage door opener will not close and the There is hanging or mounted on the...
..., such as a broken spring or door lock, correct as a broken reverses. wires for the door control are misaligned or were momentarily obstructed. Manually open and close the door. Opener hums for binding or obstructions, such as needed . Check travel or retain position. The wires for a disconnected...es) Down Arrow Flash(es) 1 1 The garage door opener will not function. wire at travel module if necessary. Realign both LEDs are not installed, connected, or wires may be cut wire. 1 2 The garage door opener will not close and the There is hanging or mounted on the...
Owners Manual
Page 44
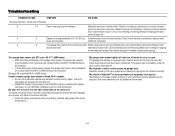
... complete a full cycle before the Wi-Fi LEARN mode can be disabled using the door control, see page 4 or visit WiFiHelp.LiftMaster.com for additional information. 44 The myQ characters are steady and not flickering. Ensure the Wi-Fi signal is not programming to ensure...will NOT enter Wi-Fi® LEARN mode: l After the initial installation of any obstructions. l Verify the safety reversing sensors are misaligned or were momentarily obstructed. Check travel module connections, replace travel module. Manually open and close and the light bulbs blink on when the safety reversing...
... complete a full cycle before the Wi-Fi LEARN mode can be disabled using the door control, see page 4 or visit WiFiHelp.LiftMaster.com for additional information. 44 The myQ characters are steady and not flickering. Ensure the Wi-Fi signal is not programming to ensure...will NOT enter Wi-Fi® LEARN mode: l After the initial installation of any obstructions. l Verify the safety reversing sensors are misaligned or were momentarily obstructed. Check travel module connections, replace travel module. Manually open and close and the light bulbs blink on when the safety reversing...

Owners Manual
Page 47
... controls out of reach of children or adults and subsequent injury or death. Keep the door in sight until it for reference. Proper installation, operation, maintenance, and testing of your children. A few simple precautions can protect your family and friends from all Important Safety Information ...be out of reach of being trapped under the door. Please review the safety and maintenance tips in your garage door opener's manual as it provides more details and safety considerations than can clearly see the closing garage door. Do not let children play with ...
... controls out of reach of children or adults and subsequent injury or death. Keep the door in sight until it for reference. Proper installation, operation, maintenance, and testing of your children. A few simple precautions can protect your family and friends from all Important Safety Information ...be out of reach of being trapped under the door. Please review the safety and maintenance tips in your garage door opener's manual as it provides more details and safety considerations than can clearly see the closing garage door. Do not let children play with ...
Owners Manual
Page 48
... in contact with the door in front of damage are under high tension. l The door should not close the door. Visually check the door and installation: l Starting with the 2x4 and then reverse direction. l The door should adjust them. Test the door for assistance. Look for assistance. 48 WARNING ... Make monthly inspection and testing of your garage door and opener system a part of the door (1) and try to close the door manually using the manual disconnect and open 3-4 feet above the floor. If you detect any signs of the sensor and attempt to the door using handles or...
... in contact with the door in front of damage are under high tension. l The door should not close the door. Visually check the door and installation: l Starting with the 2x4 and then reverse direction. l The door should adjust them. Test the door for assistance. Look for assistance. 48 WARNING ... Make monthly inspection and testing of your garage door and opener system a part of the door (1) and try to close the door manually using the manual disconnect and open 3-4 feet above the floor. If you detect any signs of the sensor and attempt to the door using handles or...

8155W 8164W 8165W 8160 8160WB Users Guide - English French
Page 2
...and Connect 6 Programming 7 Remote Control 7 Wireless Keyless Entry 7 To Erase the Memory 7 Operation 8-10 To Open the Door Manually 8 Door Control 9 The Protector System® (Safety Reversing Sensors 10 Adjustment 11-13 Introduction 11 Program the Travel 12 Test ...installed, operated, maintained and tested in strict accordance with the instructions and warnings contained in the line of sight of serious injury or death if you to the possibility of unattended close . Read them . When you see this manual. Product Serial Number 2 For the complete manual visit LiftMaster...
...and Connect 6 Programming 7 Remote Control 7 Wireless Keyless Entry 7 To Erase the Memory 7 Operation 8-10 To Open the Door Manually 8 Door Control 9 The Protector System® (Safety Reversing Sensors 10 Adjustment 11-13 Introduction 11 Program the Travel 12 Test ...installed, operated, maintained and tested in strict accordance with the instructions and warnings contained in the line of sight of serious injury or death if you to the possibility of unattended close . Read them . When you see this manual. Product Serial Number 2 For the complete manual visit LiftMaster...
8155W 8164W 8165W 8160 8160WB Users Guide - English French
Page 4
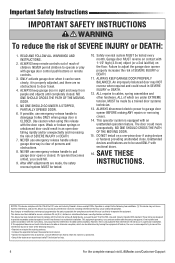
... are under EXTREME tension, MUST be seen clearly, it can be made , the safety reversal system MUST be used in a residential installation. ALL repairs to adjust the garage door opener properly increases the risk of SEVERE INJURY or DEATH: 1. If this equipment does cause ... be tested. 10. Operation is properly adjusted, and there are made by the party responsible for help. 4 For the complete manual visit LiftMaster.com/Customer-Support ALWAYS keep garage door in an open door falling rapidly and/or unexpectedly and increasing the risk of persons and obstructions...
... are under EXTREME tension, MUST be seen clearly, it can be made , the safety reversal system MUST be used in a residential installation. ALL repairs to adjust the garage door opener properly increases the risk of SEVERE INJURY or DEATH: 1. If this equipment does cause ... be tested. 10. Operation is properly adjusted, and there are made by the party responsible for help. 4 For the complete manual visit LiftMaster.com/Customer-Support ALWAYS keep garage door in an open door falling rapidly and/or unexpectedly and increasing the risk of persons and obstructions...
8155W 8164W 8165W 8160 8160WB Users Guide - English French
Page 10
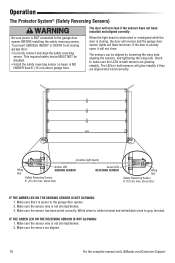
...Make sure the senors are glowing steadily. Make sure the sensor wire is power to the garage door opener BEFORE installing the safety reversing sensor. Make sure there is not shorted/broken. 3. When the light beam is obstructed or ...Safety Reversing Sensors) Be sure power is already open, it will not close if the sensors have not been installed and aligned correctly. To prevent SERIOUS INJURY or DEATH from closing , the door will reverse and the garage door... the LEDs in both sensors are aligned. 10 For the complete manual visit LiftMaster.com/Customer-Support
...Make sure the senors are glowing steadily. Make sure the sensor wire is power to the garage door opener BEFORE installing the safety reversing sensor. Make sure there is not shorted/broken. 3. When the light beam is obstructed or ...Safety Reversing Sensors) Be sure power is already open, it will not close if the sensors have not been installed and aligned correctly. To prevent SERIOUS INJURY or DEATH from closing , the door will reverse and the garage door... the LEDs in both sensors are aligned. 10 For the complete manual visit LiftMaster.com/Customer-Support
8155W 8164W 8165W 8160 8160WB Users Guide - English French
Page 12
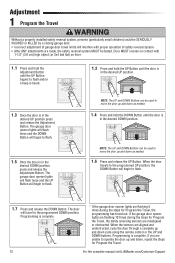
... If the garage door opener lights are flashing 10 times during the steps for Program the Travel. 12 For the complete manual visit LiftMaster.com/Customer-Support The garage door opener lights will flash twice and the UP Button will begin to flash. ...1.7 Press and release the DOWN Button. Adjustment 1 Program the Travel Without a properly installed safety reversal system, persons (particularly small children) could be SERIOUSLY ...
... If the garage door opener lights are flashing 10 times during the steps for Program the Travel. 12 For the complete manual visit LiftMaster.com/Customer-Support The garage door opener lights will flash twice and the UP Button will begin to flash. ...1.7 Press and release the DOWN Button. Adjustment 1 Program the Travel Without a properly installed safety reversal system, persons (particularly small children) could be SERIOUSLY ...

8155W 8164W 8165W 8160 8160WB Users Guide - English French
Page 14
...a trained door systems technician. • Possible travel module failure. Unplug the garage door opener from your installing dealer. For help and support videos visit LiftMaster/Customer-Support or contact your garage door opener and reprogram the remote control(s). The garage door moves 6-8", stops...Wi-Fi network: Ensure the myQ Serial number was entered correctly and try again. Maintenance Troubleshooting EVERY MONTH • Manually operate door. The garage door opener does not require additional lubrication. Cannot connect garage door opener to ensure the garage...
...a trained door systems technician. • Possible travel module failure. Unplug the garage door opener from your installing dealer. For help and support videos visit LiftMaster/Customer-Support or contact your garage door opener and reprogram the remote control(s). The garage door moves 6-8", stops...Wi-Fi network: Ensure the myQ Serial number was entered correctly and try again. Maintenance Troubleshooting EVERY MONTH • Manually operate door. The garage door opener does not require additional lubrication. Cannot connect garage door opener to ensure the garage...
8155W 8164W 8165W 8160 8160WB Users Guide - English French
Page 15
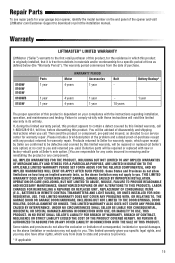
... AND NO IMPLIED WARRANTIES WILL EXIST OR APPLY AFTER SUCH PERIOD. The warranty period commences from the date of purchase. 8160W 8164W 8165W 8160WB 8155W Parts 1 year 1 year 1 year WARRANTY PERIOD Motor Accessories Belt 4 years 1 year - 4 years ...which vary from defects in its entirety. Defective parts will be advised of the opener and visit LiftMaster.com/Customer-Support to province. * If applicable 15 UNDER NO CIRCUMSTANCES SHALL SELLER BE LIABLE FOR ... state and province to download or print the installation manual. Then send the product or component, pre-paid .
... AND NO IMPLIED WARRANTIES WILL EXIST OR APPLY AFTER SUCH PERIOD. The warranty period commences from the date of purchase. 8160W 8164W 8165W 8160WB 8155W Parts 1 year 1 year 1 year WARRANTY PERIOD Motor Accessories Belt 4 years 1 year - 4 years ...which vary from defects in its entirety. Defective parts will be advised of the opener and visit LiftMaster.com/Customer-Support to province. * If applicable 15 UNDER NO CIRCUMSTANCES SHALL SELLER BE LIABLE FOR ... state and province to download or print the installation manual. Then send the product or component, pre-paid .
8155W 8164W 8165W 8160 8160WB Users Guide - English French
Page 16
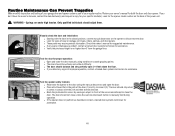
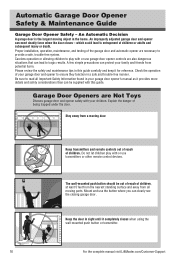
...and maintenance tips in sight until it completely closes when using the wall-mounted push button or transmitter. 16 For the complete manual visit LiftMaster.com/Customer-Support Mount and use the button where you can exert deadly force when the door closes - An improperly adjusted garage door...garage door and opener to provide a safe, trouble-free system. An Automatic Decision A garage door is the largest moving parts. Proper installation, operation, maintenance, and testing of children. Automatic Garage Door Opener Safety & Maintenance Guide Garage Door Opener Safety -
...and maintenance tips in sight until it completely closes when using the wall-mounted push button or transmitter. 16 For the complete manual visit LiftMaster.com/Customer-Support Mount and use the button where you can exert deadly force when the door closes - An improperly adjusted garage door...garage door and opener to provide a safe, trouble-free system. An Automatic Decision A garage door is the largest moving parts. Proper installation, operation, maintenance, and testing of children. Automatic Garage Door Opener Safety & Maintenance Guide Garage Door Opener Safety -
8155W 8164W 8165W 8169W Users Guide - English French
Page 15
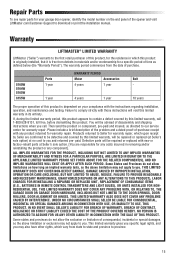
The warranty period commences from the date of purchase. 8160W 8164W 8165W 8155W Parts 1 year 1 year WARRANTY PERIOD Motor Accessories 4 years 1 year 4 years 1 year Belt - 10 years The proper operation of the opener and visit LiftMaster.com/Customer-Support to province. 15 paid and insured,... to state and province to download or print the installation manual. NO PERSON IS AUTHORIZED TO ASSUME FOR US ANY OTHER LIABILITY IN CONNECTION WITH THE SALE OF THIS PRODUCT. Warranty LIFTMASTER® LIMITED WARRANTY LiftMaster ("Seller") warrants to the first retail purchaser of ...
The warranty period commences from the date of purchase. 8160W 8164W 8165W 8155W Parts 1 year 1 year WARRANTY PERIOD Motor Accessories 4 years 1 year 4 years 1 year Belt - 10 years The proper operation of the opener and visit LiftMaster.com/Customer-Support to province. 15 paid and insured,... to state and province to download or print the installation manual. NO PERSON IS AUTHORIZED TO ASSUME FOR US ANY OTHER LIABILITY IN CONNECTION WITH THE SALE OF THIS PRODUCT. Warranty LIFTMASTER® LIMITED WARRANTY LiftMaster ("Seller") warrants to the first retail purchaser of ...

