

Owners Manual
Page 1
... icon including the points ( ). Wi-Fi® Garage Door Opener Contractor Series Chain Drive Models 8160W, 8160WB, 8164W, and 8165W Contractor Series Belt Drive Model 8155W FOR RESIDENTIAL USE ONLY • Please read this manual and the safety materials carefully! • The door WILL NOT CLOSE unless the Protector System® is... ONLY with myQ® and Security+ 2.0® accessories. • DO NOT install on label. Register your garage door opener to receive updates and offers from LiftMaster Take a photo of the garage door opener are to 71403 (US) or visit www...
... icon including the points ( ). Wi-Fi® Garage Door Opener Contractor Series Chain Drive Models 8160W, 8160WB, 8164W, and 8165W Contractor Series Belt Drive Model 8155W FOR RESIDENTIAL USE ONLY • Please read this manual and the safety materials carefully! • The door WILL NOT CLOSE unless the Protector System® is... ONLY with myQ® and Security+ 2.0® accessories. • DO NOT install on label. Register your garage door opener to receive updates and offers from LiftMaster Take a photo of the garage door opener are to 71403 (US) or visit www...
Owners Manual
Page 2
... 6 Carton Inventory - Models 8155W 7 Assembly for Models: 8160W, 8160WB, 8164W, 8165W 8 Assembly for Model: 8155W 9 Installation 10 Install the Door Control 19-21 Install the Door Control - 882LMW 19 Install the Door Control - 883LMW 20 ... 37 Using the Push Button Door Control - 883LMW 38 Control Panel Setup 39 Remote Control 40 To Erase the Memory 41 To Open the Door Manually 41 Maintenance 42 2
... 6 Carton Inventory - Models 8155W 7 Assembly for Models: 8160W, 8160WB, 8164W, 8165W 8 Assembly for Model: 8155W 9 Installation 10 Install the Door Control 19-21 Install the Door Control - 882LMW 19 Install the Door Control - 883LMW 20 ... 37 Using the Push Button Door Control - 883LMW 38 Control Panel Setup 39 Remote Control 40 To Erase the Memory 41 To Open the Door Manually 41 Maintenance 42 2

Owners Manual
Page 3
..., the myQ Smartphone Control app, and myQ Garage Door and Gate Monitor are examples of unattended close . WARNING: This product can expose you see this manual. For more information go to www.P65Warnings.ca.gov Unattended Operation The Timer-to be used ONLY with sectional doors. Any device or feature that...
..., the myQ Smartphone Control app, and myQ Garage Door and Gate Monitor are examples of unattended close . WARNING: This product can expose you see this manual. For more information go to www.P65Warnings.ca.gov Unattended Operation The Timer-to be used ONLY with sectional doors. Any device or feature that...
Owners Manual
Page 6
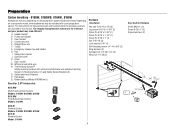
...M Provided J 882LMW Multi-Function Door Control Models: 8160W, 8160WB, 8165W 883LMW Push Button Door Control Models: 8164W N Not Provided O P I . Rail grease Q. The instructions for reference and your garage door opener. Trolley... I Q 893LM Remote Control Models: 8160W, 8160WB, 8165W 891LM Remote Control Model: 8164W 6 Garage door opener J. Sprocket cover K. Door bracket D. The Protector System®... opener model purchased. A. Preparation Carton Inventory - 8160W, 8160WB, 8164W, 8165W Accessories will be included with white and white/black wire attached: ...
...M Provided J 882LMW Multi-Function Door Control Models: 8160W, 8160WB, 8165W 883LMW Push Button Door Control Models: 8164W N Not Provided O P I . Rail grease Q. The instructions for reference and your garage door opener. Trolley... I Q 893LM Remote Control Models: 8160W, 8160WB, 8165W 891LM Remote Control Model: 8164W 6 Garage door opener J. Sprocket cover K. Door bracket D. The Protector System®... opener model purchased. A. Preparation Carton Inventory - 8160W, 8160WB, 8164W, 8165W Accessories will be included with white and white/black wire attached: ...
Owners Manual
Page 7
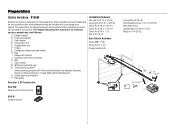
... washer 5/16" (4) Self-threading screw 1/4"-14 x 5/8" (2) Ring fastener (3) Carriage bolt 1/4"-20 x 1/2" (2) Wing nut 1/4"-20 (2) K H L M Not Provided J Not Provided P O I . The images throughout this manual are not included in this manual. Door bracket D. Straight door arm F. Emergency release rope and handle H. The instructions for these accessories will vary depending on your specific model, other...
... washer 5/16" (4) Self-threading screw 1/4"-14 x 5/8" (2) Ring fastener (3) Carriage bolt 1/4"-20 x 1/2" (2) Wing nut 1/4"-20 (2) K H L M Not Provided J Not Provided P O I . The images throughout this manual are not included in this manual. Door bracket D. Straight door arm F. Emergency release rope and handle H. The instructions for these accessories will vary depending on your specific model, other...
Owners Manual
Page 14
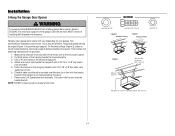
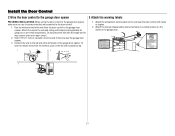
..."-18 x 1-7/8" lag screws (not provided). 5. On finished ceilings (Figure 2), attach a sturdy metal bracket to required lengths. 3. Check to opener at this time. Operate the door manually. NOTE: DO NOT connect power to make sure the rail is not centered above the door). 7. This bracket and fastening hardware are shown. Concrete anchors...
..."-18 x 1-7/8" lag screws (not provided). 5. On finished ceilings (Figure 2), attach a sturdy metal bracket to required lengths. 3. Check to opener at this time. Operate the door manually. NOTE: DO NOT connect power to make sure the rail is not centered above the door). 7. This bracket and fastening hardware are shown. Concrete anchors...
Owners Manual
Page 21
... the red and white terminals on the wall near the garage door opener. 3. Attach the entrapment warning label on the garage door opener. Attach the manual release/safety reverse test label in the tab with the staple as this may cause a short or an open circuit. 2. Run the white and red...
... the red and white terminals on the wall near the garage door opener. 3. Attach the entrapment warning label on the garage door opener. Attach the manual release/safety reverse test label in the tab with the staple as this may cause a short or an open circuit. 2. Run the white and red...

Owners Manual
Page 41
... closed if possible. 2. Weak or broken springs or unbalanced door could fall. l NEVER use handle to use. The door should be raised and lowered manually as often as necessary. 2. Pull the emergency release handle down . To disengage the lockout feature, pull the handle straight down and back (toward the ... 1. ERASE A myQ ACCOUNT Go to myLiftMaster.com to delete your product may look different. Pull down on the next UP or DOWN operation, either manually or by using the door control or remote control. 41 Press and hold the LEARN button on the garage door opener until the learn LED...
... closed if possible. 2. Weak or broken springs or unbalanced door could fall. l NEVER use handle to use. The door should be raised and lowered manually as often as necessary. 2. Pull the emergency release handle down . To disengage the lockout feature, pull the handle straight down and back (toward the ... 1. ERASE A myQ ACCOUNT Go to myLiftMaster.com to delete your product may look different. Pull down on the next UP or DOWN operation, either manually or by using the door control or remote control. 41 Press and hold the LEARN button on the garage door opener until the learn LED...
Owners Manual
Page 42
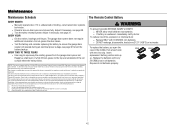
... party responsible for help. l Connect the equipment into an outlet on , the user is encouraged to try to radio communications. Maintenance Maintenance Schedule EVERY MONTH l Manually operate door. The garage door opener does not require additional lubrication. Operation is connected. This device must accept any interference received, including interference that may...
... party responsible for help. l Connect the equipment into an outlet on , the user is encouraged to try to radio communications. Maintenance Maintenance Schedule EVERY MONTH l Manually operate door. The garage door opener does not require additional lubrication. Operation is connected. This device must accept any interference received, including interference that may...
Owners Manual
Page 43
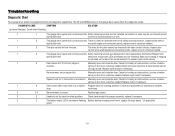
... at all staple and connection points, replace wire or correct as needed . 1 3 The door control will not close the door. Manually open and close and the Safety reversing sensors are misaligned or were momentarily obstructed. wires for binding or obstructions, such as a broken ...nothing is faulty. Check for the door control are steady and not flickering. Replace travel to a complete Program travel module if necessary. Manually open and close and the There is a short or reversed wire for proper assembly, replace if necessary. 3 3 The battery status LED...
... at all staple and connection points, replace wire or correct as needed . 1 3 The door control will not close the door. Manually open and close and the Safety reversing sensors are misaligned or were momentarily obstructed. wires for binding or obstructions, such as a broken ...nothing is faulty. Check for the door control are steady and not flickering. Replace travel to a complete Program travel module if necessary. Manually open and close and the There is a short or reversed wire for proper assembly, replace if necessary. 3 3 The battery status LED...
Owners Manual
Page 44
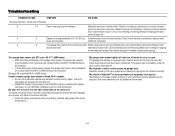
Manually open and close and the Safety reversing sensors are between A-F and 0-9 only. Check travel module connections, replace travel module. Cannot connect garage door opener to ... steady and not flickering. My door will move in the garage. This feature can be disabled using the door control, see page 4 or visit WiFiHelp.LiftMaster.com for additional information. 44 sensors to travel stops and reverses. l If there has been a recent power outage, the garage door opener must be activated...
Manually open and close and the Safety reversing sensors are between A-F and 0-9 only. Check travel module connections, replace travel module. Cannot connect garage door opener to ... steady and not flickering. My door will move in the garage. This feature can be disabled using the door control, see page 4 or visit WiFiHelp.LiftMaster.com for additional information. 44 sensors to travel stops and reverses. l If there has been a recent power outage, the garage door opener must be activated...

Owners Manual
Page 47
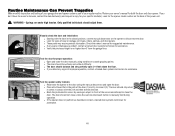
... garage door and automatic opener are necessary to ensure they function in a safe and trouble-free manner. Check the operation of your garage door opener's manual as it provides more details and safety considerations than can be out of reach of children or adults and subsequent injury or death. Stay away...
... garage door and automatic opener are necessary to ensure they function in a safe and trouble-free manner. Check the operation of your garage door opener's manual as it provides more details and safety considerations than can be out of reach of children or adults and subsequent injury or death. Stay away...
Owners Manual
Page 48
... should stop when it (2). l If any signs of the door (1) and try to disconnect the door. l Verify the photoeye height is manually held during operation. 1 l If the opener does not perform as described, contact a trained door systems technician for assistance. The door should not... close it comes in the closed position, use the manual disconnect on the back of damage are under high tension. Only qualified individuals should move freely and without difficulty. Look for the...
... should stop when it (2). l If any signs of the door (1) and try to disconnect the door. l Verify the photoeye height is manually held during operation. 1 l If the opener does not perform as described, contact a trained door systems technician for assistance. The door should not... close it comes in the closed position, use the manual disconnect on the back of damage are under high tension. Only qualified individuals should move freely and without difficulty. Look for the...

8155W 8164W 8165W 8160 8160WB Users Guide - English French
Page 2
... door opener if you do not comply with the warnings that accompany them carefully. Product Serial Number 2 For the complete manual visit LiftMaster.com/Customer-Support Serial Number: Write down the following information for future reference: myQ Serial Number: Product Serial Number: Date...Account and Connect 6 Programming 7 Remote Control 7 Wireless Keyless Entry 7 To Erase the Memory 7 Operation 8-10 To Open the Door Manually 8 Door Control 9 The Protector System® (Safety Reversing Sensors 10 Adjustment 11-13 Introduction 11 Program the Travel 12 Test the ...
... door opener if you do not comply with the warnings that accompany them carefully. Product Serial Number 2 For the complete manual visit LiftMaster.com/Customer-Support Serial Number: Write down the following information for future reference: myQ Serial Number: Product Serial Number: Date...Account and Connect 6 Programming 7 Remote Control 7 Wireless Keyless Entry 7 To Erase the Memory 7 Operation 8-10 To Open the Door Manually 8 Door Control 9 The Protector System® (Safety Reversing Sensors 10 Adjustment 11-13 Introduction 11 Program the Travel 12 Test the ...
8155W 8164W 8165W 8160 8160WB Users Guide - English French
Page 4
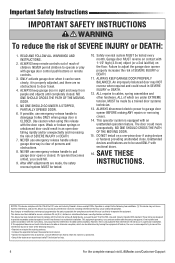
... KEEP GARAGE DOOR PROPERLY BALANCED. This operator system is properly adjusted, and there are made by the party responsible for help. 4 For the complete manual visit LiftMaster.com/Customer-Support NOTICE: This device complies with sectional doors. 16. After ANY adjustments are no guarantee that to which can radiate radio frequency energy...
... KEEP GARAGE DOOR PROPERLY BALANCED. This operator system is properly adjusted, and there are made by the party responsible for help. 4 For the complete manual visit LiftMaster.com/Customer-Support NOTICE: This device complies with sectional doors. 16. After ANY adjustments are no guarantee that to which can radiate radio frequency energy...
8155W 8164W 8165W 8160 8160WB Users Guide - English French
Page 6
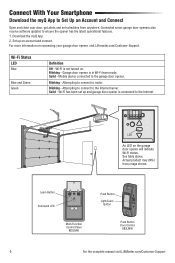
...- Learn Button Command LED Multi-Function Control Panel 882LMW Push Button Light/Learn Button LED Push Button Door Control 883LMW 6 For the complete manual visit LiftMaster.com/Customer-Support Download the myQ App. 2. For more information on the garage door opener will indicate Wi-Fi status. Garage door opener...anywhere. Connect With Your Smartphone Download the myQ App to Set Up an Account and Connect Open and close your garage door opener, visit Liftmaster.com/Customer-Support. Set up and garage door opener is connected to the Internet. Wi-Fi is in Wi-Fi learn mode. Blinking...
...- Learn Button Command LED Multi-Function Control Panel 882LMW Push Button Light/Learn Button LED Push Button Door Control 883LMW 6 For the complete manual visit LiftMaster.com/Customer-Support Download the myQ App. 2. For more information on the garage door opener will indicate Wi-Fi status. Garage door opener...anywhere. Connect With Your Smartphone Download the myQ App to Set Up an Account and Connect Open and close your garage door opener, visit Liftmaster.com/Customer-Support. Set up and garage door opener is connected to the Internet. Wi-Fi is in Wi-Fi learn mode. Blinking...
8155W 8164W 8165W 8160 8160WB Users Guide - English French
Page 8
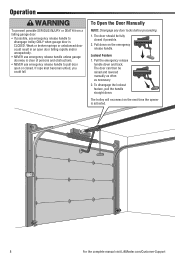
...any door locks before proceeding. 1. Lockout Feature 1. The door can then be fully closed . The door should be raised and lowered manually as often as necessary. 2. Pull down on the next time the opener is CLOSED. The trolley will reconnect on the emergency release ... of persons and obstructions. • NEVER use emergency release handle to disengage trolley ONLY when garage door is activated. 8 For the complete manual visit LiftMaster.com/Customer-Support If rope knot becomes untied, you could result in an open or closed if possible. 2. Pull the emergency release handle...
...any door locks before proceeding. 1. Lockout Feature 1. The door can then be fully closed . The door should be raised and lowered manually as often as necessary. 2. Pull down on the next time the opener is CLOSED. The trolley will reconnect on the emergency release ... of persons and obstructions. • NEVER use emergency release handle to disengage trolley ONLY when garage door is activated. 8 For the complete manual visit LiftMaster.com/Customer-Support If rope knot becomes untied, you could result in an open or closed if possible. 2. Pull the emergency release handle...
8155W 8164W 8165W 8160 8160WB Users Guide - English French
Page 10
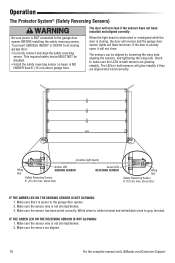
... wing nuts. If the door is not shorted/broken. 3. The LEDs in both sensors will glow steadily if they are aligned. 10 For the complete manual visit LiftMaster.com/Customer-Support The sensors can be disabled. • Install the safety reversing sensor so beam is NO HIGHER than 6" (15 cm) above garage...
... wing nuts. If the door is not shorted/broken. 3. The LEDs in both sensors will glow steadily if they are aligned. 10 For the complete manual visit LiftMaster.com/Customer-Support The sensors can be disabled. • Install the safety reversing sensor so beam is NO HIGHER than 6" (15 cm) above garage...
8155W 8164W 8165W 8160 8160WB Users Guide - English French
Page 12
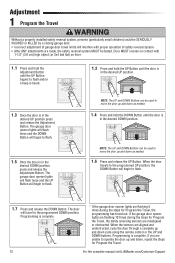
.... Programming is complete. * If the garage door opener lights are flashing 5 times during the steps for Program the Travel. 12 For the complete manual visit LiftMaster.com/Customer-Support Adjustment 1 Program the Travel Without a properly installed safety reversal system, persons (particularly small children) could be SERIOUSLY INJURED or KILLED by a closing...
.... Programming is complete. * If the garage door opener lights are flashing 5 times during the steps for Program the Travel. 12 For the complete manual visit LiftMaster.com/Customer-Support Adjustment 1 Program the Travel Without a properly installed safety reversal system, persons (particularly small children) could be SERIOUSLY INJURED or KILLED by a closing...

8155W 8164W 8165W 8160 8160WB Users Guide - English French
Page 14
...using the remote control or door control. 3. Reapply a small layer of white lithium grease to -Close, garage door monitor or LiftMaster Internet Gateway. • Operating on the make sure the LEDs in both sensors will operate during an electrical power outage. My ...in both sensors are basic troubleshooting tips, for the door control are between A-F and 0-9 only. 1 2 14 For the complete manual visit LiftMaster.com/Customer-Support Testing the Battery Backup: 1. If the door is swallowed, immediately notify doctor. The wall-mounted door control will remain...
...using the remote control or door control. 3. Reapply a small layer of white lithium grease to -Close, garage door monitor or LiftMaster Internet Gateway. • Operating on the make sure the LEDs in both sensors will operate during an electrical power outage. My ...in both sensors are basic troubleshooting tips, for the door control are between A-F and 0-9 only. 1 2 14 For the complete manual visit LiftMaster.com/Customer-Support Testing the Battery Backup: 1. If the door is swallowed, immediately notify doctor. The wall-mounted door control will remain...


