
3265M Manual
Page 1
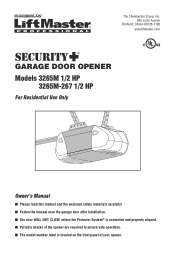
The Chamberlain Group, Inc. 845 Larch Avenue Elmhurst, Illinois 60126-1196 www.liftmaster.com ® GARAGE DOOR OPENER Models 3265M 1/2 HP 3265M-267 1/2 HP For Residential Use Only Owner's Manual ■ Please read this manual and the enclosed safety materials carefully! ■ Fasten the manual near the garage door after installation. ■ The door WILL NOT CLOSE unless the Protector System® is connected and properly aligned. ■ Periodic checks of the opener are required to ensure safe operation. ■ The model number label is located on the front panel of your opener.
The Chamberlain Group, Inc. 845 Larch Avenue Elmhurst, Illinois 60126-1196 www.liftmaster.com ® GARAGE DOOR OPENER Models 3265M 1/2 HP 3265M-267 1/2 HP For Residential Use Only Owner's Manual ■ Please read this manual and the enclosed safety materials carefully! ■ Fasten the manual near the garage door after installation. ■ The door WILL NOT CLOSE unless the Protector System® is connected and properly aligned. ■ Periodic checks of the opener are required to ensure safe operation. ■ The model number label is located on the front panel of your opener.
3265M Manual
Page 2
... 25 Operation 26-30 Operation safety instructions 26 Using your garage door opener 26 Using the wall-mounted door control 27 To open the door manually 27 Care of your garage door opener 28 Having a problem 29 Diagnostic chart 30 Programming 31-32 To add or reprogram a hand-held remote control... door and/or the garage door opener if you do not comply with the warnings that accompany them carefully. 2 Mechanical Electrical When you see this manual. The hazard may come from something mechanical or from electric shock. Read them .
... 25 Operation 26-30 Operation safety instructions 26 Using your garage door opener 26 Using the wall-mounted door control 27 To open the door manually 27 Care of your garage door opener 28 Having a problem 29 Diagnostic chart 30 Programming 31-32 To add or reprogram a hand-held remote control... door and/or the garage door opener if you do not comply with the warnings that accompany them carefully. 2 Mechanical Electrical When you see this manual. The hazard may come from something mechanical or from electric shock. Read them .
3265M Manual
Page 7
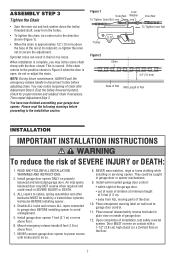
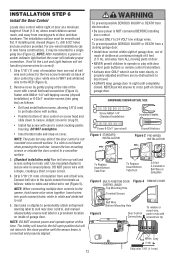
... the installation section. Mount emergency release handle 6 feet (1.8 m) above floor. 6. Install garage door opener ONLY on inside of installation, test safety reversal system. Place manual release/safety reverse test label in Figure 2 when the door is normal. WARNING NOTE: During future maintenance, ALWAYS pull the emergency release handle to disconnect...
... the installation section. Mount emergency release handle 6 feet (1.8 m) above floor. 6. Install garage door opener ONLY on inside of installation, test safety reversal system. Place manual release/safety reverse test label in Figure 2 when the door is normal. WARNING NOTE: During future maintenance, ALWAYS pull the emergency release handle to disconnect...
3265M Manual
Page 11
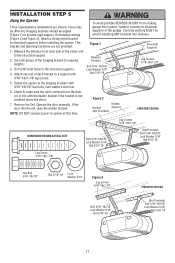
... SERIOUS INJURY from each bracket to the hanging brackets with the header bracket if the bracket is not centered above the door). 7. Operate the door manually. If the door hits the rail, raise the header bracket. Concrete anchors MUST be different. INSTALLATION STEP 5 Hang the Opener Three representative installations are not...
... SERIOUS INJURY from each bracket to the hanging brackets with the header bracket if the bracket is not centered above the door). 7. Operate the door manually. If the door hits the rail, raise the header bracket. Concrete anchors MUST be different. INSTALLATION STEP 5 Hang the Opener Three representative installations are not...
3265M Manual
Page 12
...-tapping screws (drywall installation) or 6-32x1" machine screws (into gang box) as follows: white to white and white/red to wall near door control, and manual release/safety reverse test label in several places. Use tacks or staples to permanently attach entrapment warning label to red (Figure 5). If not lit, the...
...-tapping screws (drywall installation) or 6-32x1" machine screws (into gang box) as follows: white to white and white/red to wall near door control, and manual release/safety reverse test label in several places. Use tacks or staples to permanently attach entrapment warning label to red (Figure 5). If not lit, the...

3265M Manual
Page 22
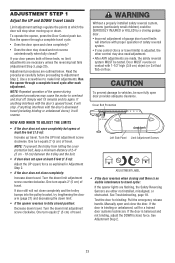
Manually raise the door to the open position (parallel to the floor), and lift the door arm to the fully open position. - Refer to the ... on the following page, the door should not have a "backward" slant when fully open position. Press the Door Control push button. Follow adjustment procedures below . Manually close the door and lift the door arm to the floor. If the door has a slight "backward" slant in back of the door arm...
Manually raise the door to the open position (parallel to the floor), and lift the door arm to the fully open position. - Refer to the ... on the following page, the door should not have a "backward" slant when fully open position. Press the Door Control push button. Follow adjustment procedures below . Manually close the door and lift the door arm to the floor. If the door has a slight "backward" slant in back of the door arm...
3265M Manual
Page 23
... door. If door still will not close completely? • Does the door stay closed and not reverse unintentionally when fully closed position: Decrease down travel . Manually open completely but opens at least five feet (1.5 m): Increase up or down travel . If the door is adjusted, the other control may cause the...
... door. If door still will not close completely? • Does the door stay closed and not reverse unintentionally when fully closed position: Decrease down travel . Manually open completely but opens at least five feet (1.5 m): Increase up or down travel . If the door is adjusted, the other control may cause the...
3265M Manual
Page 27
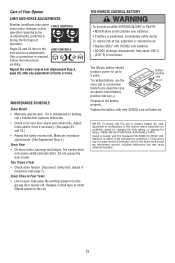
...be changed to 1-1/2, 2-1/2, or 3-1/2 minutes as follows: Press and hold the Lock button for 2 seconds. With the door closed if possible. MANUAL DISCONNECT POSITION Multi-Function door control. 3. Additional features when used with the third button. However, the door will not control the opener lights when...• NEVER use emergency release handle to disengage trolley ONLY when garage door is on the door control. 3. To Open the Door Manually Lock feature Designed to prevent operation of four blinks and 4-1/2 minutes. Press and hold the Light button on the down on the next...
...be changed to 1-1/2, 2-1/2, or 3-1/2 minutes as follows: Press and hold the Lock button for 2 seconds. With the door closed if possible. MANUAL DISCONNECT POSITION Multi-Function door control. 3. Additional features when used with the third button. However, the door will not control the opener lights when...• NEVER use emergency release handle to disengage trolley ONLY when garage door is on the door control. 3. To Open the Door Manually Lock feature Designed to prevent operation of four blinks and 4-1/2 minutes. Press and hold the Light button on the down on the next...
3265M Manual
Page 28
... some re-adjustments, particularly during the first year of operation. Tested to be sure door opens and closes fully. MAINTENANCE SCHEDULE Every Month • Manually operate door. Battery positive side up (+). Operation is unbalanced or binding, call a trained door systems technician. • Check to Comply with FCC and or Industry...
... some re-adjustments, particularly during the first year of operation. Tested to be sure door opens and closes fully. MAINTENANCE SCHEDULE Every Month • Manually operate door. Battery positive side up (+). Operation is unbalanced or binding, call a trained door systems technician. • Check to Comply with FCC and or Industry...

3265M Manual
Page 29
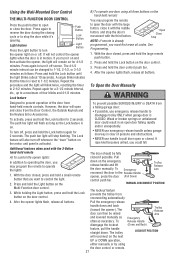
... UP travel by turning the UP Travel adjustment screw 2 full turns away from the opener by pulling the Emergency Release Rope. • Manually bring the door to force or travel by adjusting the outer nut 4 to Adjustment Step 2, Adjust the Force. 4. Using the Wall...The garage door opener is not blinking. This feature activates the light on the following the programming instructions. The trolley should travel . • Manually check door for Using the Wall Mounted Door Control. • Reprogram remotes following page. 2. Weather conditions in the down limit adjustment screw ...
... UP travel by turning the UP Travel adjustment screw 2 full turns away from the opener by pulling the Emergency Release Rope. • Manually bring the door to force or travel by adjusting the outer nut 4 to Adjustment Step 2, Adjust the Force. 4. Using the Wall...The garage door opener is not blinking. This feature activates the light on the following the programming instructions. The trolley should travel . • Manually check door for Using the Wall Mounted Door Control. • Reprogram remotes following page. 2. Weather conditions in the down limit adjustment screw ...

3265M Manual
Page 33
... 178B35 Curved door arm section 12 41A5266-1 Safety reversing sensor brackets (2) NOT SHOWN 41A2770-6 Installation hardware bag (includes hardware listed on page 5). 114A4255 Owner's manual 114A4255SP Owner's manual - Spanish 33 DESCRIPTION 1 4A1008 Master link kit 2 41A4813 Chain pulley bracket 6 3 41A3489 Complete trolley assembly 4 1707LM One-piece rail - 7' (2.1 m) 1708LM One-piece rail - 8' (2.4 m) 1710LM...
... 178B35 Curved door arm section 12 41A5266-1 Safety reversing sensor brackets (2) NOT SHOWN 41A2770-6 Installation hardware bag (includes hardware listed on page 5). 114A4255 Owner's manual 114A4255SP Owner's manual - Spanish 33 DESCRIPTION 1 4A1008 Master link kit 2 41A4813 Chain pulley bracket 6 3 41A3489 Complete trolley assembly 4 1707LM One-piece rail - 7' (2.1 m) 1708LM One-piece rail - 8' (2.4 m) 1710LM...
3265M Manual
Page 35
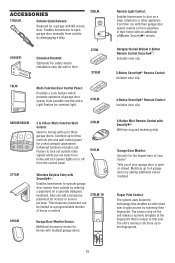
...garage doors. CLOSED OPEN Garage Door Monitor: Security for visitors or service persons. Enables homeowner to that is open garage door manually from outside by disengaging trolley. 395LM Remote Light Control: Enables homeowner to turn opener lights on or off from the control ...panel. 370LM 915LM Wireless Keyless Entry with an additional LiftMaster Security✚® remote. 41A5281 78LM LOCK LIGHT Extension Brackets: (Optional) For safety sensor installation onto the wall or fl...
...garage doors. CLOSED OPEN Garage Door Monitor: Security for visitors or service persons. Enables homeowner to that is open garage door manually from outside by disengaging trolley. 395LM Remote Light Control: Enables homeowner to turn opener lights on or off from the control ...panel. 370LM 915LM Wireless Keyless Entry with an additional LiftMaster Security✚® remote. 41A5281 78LM LOCK LIGHT Extension Brackets: (Optional) For safety sensor installation onto the wall or fl...


