
LiftMaster 3265 Support Question
LiftMaster 3265 Support Question
Find answers below for this question about LiftMaster 3265.Need a LiftMaster 3265 manual? We have 1 online manual for this item!
Question posted by nickdoonis on June 14th, 2013
Door Will Not Open
I had a new Liftmaster 3265 Garage Door Opener installed and now I can not open using the handheld devices. I can see the light come on inside but will not open. What can I do? The manual key does nothing.
Thanks for the help.
Nick
Current Answers
Answer #1: Posted by TommyKervz on June 14th, 2013 10:31 PM
TommyKervz

Member since:
January 10th, 2013 Points: 17,776,813

Member since:
January 10th, 2013 Points: 17,776,813
Greetings - Did you remember to programme the remote? - Well, the LiftMaster 3265 Manual available for free download on the link below should be able to help you verfy/troubleshoot the issue -
Hope it helps
Related LiftMaster 3265 Manual Pages
3265M Manual - Page 1
..., Inc. 845 Larch Avenue
Elmhurst, Illinois 60126-1196 www.liftmaster.com
®
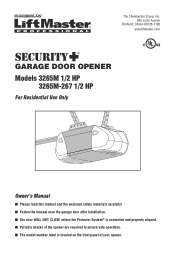
GARAGE DOOR OPENER Models 3265M 1/2 HP
3265M-267 1/2 HP
For Residential Use Only
Owner's Manual
■ Please read this manual and the enclosed safety materials carefully! ■ Fasten the manual near the garage door after installation. ■ The door WILL NOT CLOSE unless the Protector System® is connected...
3265M Manual - Page 2
...
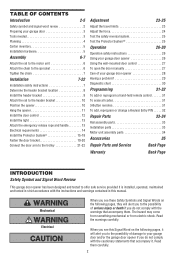
Operation
26-30
Operation safety instructions 26 Using your garage door opener 26 Using the wall-mounted door control 27 To open the door manually 27 Care of serious injury or death if you do not comply with the instructions and warnings contained in strict accordance with the warnings that accompany it is installed, operated, maintained and tested in this...
3265M Manual - Page 3
... and Wrench
Pliers
3
Hack Saw Claw Hammer
Screwdriver Adjustable End Wrench Sectional Door
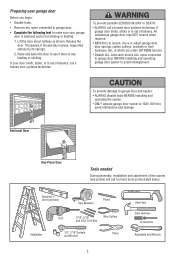
To prevent damage to garage door and opener:
• ALWAYS disable locks BEFORE installing and operating the opener.
• ONLY operate garage door opener at 120V, 60 Hz to loosen, move or adjust garage door, door springs, cables, pulleys, brackets or their hardware, ALL of balance. If your...
3265M Manual - Page 4

...64258;oor and bottom of door must not exceed 1/4" (6 mm) Survey your garage area to your opener.
See page 19 for lightweight garage doors (fiberglass, steel, aluminum, door with the installation of door must not exceed 1/4" (6 mm). Slack in chain tension is normal when garage door is closed .
Motor Unit
Wallmounted Door Control
ONE-PIECE DOOR WITH TRACK
Slack in chain...
3265M Manual - Page 5
... Styrofoam
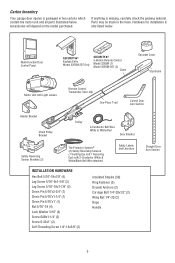
Motor Unit with Light Lenses
CEILING MOUNT ONLY UP
Remote Control Transmitter Visor Clip
One-Piece T-rail
Curved Door Arm Section
Header Bracket
Chain...Door Arm Section
5
If anything is packaged in the foam. Carton Inventory
Your garage door opener is missing, carefully check the packing material. Accessories will depend on the model purchased. Hardware for installation...
3265M Manual - Page 6
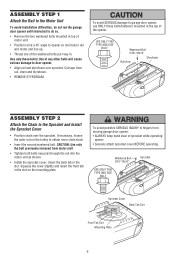
... the Sprocket and Install the Sprocket Cover
• Position chain over sprocket. USE ONLY THIS TYPE AND SIZE
BOLT
Washered Bolt 5/16"-18x12"
Rail Hole
Styrofoam
ASSEMBLY STEP 2
Attach the Chain to door opener. • Align rail and styrofoam over the sprocket.
To avoid SERIOUS damage to fingers from moving garage door opener:
• ALWAYS keep...
3265M Manual - Page 7
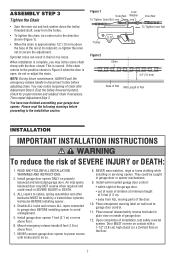
... result in garage door or opener mechanisms.
9. Place manual release/safety reverse test label in Figure 2 when the door is normal.
If the chain
returns to the position shown in plain view on inside of the rail at its midpoint, re-tighten the inner nut to the installation section. You have now finished assembling your garage door
opener.
Install garage door opener 7 feet...
3265M Manual - Page 8

... their hardware, ALL of which apply to your garage, use lag screws (not provided) to securely fasten the 2x4 to structural supports as shown. This height will provide travel as shown here and on page 9.
3. NOTE: If the total number of the door. Open your door to the highest point of travel clearance for sectional...
3265M Manual - Page 10
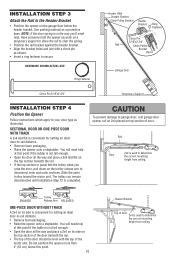
...Garage Door
Clevis Pin 5/16"x2-3/4"
Temporary Support
INSTALLATION STEP 4
Position the Opener
Follow instructions which apply to garage door, rest garage door opener...opener onto a stepladder.
You will need help. SECTIONAL DOOR OR ONE-PIECE DOOR WITH TRACK
A 2x4 laid flat this point.
10
Header Bracket
Top of Door 2x4 is used to the Header Bracket
• Position the opener...
3265M Manual - Page 11
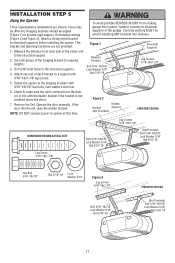
.... Concrete anchors MUST be different. Operate the door manually. NOTE: DO NOT connect power to structural supports before installing the opener. This bracket and fastening hardware are shown. Attach one end of each side of the garage.
Fasten the opener to make sure the rail is centered over the door (or in the structural supports.
4.
Check to...
3265M Manual - Page 12
... terminals as in new home construction), it can be seen clearly, is not mounted on inside of garage door. Fasten with door control push buttons or remote control transmitters. • Activate door ONLY when it may stick if the door control is properly adjusted and there are no obstructions to door travel to the full open circuit.
4. Use insulated staples...
3265M Manual - Page 13
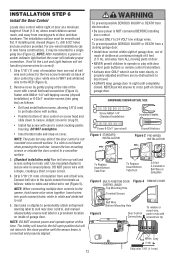
...standard light bulbs.
NOTE: If it is 6 feet (1.83 m) above the floor. Do not remove the lens.
• Install up as shown.
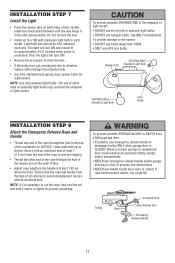
Secure with an overhand knot at least 1" (2.5 cm) from a falling garage door:
• If possible, use emergency release handle unless garage doorway is CLOSED. Secure with a Garage Door Opener bulb.
• Use A19, standard neck garage door opener bulbs...
3265M Manual - Page 14
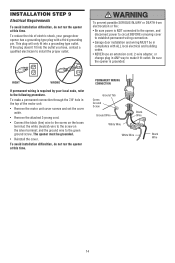
... to make a permanent connection through the 7/8" hole in ANY way to install the proper outlet.
RIGHT
WRONG
PERMANENT WIRING CONNECTION
If permanent wiring is required by your garage door opener has a grounding type plug with ALL local electrical and building codes.
• NEVER use an extension cord, 2-wire adapter, or change plug in
Green
the...
3265M Manual - Page 15
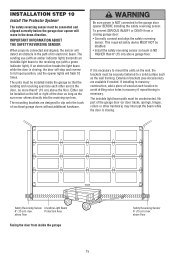
... safety device MUST NOT be installed inside the garage
15
Safety Reversing Sensor 6" (15 cm) max.
If an obstruction breaks the light beam while the door is NOT connected to the receiving eye (with a green indicator light). Either can be securely fastened to full open position, and the opener lights will flash 10 times. above garage floor. INSTALLATION STEP 10
Install...
3265M Manual - Page 16
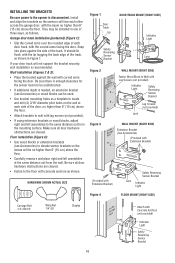
... concrete anchors as shown.
HARDWARE SHOWN ACTUAL SIZE
Figure 1
Door Track
Lip
DOOR TRACK MOUNT (RIGHT SIDE)
Indicator Light
Safety
Reversing
Sensor
Lens
Bracket
Figure 2 Figure 3
WALL MOUNT (RIGHT SIDE)
Fasten Wood Block to the floor with the curved arms facing the door. Garage door track installation (preferred) (Figure 1):
• Slip the curved arms over the...
3265M Manual - Page 17
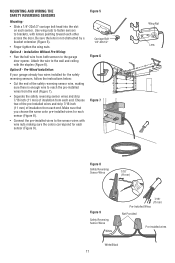
... wire, making sure the colors correspond for each sensor (Figure 9). Use wing nuts to fasten sensors to the sensor wires with lenses pointing toward each sensor. Attach the wire to the garage door opener. Be sure the lens is enough wire to reach the pre-installed wires from the wall (Figure 7).
• Separate the safety...
3265M Manual - Page 19

... inside the bracket.
2. proceed to side door bracket holes.
Secure the door bracket using the self-threading screws. (Figure 3) Wood Doors: • Use top and bottom or side to Step 12. A horizontal reinforcement brace should cover the height of the door.
3. Drill 5/16" holes through the door and secure bracket with your door manufacturer for an opener installation door reinforcement...
3265M Manual - Page 24
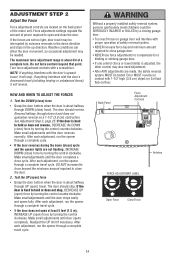
... limit if necessary. Without a properly installed safety reversal system, persons (particularly small children) could be needed. Door MUST reverse on garage door will stop .
The door should stop . Make small adjustments until door opens completely. Make small adjustments until the door completes a close ) force
• Grasp the door bottom when the door is adjusted, the other control...
3265M Manual - Page 26

... BALANCED (see page 3). closed . If obstructed while opening cycle. Your opener will reverse. If you purchase a new remote, or if you could result in an open
then off automatically after interruption; Bulb size is activated. Using Your Garage Door Opener
6. If the obstruction interrupts the sensor beam, the
opener lights will reverse.
10 seconds until completely closed...
3265M Manual - Page 32
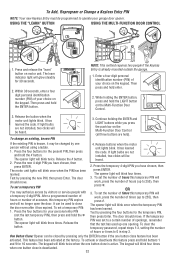
... has expired. If light bulbs are not installed, two clicks will no longer open the door. After a programmed number of hours or number of your garage door opener. To set the number...new PIN, then press Enter. Press the four buttons for your choice on the keypad. USING THE "LEARN" BUTTON
USING THE MULTI-FUNCTION DOOR CONTROL
1. To change an existing, known PIN
3.
The door...
Similar Questions

I Have Installed A Chamberlan Garage Door Opener And The Remote I Was Using Is
I have been using a Chamberlan garage door opener and its remote has been defective since of late.Pl...
I have been using a Chamberlan garage door opener and its remote has been defective since of late.Pl...
(Posted by donweera42 8 months ago)

Where Is The Reset Button On Liftmaster Model 3265 Garage Door Opener
(Posted by cjaxlme 9 years ago)

3850 Liftmaster Garage Door Opener Manual
My liftmaster 3850 smart control panel doesn't show time or temperature.....screen is just lit with ...
My liftmaster 3850 smart control panel doesn't show time or temperature.....screen is just lit with ...
(Posted by dsprangel 10 years ago)
Liftmaster Elite Garage Door Opener Manual
i have a 3585s opener. always workusing inside control. it has been failing to open at times useing ...
i have a 3585s opener. always workusing inside control. it has been failing to open at times useing ...
(Posted by lgwinnjr 10 years ago)

Noise From Garage Door Opener
I have a liftmaster garage door opener. It makes a loud screeching noise when the door is lowered....
I have a liftmaster garage door opener. It makes a loud screeching noise when the door is lowered....
(Posted by tom19097 11 years ago)