
LiftMaster 3265 Support Question
LiftMaster 3265 Support Question
Find answers below for this question about LiftMaster 3265.Need a LiftMaster 3265 manual? We have 1 online manual for this item!
Question posted by cjaxlme on August 25th, 2014
Where Is The Reset Button On Liftmaster Model 3265 Garage Door Opener
The person who posted this question about this LiftMaster product did not include a detailed explanation. Please use the "Request More Information" button to the right if more details would help you to answer this question.
Current Answers
Related LiftMaster 3265 Manual Pages
3265M Manual - Page 1
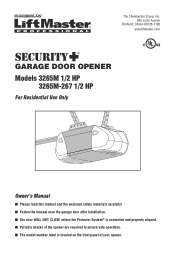
.... 845 Larch Avenue
Elmhurst, Illinois 60126-1196 www.liftmaster.com
®
GARAGE DOOR OPENER Models 3265M 1/2 HP
3265M-267 1/2 HP
For Residential Use Only
Owner's Manual
■ Please read this manual and the enclosed safety materials carefully! ■ Fasten the manual near the garage door after installation. ■ The door WILL NOT CLOSE unless the Protector System®...
3265M Manual - Page 2
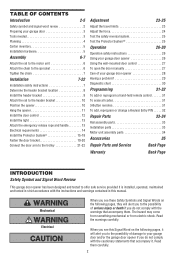
... not comply with the warnings that accompany it will alert you to your garage door opener 28 Having a problem 29 Diagnostic chart 30
Programming
31-32
To add or reprogram a hand-held remote control 31 To erase all codes 31 3-Button remotes 31 To add, reprogram or change a Keyless Entry PIN . . . . . 32
Repair Parts...
3265M Manual - Page 3
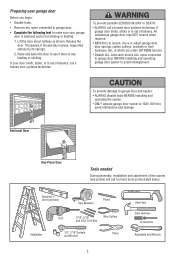
... and remove ALL ropes connected to garage door BEFORE installing and operating garage door opener to avoid malfunction and damage. Lift the door about halfway as illustrated below. Sectional Door
To prevent damage to garage door and opener:
• ALWAYS disable locks BEFORE installing and operating the opener.
• ONLY operate garage door opener at 120V, 60 Hz to avoid entanglement...
3265M Manual - Page 5
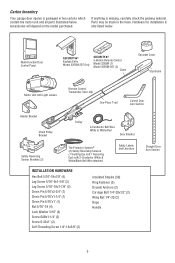
... installation is packaged in the foam. Carton Inventory
Your garage door opener is also listed below . If anything is missing, carefully check the packing material. LOCK LIGHT
Multi-Function Door Control Panel
SECURITY✚® Keyless Entry Model 3265M-267 Only
SECURITY✚® 3-Button Remote Control Model 3265M (1) Model 3265M-267 (2)
Chain
Sprocket Cover Styrofoam
Motor Unit...
3265M Manual - Page 6
... slightly and insert the front tab in the top of the opener.
Use only these bolts! To avoid SERIOUS damage to garage door opener, use ONLY those bolts/fasteners mounted in the slot on the...
Attach the Rail to the Motor Unit
To avoid installation difficulties, do not run the garage door opener until instructed to do so. • Remove the two washered bolts mounted in top of
motor unit...
3265M Manual - Page 7
...
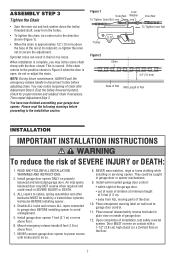
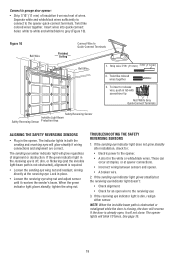
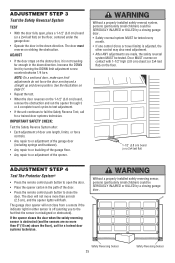
WARNING
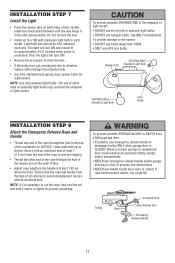
To reduce the risk of installation, test safety reversal system. ALL repairs to cables, spring assemblies and other hardware MUST be caught in garage door or opener mechanisms.
9. Install garage door opener 7 feet (2.1 m) or more above floor.
7. Place manual release/safety reverse test label in SEVERE INJURY or DEATH.
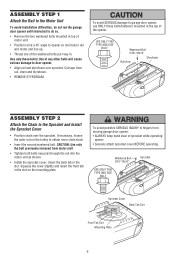
3. ASSEMBLY STEP 3
Tighten the Chain...
3265M Manual - Page 10
... will need help
at is convenient for setting an ideal door-to -rail distance. • Remove foam packaging. • Raise the opener onto a stepladder. The trolley can remain disconnected until Installation Step 12 is used to garage door, rest garage door opener rail on 2x4 placed on the garage floor below the header bracket. To prevent damage...
3265M Manual - Page 11
.... Drill 3/16" pilot holes in line with 5/16"-18x7/8" hex bolts, lock washers and nuts.
6. Concrete anchors MUST be different. Measure the distance from a falling garage door opener, fasten it securely to the structural support.
2. On finished ceilings (Figure 2 and Figure 3), attach a sturdy metal bracket to make sure the rail is not...
3265M Manual - Page 13
... clear of lens. Gently rotate lens back and downward until the lens hinge is necessary to cut the rope, heat seal the cut end with a Garage Door Opener bulb.
• Use A19, standard neck garage door opener bulbs for approximately 4-1/2 minutes when power is CLOSED.
Secure with an overhand knot at least 1" (2.5 cm) from a falling...
3265M Manual - Page 14
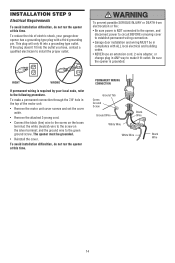
... on the brass terminal; If the plug doesn't fit into a grounding type outlet. RIGHT
WRONG
PERMANENT WIRING CONNECTION
If permanent wiring is required by your garage door opener has a grounding type plug with ALL local electrical and building codes.
• NEVER use an extension cord, 2-wire adapter, or change plug in
Green
the...
3265M Manual - Page 15
... move in the path of its electronic beam. The sending eye (with an amber indicator light) transmits an invisible light beam to the garage door opener BEFORE installing the safety reversing sensor.
The mounting brackets are available if needed. If it is NO HIGHER than 6" (15 cm) above floor
Protection Area
...
3265M Manual - Page 17
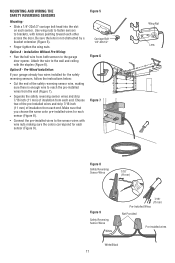
...carriage bolt head into the slot on each sensor (Figure 9). Attach the wire to the garage door opener. Option B - Make sure that you choose the same color pre-installed wires for each...pre-installed wires to the sensor wires with the staples (Figure 6).
Pre-Wired Installation:
If your garage already has wires installed for each sensor. Figure 5
Carriage Bolt 1/4"-20x1/2" Figure 6
Figure 7...
3265M Manual - Page 18
... light beam path is not obstructed), alignment is dim, realign either sensor. Twist like colored wires together
3. Twist like colored wires together. The opener lights will reverse. Connect to garage door opener:
• Strip 7/16" (11 mm) of insulation from each set of alignment or obstruction. Separate white and white/black wires suffi...
3265M Manual - Page 25
... SERIOUSLY INJURED or KILLED by a closing garage door. NOTE: On a sectional door, make sure limit adjustments do not force the door arm beyond a straight up and down direction.
The garage door opener will not move more than an inch (2.5 cm), and the opener lights will flash. If the opener closes the door when the safety reversing sensor is misaligned...
3265M Manual - Page 26

... clear of children. ALWAYS keep garage door in ; If obstructed while closing , the door will reverse. If opening , the door will blink for 10 seconds, until the door starts to move. • The wall-mounted Door Control: Hold the push
button or bar down travel is A19. The sensor has no obstructions to garage door opener BEFORE making ANY repairs or...
3265M Manual - Page 29

...Button
LED or Diagnostic
LED
Sending Eye Safety
Receiving Eye Safety
Reversing Sensor
Reversing Sensor
(Amber Indicator Light) (Green Indicator Light)
3. This feature activates the light on the following page. My motor unit hums briefly:
• First verify that the trolley is not blinking. My door...turn off when door is open:
• The garage door opener is normal. My...
3265M Manual - Page 30
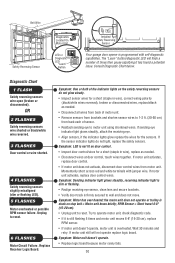
... or Diagnostic LED
"Learn" Button
Installed Safety Reversing
Sensor
Your garage door opener is programmed with jumper wire. Diagnostic Chart 1 FLASH
Safety reversing sensors wire open (broken or disconnected). the motor unit does not operate or trolley is firmly secured to 1-2 ft. (30-60 cm) from motor unit. Unplug to reset. RPM Sensor = Short travel...
3265M Manual - Page 31
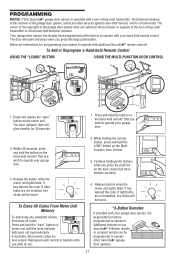
...Security✚® remote controls. Reprogram each remote or keyless entry you press the large push button.
The door will be heard.
*3-Button Remotes
If provided with your garage door opener, the large button is operated with your garage door.
2. Continue holding the remote button, press and hold the "learn indicator light goes out (approximately 6 seconds). If light bulbs are...
3265M Manual - Page 32
... motor unit lights blink.
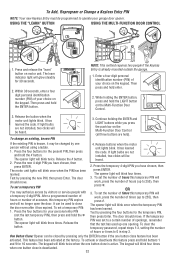
The motor unit lights will be heard. The door should move . After a programmed number of hours or number of your garage door opener. The opener light will blink twice. USING THE "LEARN" BUTTON
USING THE MULTI-FUNCTION DOOR CONTROL
1. The learn " button on the keypad. To set the number of hours this temporary PIN...
3265M Manual - Page 35
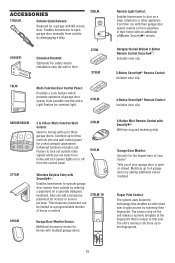
... include Lock Feature to 4 garage doors by scanning their home with an additional LiftMaster Security✚® remote.
41A5281
78LM
LOCK
LIGHT
Extension Brackets:
(Optional) For safety sensor installation onto the wall or floor.
373W 373LM
Multi-Function Door Control Panel:
Provides a Lock Feature which prevents operation of garage door opener from portable remotes and a Light...
Similar Questions

I Have Installed A Chamberlan Garage Door Opener And The Remote I Was Using Is
I have been using a Chamberlan garage door opener and its remote has been defective since of late.Pl...
I have been using a Chamberlan garage door opener and its remote has been defective since of late.Pl...
(Posted by donweera42 8 months ago)
Garage Door Opens After Shutting.
My Lift master 8550 inside keypad is Inside wall pad is model #880LM. outside keypad Model # is 877M...
My Lift master 8550 inside keypad is Inside wall pad is model #880LM. outside keypad Model # is 877M...
(Posted by BONNIECA92 2 years ago)

Is There A Reset Button On The Liftmaster Garage Door Opener To Stop The
beeping
beeping
(Posted by maggifoto 10 years ago)

Chamberlin Liftmaster Garage Door Opener Model # 3265-267
Where do I put the trolley before I attach the chain to the sprocket?
Where do I put the trolley before I attach the chain to the sprocket?
(Posted by garretmegan 11 years ago)

Question About My Model Of Garage Door
Hi i have the book for liftmaster modeles 377lm, 377lmc, 315 mhz security + , but i don't know wath ...
Hi i have the book for liftmaster modeles 377lm, 377lmc, 315 mhz security + , but i don't know wath ...
(Posted by sportifman33 11 years ago)