
LiftMaster 3265 Support Question
LiftMaster 3265 Support Question
Find answers below for this question about LiftMaster 3265.Need a LiftMaster 3265 manual? We have 1 online manual for this item!
Question posted by garretmegan on January 12th, 2013
Chamberlin Liftmaster Garage Door Opener Model # 3265-267
Where do I put the trolley before I attach the chain to the sprocket?
Current Answers
Related LiftMaster 3265 Manual Pages
3265M Manual - Page 1
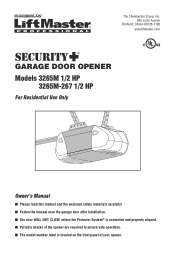
.... 845 Larch Avenue
Elmhurst, Illinois 60126-1196 www.liftmaster.com
®
GARAGE DOOR OPENER Models 3265M 1/2 HP
3265M-267 1/2 HP
For Residential Use Only
Owner's Manual
■ Please read this manual and the enclosed safety materials carefully! ■ Fasten the manual near the garage door after installation. ■ The door WILL NOT CLOSE unless the Protector System® is...
3265M Manual - Page 2
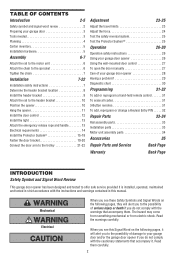
... your garage door 3 Tools needed 3 Planning 4 Carton inventory 5 Installation hardware 5
Assembly
6-7
Attach the rail to the motor unit 6 Attach the chain to the sprocket 6 Tighten the chain 7
Installation
7-22
Installation safety instructions 7 Determine the header bracket location 8 Install the header bracket 9 Attach the rail to the header bracket 10 Position the opener 10...
3265M Manual - Page 3
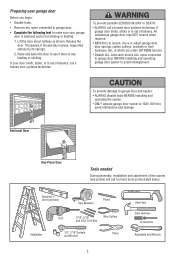
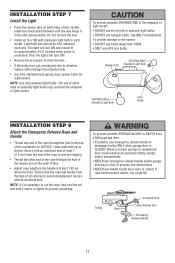
... tools as shown. Sectional Door
To prevent damage to garage door and opener:
• ALWAYS disable locks BEFORE installing and operating the opener.
• ONLY operate garage door opener at 120V, 60 Hz to loosen, move or adjust garage door, door springs, cables, pulleys, brackets or their hardware, ALL of balance, call a trained door systems technician if garage door binds, sticks or is...
3265M Manual - Page 5
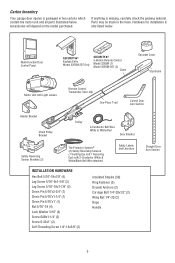
...Panel
SECURITY✚® Keyless Entry Model 3265M-267 Only
SECURITY✚® 3-Button Remote Control Model 3265M (1) Model 3265M-267 (2)
Chain
Sprocket Cover Styrofoam
Motor Unit with Light Lenses
CEILING MOUNT ONLY UP
Remote Control Transmitter Visor Clip
One-Piece T-rail
Curved Door Arm Section
Header Bracket
Chain Pulley Bracket
Trolley
2-Conductor Bell Wire White & White/Red...
3265M Manual - Page 6
... SIZE
BOLT
Washered Bolt 5/16"-18x12"
Rail Hole
Styrofoam
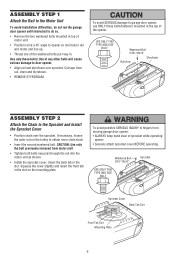
ASSEMBLY STEP 2
Attach the Chain to the Sprocket and Install the Sprocket Cover
• Position chain over sprocket. To avoid SERIOUS damage to garage door opener, use ONLY those bolts/fasteners mounted in the slot on the trolley to obtain more chain slack.
• Insert the second washered bolt.
Use of any...
3265M Manual - Page 7
...; away from the trolley.
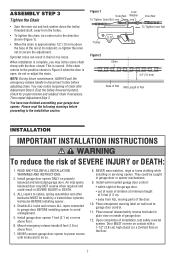
• To tighten the chain, turn outer nut in SEVERE INJURY or DEATH.
3. Sprocket noise can result if chain is normal. You may NOT reverse when required and could be made by a trained door systems technician BEFORE installing opener.
4.
Please read the following warnings before
adjusting chain. NEVER connect garage door opener to power source until...
3265M Manual - Page 10
... the rail. • If the top section or panel hits the trolley when you 'll need help .
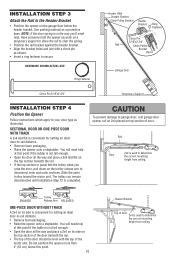
INSTALLATION STEP 3
Attach the Rail to garage door, rest garage door opener rail on 2x4 placed on top section of door. Use packing material as a protective base. SECTIONAL DOOR OR ONE-PIECE DOOR WITH TRACK
A 2x4 laid flat is in the way...
3265M Manual - Page 11
... 5/16"-18
FINISHED CEILING
(Not Provided) Bolt 5/16"-18x7/8" Lock Washer 5/16"
Nut 5/16"-18
11 Attach one end of the motor unit to a support with 5/16"-18x7/8" hex bolts, lock washers and nuts....with 5/16"-18x1-7/8" lag screws. Measure the distance from a falling garage door opener, fasten it securely to structural supports of the hanging bracket to make sure the rail is not centered ...
3265M Manual - Page 13
...
Rope
NOTICE
Trolley Release Arm
Emergency Release Handle
13 Then the lights will turn OFF.
• Reverse the procedure to close the lens.
• If the bulbs burn out prematurely due to prevent slipping.
• Thread the other end of the rope through the hole in each socket.
Secure with a Garage Door Opener bulb...
3265M Manual - Page 14
...DEATH from electrocution or fire:
• Be sure power is required by your garage door opener has a grounding type plug with ALL local electrical and building codes.
• NEVER use....
• Garage door installation and wiring MUST be grounded.
• Reinstall the cover. The opener must be in compliance with a third grounding pin. Black
• Remove the attached 3-prong cord....
3265M Manual - Page 15
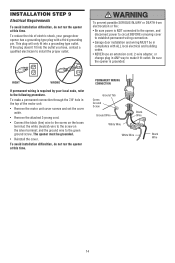
...®
The safety reversing sensor must be connected and aligned correctly before the garage door opener will move in masonry construction, add a piece of the garage door (or door tracks, springs, hinges, rollers or other across the door, no more than 6" (15 cm) above garage floor. IMPORTANT INFORMATION ABOUT THE SAFETY REVERSING SENSOR
When properly connected and...
3265M Manual - Page 17
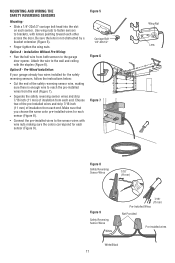
...installed wires and strip 7/16 inch (11 mm) of insulation from each other across the door. Make sure that you choose the same color pre-installed wires for each sensor (Figure ...sensors to the wall and ceiling with the staples (Figure 6). Attach the wire to the garage door opener. Pre-Wired Installation:
If your garage already has wires installed for each sensor.
MOUNTING AND WIRING ...
3265M Manual - Page 18
...
• Plug in the receiving eye is off, dim, or flickering (and the invisible light beam path is not obstructed), alignment is already open wire to garage door opener:
• Strip 7/16" (11 mm) of insulation from each set of alignment or obstruction. If the sending eye indicator light glows steadily but the...
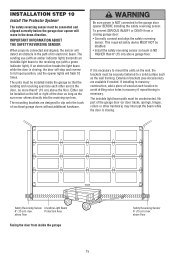
3265M Manual - Page 25
... move more than an inch (2.5 cm), and the opener lights will not close the door.
ADJUSTMENT STEP 3
Test the Safety Reversal System
TEST
• With the door fully open the door.
• Place the opener carton in the down position. The garage door opener will flash. ADJUST
• If the door stops on the floor.
1-1/2" (3.8 cm) board (or...
3265M Manual - Page 26

... or bar down travel limits) is initially plugged in the Programming section. ALWAYS disconnect electric power to disengage trolley ONLY when garage door is properly adjusted, and there are under the following conditions: when the opener is adjusted, the other hardware, ALL of the following: • The hand-held remote control have been factory...
3265M Manual - Page 28
.... (See Adjustment Step 3.) Every Year • Oil door rollers, bearings and hinges. Disconnect trolley first. Reapply a small layer of fire, explosion or chemical burn: • Replace ONLY with only 3V2032 coin cell batteries.
Tested to wipe away the existing grease from the garage door opener rail. Every Three to Four Years • Use...
3265M Manual - Page 29

...• First verify that the trolley is normal.)
• If the trolley does not move in particular can affect door travel limits. This is against ...chain is normal.
My remotes will not turn off when door is open:
• The garage door opener is not blinking. My lights will not activate the door:
• Verify your door, check diagnostic LED for Using the Wall Mounted Door...
3265M Manual - Page 30
...trolley is not lit on door control.
• Inspect door control/wires for a short (staple in wire), correct wiring polarity (black/white wires reversed), broken or disconnected wires, replace/attach ... On Motor Unit
LED or Diagnostic LED
"Learn" Button
Installed Safety Reversing
Sensor
Your garage door opener is programmed with jumper wire.
RPM Sensor = Short travel 6-8" (15-20 cm)....
3265M Manual - Page 31
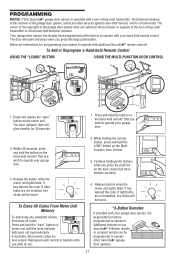
..., first erase all three buttons are instructions for programming your opener to operate with your garage door opener, the large button is operated with a non-rolling code transmitter, the technical measure in the garage door opener does not authorize the purchaser or supplier of the garage door opener, which provides security against code-theft devices, will glow steadily for...
3265M Manual - Page 35
... by disengaging trolley.
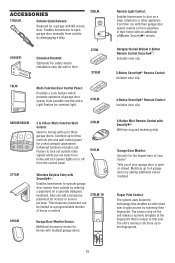
395LM
Remote Light Control:
Enables homeowner to turn on the unit makes a numeric template of the fingerprint that is open garage door manually from ...
Also can add a temporary password for the largest door of garage door opener from outside by scanning their home with an additional LiftMaster Security✚® remote.
41A5281
78LM
LOCK
LIGHT
...
Similar Questions

Garage Door Opener Model
How do I know if I have a 3255 or 3255-2M garage door opener?
How do I know if I have a 3255 or 3255-2M garage door opener?
(Posted by ericoster1 3 years ago)

My Lift Master Model 3265-267 Is Beeping. I Can't Find A Battery Anywhere.
The motor is working but beeps every 30 seconds or so. Can't find a battery anywhere nor is there me...
The motor is working but beeps every 30 seconds or so. Can't find a battery anywhere nor is there me...
(Posted by funrasr 6 years ago)

Where Is The Reset Button On Liftmaster Model 3265 Garage Door Opener
(Posted by cjaxlme 9 years ago)

Model 3265 Liftmaster Opens Randomly
Have noticed on different occassions these doors open on their own. Can I change receiver frequency ...
Have noticed on different occassions these doors open on their own. Can I change receiver frequency ...
(Posted by joev4012 11 years ago)

Liftmaster Model 3265 Inop
Lightning struck near house now Liftmaster model 3265 1/2 HP professional garage door won't work. Wh...
Lightning struck near house now Liftmaster model 3265 1/2 HP professional garage door won't work. Wh...
(Posted by Walkercb 12 years ago)