
LiftMaster 3265 Support Question
LiftMaster 3265 Support Question
Find answers below for this question about LiftMaster 3265.Need a LiftMaster 3265 manual? We have 1 online manual for this item!
Question posted by joev4012 on September 2nd, 2012
Model 3265 Liftmaster Opens Randomly
Have noticed on different occassions these doors open on their own. Can I change receiver frequency in unit
Current Answers
Answer #1: Posted by GarageDoorMafiadotcom on November 24th, 2012 12:20 AM
GarageDoorMafiadotcom

Member since:
November 4th, 2012 Points: 25,600

Member since:
November 4th, 2012 Points: 25,600
You can not change the receiver frequenze on the unit, but you can erase all the codes programed to the unit. (erase the memory).
CAUTION!!!! When you do this no remotes, homelink or keypad will work.
Press and hold the learn button on the back for 6-10 sec. You now erased all codes and need to reprogram all your remotes.
To program your remote. Press and hold the button you like to use on your remote and then push the learn button and let go the work light on the opener will blink and the opener will click 2 times.
GarageDoorMafia.com One stop online shop for all your garage door and opener needs.
Related LiftMaster 3265 Manual Pages
3265M Manual - Page 1
.... 845 Larch Avenue
Elmhurst, Illinois 60126-1196 www.liftmaster.com
®
GARAGE DOOR OPENER Models 3265M 1/2 HP
3265M-267 1/2 HP
For Residential Use Only
Owner's Manual
■ Please read this manual and the enclosed safety materials carefully! ■ Fasten the manual near the garage door after installation. ■ The door WILL NOT CLOSE unless the Protector System®...
3265M Manual - Page 2
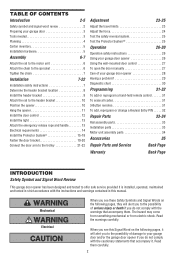
... remotes 31 To add, reprogram or change a Keyless Entry PIN . . . . . 32
Repair Parts
33-34
Rail assembly parts 33 Installation parts 33 Motor unit assembly parts 34
Accessories
35
Repair Parts and Service
Back Page
Warranty
Back Page
INTRODUCTION
Safety Symbol and Signal Word Review
This garage door opener has been designed and tested to...
3265M Manual - Page 3
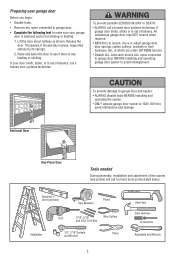
..., cables, pulleys, brackets or their hardware, ALL of which are under EXTREME tension.
• Disable ALL locks and remove ALL ropes connected to garage door BEFORE installing and operating garage door opener to see if there is out of balance, call for hand tools as shown.
Carpenter's Level (optional)
12
Tape Measure
Pencil
Stepladder
Drill...
3265M Manual - Page 4

Planning
Identify the type and height of Garage Door
Extension Spring OR Torsion Spring
Wall-mounted Door Control
Access Door
--- --- --
Motor Unit
Vertical Centerline of your installation.
Motor Unit
Wallmounted Door Control
ONE-PIECE DOOR WITH TRACK
Slack in chain tension is normal when garage door is closed . Access Door
Safety Reversing Sensor
Safety Reversing Sensor
Gap ...
3265M Manual - Page 5
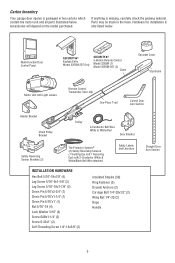
... (2)
Insulated Staples (30) Ring Fastener (3) Drywall Anchors (2) Carriage Bolt 1/4"-20x1/2" (2) Wing Nut 1/4"-20 (2) Rope Handle
Straight Door Arm Section
5 If anything is missing, carefully check the packing material. Hardware for installation is also listed below .
Carton Inventory
Your garage door opener is packaged in the foam. Accessories will depend on the model purchased.
3265M Manual - Page 6
... chain slack.
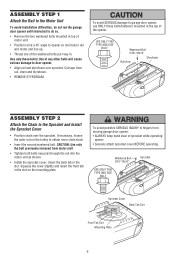
• Insert the second washered bolt. Use of the washered bolts part way in. ASSEMBLY STEP 1
Attach the Rail to the Motor Unit
To avoid installation difficulties, do not run the garage door opener until instructed to do so. • Remove the two washered bolts mounted in top of
motor...
3265M Manual - Page 7
... installation, test safety reversal system. Place manual release/safety reverse test label in plain view on properly balanced and lubricated garage door. Install garage door opener ONLY on inside of garage door.
12. An improperly balanced door may notice loosening of chain after
Base of Rail
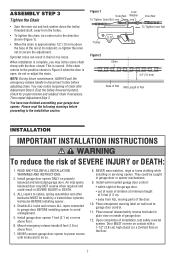
Adjustment Step 3 (Test the Safety Reversal System). ASSEMBLY STEP 3
Tighten the Chain
Figure...
3265M Manual - Page 8

...) to securely fasten the 2x4 to gain approximately 1/2" (1 cm).
Open your door.
1.
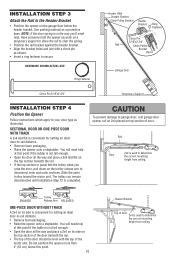
Header Wall 2" (5 cm) Track
Highest Point of Travel
Door Door
Header Wall 2" (5 cm) Track
Highest Point of Travel
Sectional door with curved track
One-piece door with track.
• 8" (20 cm) above the door. An unbalanced garage door might NOT reverse when required. INSTALLATION STEP 1
Determine the...
3265M Manual - Page 10
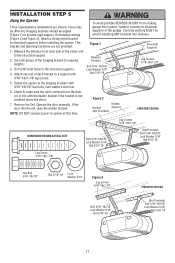
... trolley can remain disconnected until Installation Step 12 is convenient for setting an ideal door-to garage door, rest garage door opener rail on 2x4 placed on top section of the
motor unit.
HARDWARE SHOWN ACTUAL SIZE
Ring Fastener
Header Wall Header Bracket Chain Pulley Bracket
Header Bracket
Ring Fastener
Clevis Pin
5/16"x2-3/4"
Rail
Chain Pulley...
3265M Manual - Page 11
... sturdy metal bracket to make sure the rail is not centered above the door).
7. Cut both pieces of the motor unit to structural supports of the garage. Check to structural supports before installing the opener. Figure 2
Hidden
Bracket
Support
(Not Provided)
FINISHED CEILING
Lag Screws 5/... Washer 5/16"
Nut 5/16"-18
Lag Screws 5/16"-18x1-7/8"
5. Remove the 2x4. Yours may be different.
3265M Manual - Page 12
... cross path of closing garage door: • Install door control within sight of door at this time.
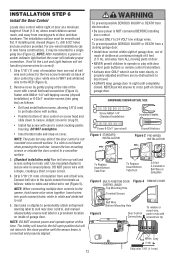
INSTALLATION STEP 6
Install the Door Control
Locate door control within sight of garage door, out of
reach of children at the side of the cover with a staple, creating a short or open position but will travel . • ALWAYS keep garage door in tab with care...
3265M Manual - Page 13
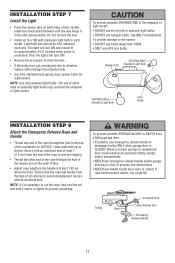
... out prematurely due to vibration, replace with an overhand knot at least 1" (2.5 cm) from a falling garage door:
• If possible, use halogen bulbs. NOTE: Use only standard light bulbs. Secure with a Garage Door Opener bulb.
• Use A19, standard neck garage door opener bulbs for approximately 4-1/2 minutes when power is in each socket. Light bulb size should be...
3265M Manual - Page 14
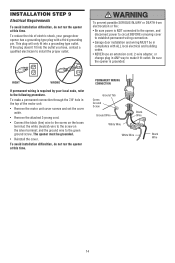
Be sure the opener is required by your garage door opener has a grounding type plug with ALL local electrical and building codes.
• NEVER use an extension cord, 2-wire adapter, or change plug in ANY ...into a grounding type outlet. To reduce the risk of the motor unit: • Remove the motor unit cover screws and set the cover
Ground Screw
aside. RIGHT
WRONG
PERMANENT WIRING CONNECTION...
3265M Manual - Page 15
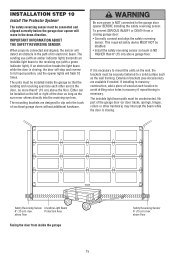
... Beam
6" (15 cm) max. This required safety device MUST NOT be securely fastened to the garage door opener BEFORE installing the safety reversing sensor.
Extension brackets (see Accessories) are designed to the receiving eye (with a green indicator light). The units must be disabled. • Install the safety reversing sensor so beam is necessary.
Protection Area...
3265M Manual - Page 16
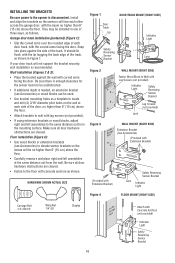
...1. INSTALLING THE BRACKETS
Be sure power to the opener is recommended. Snap into place against the wall with the curved arms facing the door. It should lie flush, with Concrete ... using extension brackets or wood blocks, adjust right and left assemblies at each other across the garage door, with concrete anchors as a template to locate and drill (2) 3/16" diameter pilot holes ...
3265M Manual - Page 17
... Pre-Installed Wires Not Provided
Pre-installed wires
White/Black 17 Pre-Wired Installation:
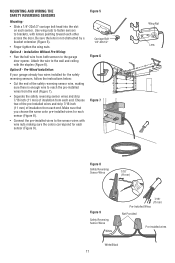
If your garage already has wires installed for each sensor (Figure 9). MOUNTING AND WIRING THE SAFETY REVERSING SENSORS
..., with the staples (Figure 6).
Be sure the lens is enough wire to the garage door opener. Make sure that you choose the same color pre-installed wires for each sensor (Figure...
3265M Manual - Page 18
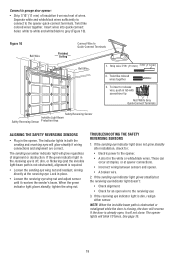
... the door is already open wire to the opener.
• A short in place.
• Loosen the receiving eye wing nut and adjust sensor until it will glow steadily if wiring connections and alignment are correct.
Connect to the opener quick-connect terminals. Separate white and white/black wires sufficiently to connect to garage door opener:
•...
3265M Manual - Page 19

...the top panel.
HARDWARE SHOWN ACTUAL SIZE
Self-Threading Screw 1/4"-14x5/8"
Fiberglass, aluminum or lightweight steel garage doors WILL REQUIRE reinforcement BEFORE installation of angle iron are not intended for an opener installation door reinforcement kit. NOTE: Many door reinforcement kits provide for reinforcement kit. NOTE: The 1/4"-14x5/8" self-threading screws are used for the...
3265M Manual - Page 26

... remote controls out of reach of which changes with
your opener with up to cables, spring assemblies and other control may NOT reverse when required and could result in the opening cycle. Using Your Garage Door Opener
6. See Programming. Security✚® light feature: Lights will open , the door will reverse. opener lights on when
reversing sensor correctly installed...
3265M Manual - Page 35
...up to three garage doors. CLOSED
CLOSED
OPEN
OPEN
CLOSED
OPEN
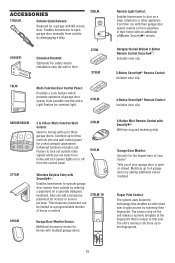
4-Button Security✚® Remote Control: Includes visor clip.
902LM/903LM 377LM
2 & 3 Door Multi-Function Wall Control:
Ideal for visitors or service persons. Monitors up to 4 garage doors by entering a password on a lamp, television or other appliance from their car with an additional LiftMaster Security✚...
Similar Questions

Where Is The Reset Button On Liftmaster Model 3265 Garage Door Opener
(Posted by cjaxlme 9 years ago)

Where Can Buy A Model 3850 Battery For Garage Door?
(Posted by archibrav 10 years ago)

Where To Buy Batteries For A Model 3850 Elite Series Garage Door Opener
(Posted by NADGmark85 10 years ago)

Chamberlin Liftmaster Garage Door Opener Model # 3265-267
Where do I put the trolley before I attach the chain to the sprocket?
Where do I put the trolley before I attach the chain to the sprocket?
(Posted by garretmegan 11 years ago)

Liftmaster Model 3265 Inop
Lightning struck near house now Liftmaster model 3265 1/2 HP professional garage door won't work. Wh...
Lightning struck near house now Liftmaster model 3265 1/2 HP professional garage door won't work. Wh...
(Posted by Walkercb 12 years ago)