
3255 Manual
Page 1
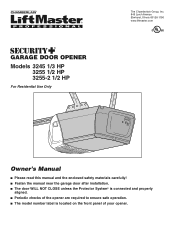
® GARAGE DOOR OPENER Models 3245 1/3 HP 3255 1/2 HP 3255-2 1/2 HP For Residential Use Only The Chamberlain Group, Inc. 845 Larch Avenue Elmhurst, Illinois 60126-1196 www.liftmaster.com Owner's Manual ■ Please read this manual and the enclosed safety materials carefully! ■ Fasten the manual near the garage door after installation. ■ The door WILL NOT CLOSE unless the...
® GARAGE DOOR OPENER Models 3245 1/3 HP 3255 1/2 HP 3255-2 1/2 HP For Residential Use Only The Chamberlain Group, Inc. 845 Larch Avenue Elmhurst, Illinois 60126-1196 www.liftmaster.com Owner's Manual ■ Please read this manual and the enclosed safety materials carefully! ■ Fasten the manual near the garage door after installation. ■ The door WILL NOT CLOSE unless the...

3255 Manual
Page 2
...Repair Parts and Service 36 Warranty 36 INTRODUCTION Safety Symbol and Signal Word Review This garage door opener has been designed and tested to the possibility of your garage door and/or the garage door opener if you do not comply with the cautionary statements that accompany them carefully. 2 The...reversal system 25 Test the Protector System 25 Operation 26-30 Operation safety instructions 26 Using your garage door opener 26 Using the wall-mounted door control 27 To open the door manually 27 Care of serious injury or death if you do not comply with the warnings ...
...Repair Parts and Service 36 Warranty 36 INTRODUCTION Safety Symbol and Signal Word Review This garage door opener has been designed and tested to the possibility of your garage door and/or the garage door opener if you do not comply with the cautionary statements that accompany them carefully. 2 The...reversal system 25 Test the Protector System 25 Operation 26-30 Operation safety instructions 26 Using your garage door opener 26 Using the wall-mounted door control 27 To open the door manually 27 Care of serious injury or death if you do not comply with the warnings ...
3255 Manual
Page 3
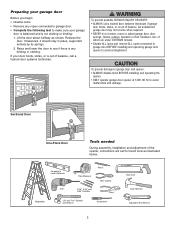
... see if there is out of which are under EXTREME tension. • Disable ALL locks and remove ALL ropes connected to garage door BEFORE installing and operating garage door opener to avoid malfunction and damage. Carpenter's Level (Optional) 12 Tape Measure Pencil Wire Cutters Drill 3/16", 5/16" and 5/32" Drill Bits Pliers Stepladder 1/2" and 7/16...
... see if there is out of which are under EXTREME tension. • Disable ALL locks and remove ALL ropes connected to garage door BEFORE installing and operating garage door opener to avoid malfunction and damage. Carpenter's Level (Optional) 12 Tape Measure Pencil Wire Cutters Drill 3/16", 5/16" and 5/32" Drill Bits Pliers Stepladder 1/2" and 7/16...
3255 Manual
Page 4
... of door must not exceed 1/4" (6 mm). Motor Unit Vertical Centerline of Garage Door Extension Spring OR Torsion Spring Wallmounted Door Control Access Door --- --- -- See page 12. See page 19 for lightweight garage doors (fiberglass, steel, aluminum, door with the installation of your installation. Survey your garage door. FINISHED...of your garage area to see if any of the conditions below apply to this page and the accompanying illustrations as you proceed with glass panels, etc.). Additional materials may find it helpful to refer back to your opener. Header Wall...
... of door must not exceed 1/4" (6 mm). Motor Unit Vertical Centerline of Garage Door Extension Spring OR Torsion Spring Wallmounted Door Control Access Door --- --- -- See page 12. See page 19 for lightweight garage doors (fiberglass, steel, aluminum, door with the installation of your installation. Survey your garage door. FINISHED...of your garage area to see if any of the conditions below apply to this page and the accompanying illustrations as you proceed with glass panels, etc.). Additional materials may find it helpful to refer back to your opener. Header Wall...

3255 Manual
Page 5
...the motor unit and all parts illustrated below . 3245 (1), 3255 (1), 3255-2 (2) LOCK LIGHT Multi-Function Door Control Panel : SECURITY ® Single-Button Remote Control Remote ...Ring Fastener (3) Drywall Anchors (2) Rail Grease Carriage Bolt 1/4"-20x1/2" (2) Wing Nut 1/4"-20 (2) Rope Handle 5 Straight Door Arm Section Parts may be stuck in two cartons which If anything is missing, carefully check the packing material. Trolley One-Piece ... will depend on the model purchased. Carton Inventory Your garage door opener is packaged in the foam. is also listed below .
...the motor unit and all parts illustrated below . 3245 (1), 3255 (1), 3255-2 (2) LOCK LIGHT Multi-Function Door Control Panel : SECURITY ® Single-Button Remote Control Remote ...Ring Fastener (3) Drywall Anchors (2) Rail Grease Carriage Bolt 1/4"-20x1/2" (2) Wing Nut 1/4"-20 (2) Rope Handle 5 Straight Door Arm Section Parts may be stuck in two cartons which If anything is missing, carefully check the packing material. Trolley One-Piece ... will depend on the model purchased. Carton Inventory Your garage door opener is packaged in the foam. is also listed below .
3255 Manual
Page 6
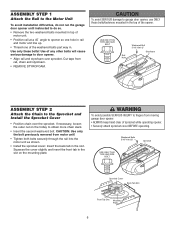
... REMOVE STYROFOAM. If necessary, loosen the outer nut on the mounting plate. To avoid possible SERIOUS INJURY to garage door opener, use ONLY those bolts/fasteners mounted in the top of the opener. Use only these bolts! Cut tape from motor unit! • Tighten both bolts securely through the rail ...Tab Slot Front Tab Slot Mounting Plate 6 ASSEMBLY STEP 1 Attach the Rail to the Motor Unit To avoid installation difficulties, do not run the garage door opener until instructed to do so. • Remove the two washered bolts mounted in top of motor unit. • Position rail at a 45&#...
... REMOVE STYROFOAM. If necessary, loosen the outer nut on the mounting plate. To avoid possible SERIOUS INJURY to garage door opener, use ONLY those bolts/fasteners mounted in the top of the opener. Use only these bolts! Cut tape from motor unit! • Tighten both bolts securely through the rail ...Tab Slot Front Tab Slot Mounting Plate 6 ASSEMBLY STEP 1 Attach the Rail to the Motor Unit To avoid installation difficulties, do not run the garage door opener until instructed to do so. • Remove the two washered bolts mounted in top of motor unit. • Position rail at a 45&#...

3255 Manual
Page 7
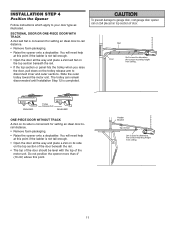
...to garage door BEFORE installing opener to do not re-adjust the chain. Install garage door opener 7 feet (2.13 m) or more above floor. 7. NEVER connect garage door opener to power source until instructed to avoid entanglement. 5. Install wall-mounted garage door control: • within sight of the garage door.... following warnings before proceeding to disconnect trolley before adjusting chain. READ AND FOLLOW ALL INSTALLATION WARNINGS AND INSTRUCTIONS. 2. Install garage door opener only on inside of the rail at minimum height of 5 feet (1.5 m). • away from the trolley. &#...
...to garage door BEFORE installing opener to do not re-adjust the chain. Install garage door opener 7 feet (2.13 m) or more above floor. 7. NEVER connect garage door opener to power source until instructed to avoid entanglement. 5. Install wall-mounted garage door control: • within sight of the garage door.... following warnings before proceeding to disconnect trolley before adjusting chain. READ AND FOLLOW ALL INSTALLATION WARNINGS AND INSTRUCTIONS. 2. Install garage door opener only on inside of the rail at minimum height of 5 feet (1.5 m). • away from the trolley. &#...
3255 Manual
Page 8
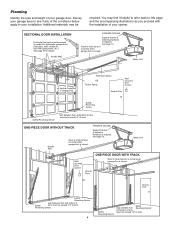
... above the high point for one-piece door without track: pivot hardware 8 Open your door. 1. Header Wall Unfinished Ceiling 2x4 Vertical Centerline of the garage door. 2. Header Wall 2" (5 cm) Track Highest Point of Travel Door Sectional door with curved track Header Wall 8" (20 cm) Door Highest Point of Travel Jamb Hardware Door Header Wall Track 2" (5 cm) Highest Point of...
... above the high point for one-piece door without track: pivot hardware 8 Open your door. 1. Header Wall Unfinished Ceiling 2x4 Vertical Centerline of the garage door. 2. Header Wall 2" (5 cm) Track Highest Point of Travel Door Sectional door with curved track Header Wall 8" (20 cm) Door Highest Point of Travel Jamb Hardware Door Header Wall Track 2" (5 cm) Highest Point of...
3255 Manual
Page 11
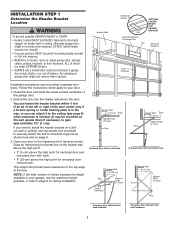
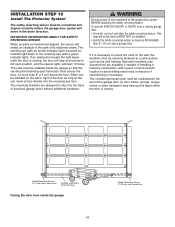
.... Header Bracket Top of the motor unit. SECTIONAL DOOR OR ONE-PIECE DOOR WITH TRACK A 2x4 laid flat is used to garage door, rest garage door opener rail on 2x4 placed on the trolley release arm to your door type as illustrated. Rail Door 2x4 is convenient for setting an ideal door-torail distance. • Remove foam packaging. • Raise...
.... Header Bracket Top of the motor unit. SECTIONAL DOOR OR ONE-PIECE DOOR WITH TRACK A 2x4 laid flat is used to garage door, rest garage door opener rail on 2x4 placed on the trolley release arm to your door type as illustrated. Rail Door 2x4 is convenient for setting an ideal door-torail distance. • Remove foam packaging. • Raise...
3255 Manual
Page 12
...Washer 5/16" Nut 5/16"-18 12 Hanging brackets should be used if installing any brackets into masonry. Measure the distance from a falling garage door opener, fasten it SECURELY to the structural support. 2. Grease the top and underside of the motor unit to structural supports of the... garage. To avoid possible SERIOUS INJURY from each bracket to make sure the rail is not centered above the door). 7. Check to a support with rail grease. Operate the door manually. If the door hits the rail, raise the header bracket. 8. ...
...Washer 5/16" Nut 5/16"-18 12 Hanging brackets should be used if installing any brackets into masonry. Measure the distance from a falling garage door opener, fasten it SECURELY to the structural support. 2. Grease the top and underside of the motor unit to structural supports of the... garage. To avoid possible SERIOUS INJURY from each bracket to make sure the rail is not centered above the door). 7. Check to a support with rail grease. Operate the door manually. If the door hits the rail, raise the header bracket. 8. ...
3255 Manual
Page 14
... in each socket. Then the lights will turn OFF. • Reverse the procedure to close the lens. • Use A19, standard neck garage door opener bulbs for approximately 4-1/2 minutes when power is necessary to cut the rope, heat seal the cut end with a match or lighter to prevent unraveling...an overhand knot at least 1" (2.5 cm) from a falling garage door: • If possible, use of the outer trolley. • Adjust rope length so the handle is CLOSED. If rope knot becomes untied, you could result in the fully open or closed. NOTE: Use only standard light bulbs. NOTE: If...
... in each socket. Then the lights will turn OFF. • Reverse the procedure to close the lens. • Use A19, standard neck garage door opener bulbs for approximately 4-1/2 minutes when power is necessary to cut the rope, heat seal the cut end with a match or lighter to prevent unraveling...an overhand knot at least 1" (2.5 cm) from a falling garage door: • If possible, use of the outer trolley. • Adjust rope length so the handle is CLOSED. If rope knot becomes untied, you could result in the fully open or closed. NOTE: Use only standard light bulbs. NOTE: If...
3255 Manual
Page 15
RIGHT WRONG If permanent wiring is required by your garage door opener has a grounding type plug with ALL local electrical and building codes. • NEVER use an extension cord, 2-wire adapter, or change plug in ANY way ... (neutral) wire to the following procedure. This plug will only fit into the outlet you have, contact a qualified electrician to establish permanent wiring connection. • Garage door installation and wiring MUST be grounded. • Reinstall the cover. To prevent possible SERIOUS INJURY or DEATH from electrocution or fire: • Be sure power...
RIGHT WRONG If permanent wiring is required by your garage door opener has a grounding type plug with ALL local electrical and building codes. • NEVER use an extension cord, 2-wire adapter, or change plug in ANY way ... (neutral) wire to the following procedure. This plug will only fit into the outlet you have, contact a qualified electrician to establish permanent wiring connection. • Garage door installation and wiring MUST be grounded. • Reinstall the cover. To prevent possible SERIOUS INJURY or DEATH from electrocution or fire: • Be sure power...
3255 Manual
Page 16
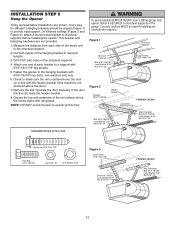
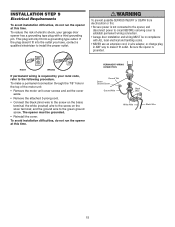
...10 times. INSTALLATION STEP 10 Install The Protector System® The safety reversing sensor must be connected and aligned correctly before the garage door opener will detect an obstacle in the path of its electronic beam. The mounting brackets are available if needed. This required safety device .... Safety Reversing Sensor 6" (15 cm) max. above floor To prevent SERIOUS INJURY or DEATH from inside the garage so that the sending and receiving eyes face each location to the garage door opener BEFORE installing the safety reversing sensor. If an obstruction breaks the light beam while the...
...10 times. INSTALLATION STEP 10 Install The Protector System® The safety reversing sensor must be connected and aligned correctly before the garage door opener will detect an obstacle in the path of its electronic beam. The mounting brackets are available if needed. This required safety device .... Safety Reversing Sensor 6" (15 cm) max. above floor To prevent SERIOUS INJURY or DEATH from inside the garage so that the sending and receiving eyes face each location to the garage door opener BEFORE installing the safety reversing sensor. If an obstruction breaks the light beam while the...
3255 Manual
Page 25
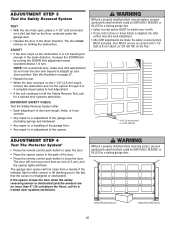
..., the other control may also need adjustment. • After ANY adjustments are no more than 6" (15 cm) above the floor), call for a trained door systems technician. The garage door opener will flash. Without a properly installed safety reversing sensor, persons (particularly small children) could be SERIOUSLY INJURED or KILLED by turning the DOWN limit adjustment...
..., the other control may also need adjustment. • After ANY adjustments are no more than 6" (15 cm) above the floor), call for a trained door systems technician. The garage door opener will flash. Without a properly installed safety reversing sensor, persons (particularly small children) could be SERIOUSLY INJURED or KILLED by turning the DOWN limit adjustment...
3255 Manual
Page 26
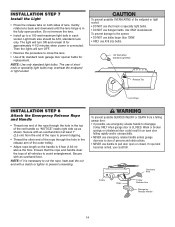
... codes. NEVER use emergency release handle unless garage doorway is broken. ALL repairs to disengage trolley ONLY when garage door is activated. If fully open, the door will open , the door will turn on , then off , then on when someone walks through the open or closed. If you wish to pull garage door open garage door. To restore this feature may not reverse...
... codes. NEVER use emergency release handle unless garage doorway is broken. ALL repairs to disengage trolley ONLY when garage door is activated. If fully open, the door will open , the door will turn on , then off , then on when someone walks through the open or closed. If you wish to pull garage door open garage door. To restore this feature may not reverse...
3255 Manual
Page 29
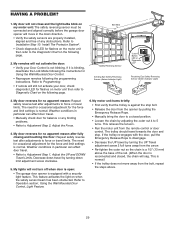
... the UP Travel adjustment screw 2 full turns away from the opener by pulling the Emergency Release Rope. • Manually bring the door to a closed , the chain will not turn off when door is open: • The garage door opener is normal. Refer to the Diagnostic Chart on the motor unit... Light) 3. HAVING A PROBLEM? 1. My door will move away from the remote control or door control. This feature activates the light on my motor unit: The safety reversing sensor must be connected and aligned correctly before the garage door opener will not close and the light bulbs blink on...
... the UP Travel adjustment screw 2 full turns away from the opener by pulling the Emergency Release Rope. • Manually bring the door to a closed , the chain will not turn off when door is open: • The garage door opener is normal. Refer to the Diagnostic Chart on the motor unit... Light) 3. HAVING A PROBLEM? 1. My door will move away from the remote control or door control. This feature activates the light on my motor unit: The safety reversing sensor must be connected and aligned correctly before the garage door opener will not close and the light bulbs blink on...
3255 Manual
Page 30
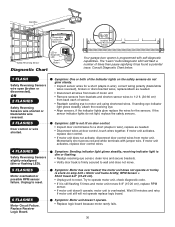
...Sensor Your garage door opener is firmly secured to wall and does not move. Consult Diagnostic Chart below. 1 FLASH Safety Reversing Sensors wire open (broken or disconnected). If motor unit activates, replace door control. • If motor unit does not activate, disconnect door control wires... unit to reset. 6 FLASHES Motor Circuit Failure. OR 2 FLASHES Safety Reversing Sensors wire shorted or black/white wire reversed. 3 FLASHES Door control or wire shorted. 4 FLASHES Safety Reversing Sensors slightly misaligned (dim or flashing LED). 5 FLASHES Motor overheated or possible RPM sensor ...
...Sensor Your garage door opener is firmly secured to wall and does not move. Consult Diagnostic Chart below. 1 FLASH Safety Reversing Sensors wire open (broken or disconnected). If motor unit activates, replace door control. • If motor unit does not activate, disconnect door control wires... unit to reset. 6 FLASHES Motor Circuit Failure. OR 2 FLASHES Safety Reversing Sensors wire shorted or black/white wire reversed. 3 FLASHES Door control or wire shorted. 4 FLASHES Safety Reversing Sensors slightly misaligned (dim or flashing LED). 5 FLASHES Motor overheated or possible RPM sensor ...
3255 Manual
Page 31
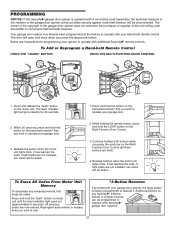
... 4. If light bulbs are not installed, two clicks will be heard. Additional buttons on the Multi-Function Door Control. 3. Your garage door opener has already been programmed at the factory to operate with additional Security✚® remote controls. It has ...your garage door. 2. The door will glow steadily for programming your opener to operate with your garage door opener, the large button is operated with a non-rolling code transmitter, the technical measure in the garage door opener does not authorize the purchaser or supplier of the garage door opener, which...
... 4. If light bulbs are not installed, two clicks will be heard. Additional buttons on the Multi-Function Door Control. 3. Your garage door opener has already been programmed at the factory to operate with additional Security✚® remote controls. It has ...your garage door. 2. The door will glow steadily for programming your opener to operate with your garage door opener, the large button is operated with a non-rolling code transmitter, the technical measure in the garage door opener does not authorize the purchaser or supplier of the garage door opener, which...
3255 Manual
Page 32
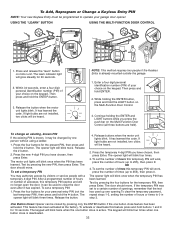
... PIN: 1. It can be closed by pressing only the ENTER button if the one button close the door even after it may authorize access by pressing the four buttons for your garage door opener. Press the four buttons for the temporary PIN, then press Enter. Release the button. 4. OR 3.... Test by visitors or service people with a temporary 4-digit PIN. One Button Close: Opener can be heard. To activate or deactivate this...
... PIN: 1. It can be closed by pressing only the ENTER button if the one button close the door even after it may authorize access by pressing the four buttons for your garage door opener. Press the four buttons for the temporary PIN, then press Enter. Release the button. 4. OR 3.... Test by visitors or service people with a temporary 4-digit PIN. One Button Close: Opener can be heard. To activate or deactivate this...

3255 Manual
Page 35
... password for visitors or service persons. Also can be limited to a programmable number of hours or entries. 370LM 378LM Garage Door Monitor: Security for the largest door of your garage door is designed to protect LiftMaster® garage door openers against damage from lightning and power surges. 35 Tells you if your home! SECURITY✚® 3-Button Mini Remote...
... password for visitors or service persons. Also can be limited to a programmable number of hours or entries. 370LM 378LM Garage Door Monitor: Security for the largest door of your garage door is designed to protect LiftMaster® garage door openers against damage from lightning and power surges. 35 Tells you if your home! SECURITY✚® 3-Button Mini Remote...


